Introduction
eRaser is a new kind of noise gate. Instead of the usual Attack, Hold and Release knobs, it listens to your audio directly — it hears how a sound is fading away right now, and uses that to decide how the erase should unfold. There is nothing to time by hand, because eRaser is already following the source.
What makes eRaser different goes a step further: while it erases, it also works out — moment to moment, using the phase relationships inside the signal — what still genuinely belongs to your original source, and protects exactly that. Room tone, bleed, hiss and inter-syllable noise get removed; the tail of the note, the breath, the decaying resonance of the instrument stays where it was.
The Core Idea
A conventional gate only knows level and time — it cannot tell your voice's tail from the room noise sitting right underneath it, so it has to choose: cut both together, or let both through. eRaser tells them apart using phase, so it can do the one thing a gate never could — keep the tail and lose the noise, at the same time.
Adaptive, Not Timed
No Attack/Hold/Release to dial in. eRaser reads the signal's own decay and follows it, so the release always matches the material.
Phase-Aware Identity
eRaser builds a running picture of your source and checks new material against it, so it can separate "still you" from "everything else" even when they overlap.
Built for Sustain
Vocal tails, sustained strings, cymbal decay, room ambience — anywhere a sound trails off naturally, eRaser has the most to work with and the most to offer.
See What It Hears
Switch the monitor bus to listen to exactly what eRaser identified as your source, and what it treated as everything else.
First Steps
- Load eRaser on the track or bus you want to clean up — a vocal, a room mic, an ambience track, anything with a signal that rises and falls.
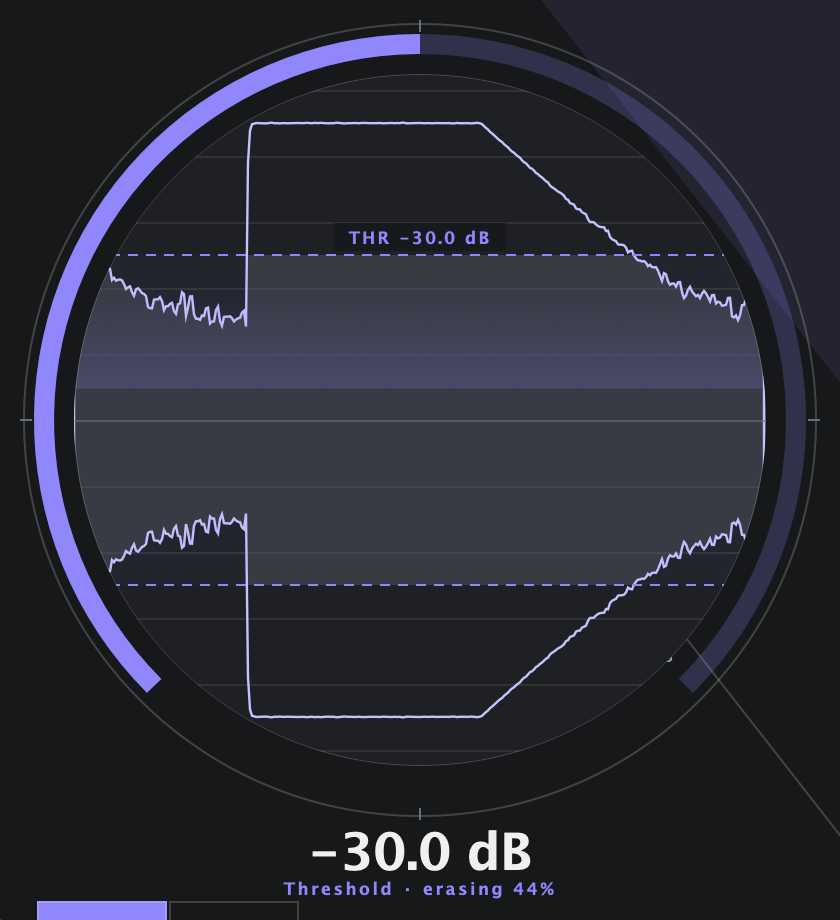
- Set the Threshold — drag the dial until it sits just under the level of the material you want to keep. Everything below the line is a candidate for erasing.
- Leave Erase, Range and Curve on AUTO for the first pass — eRaser will derive all three from the signal itself. Play the track and listen.
- Watch the GR meter and the output scope — you'll see the erase happening in real time, and the tinted band on the dial shows where eRaser is actually working.
- Try the MONITOR modes — switch to SRC to hear only what eRaser kept, or RES to hear only what it's removing. This is the fastest way to check it isn't touching anything it shouldn't.
- Save a preset once you're happy, so the setting travels with your session template.
Quick Examples
Vocal Breath & Tails
Start from the Vocal Breath or Vocal Room preset. eRaser removes the room and breath noise between phrases while letting the natural tail of each line fade out on its own terms.
Dialogue Cleanup
Start from Dialogue Cleanup. Room tone and HVAC hiss drop out between words without the choppy, re-triggering feel of a fast conventional gate.
Drum & Room Bleed
Start from Snare Bleed or Overhead Cleanup. Bleed from other kit pieces is reduced while the ring and decay of the actual hit is preserved.
Understanding the Display
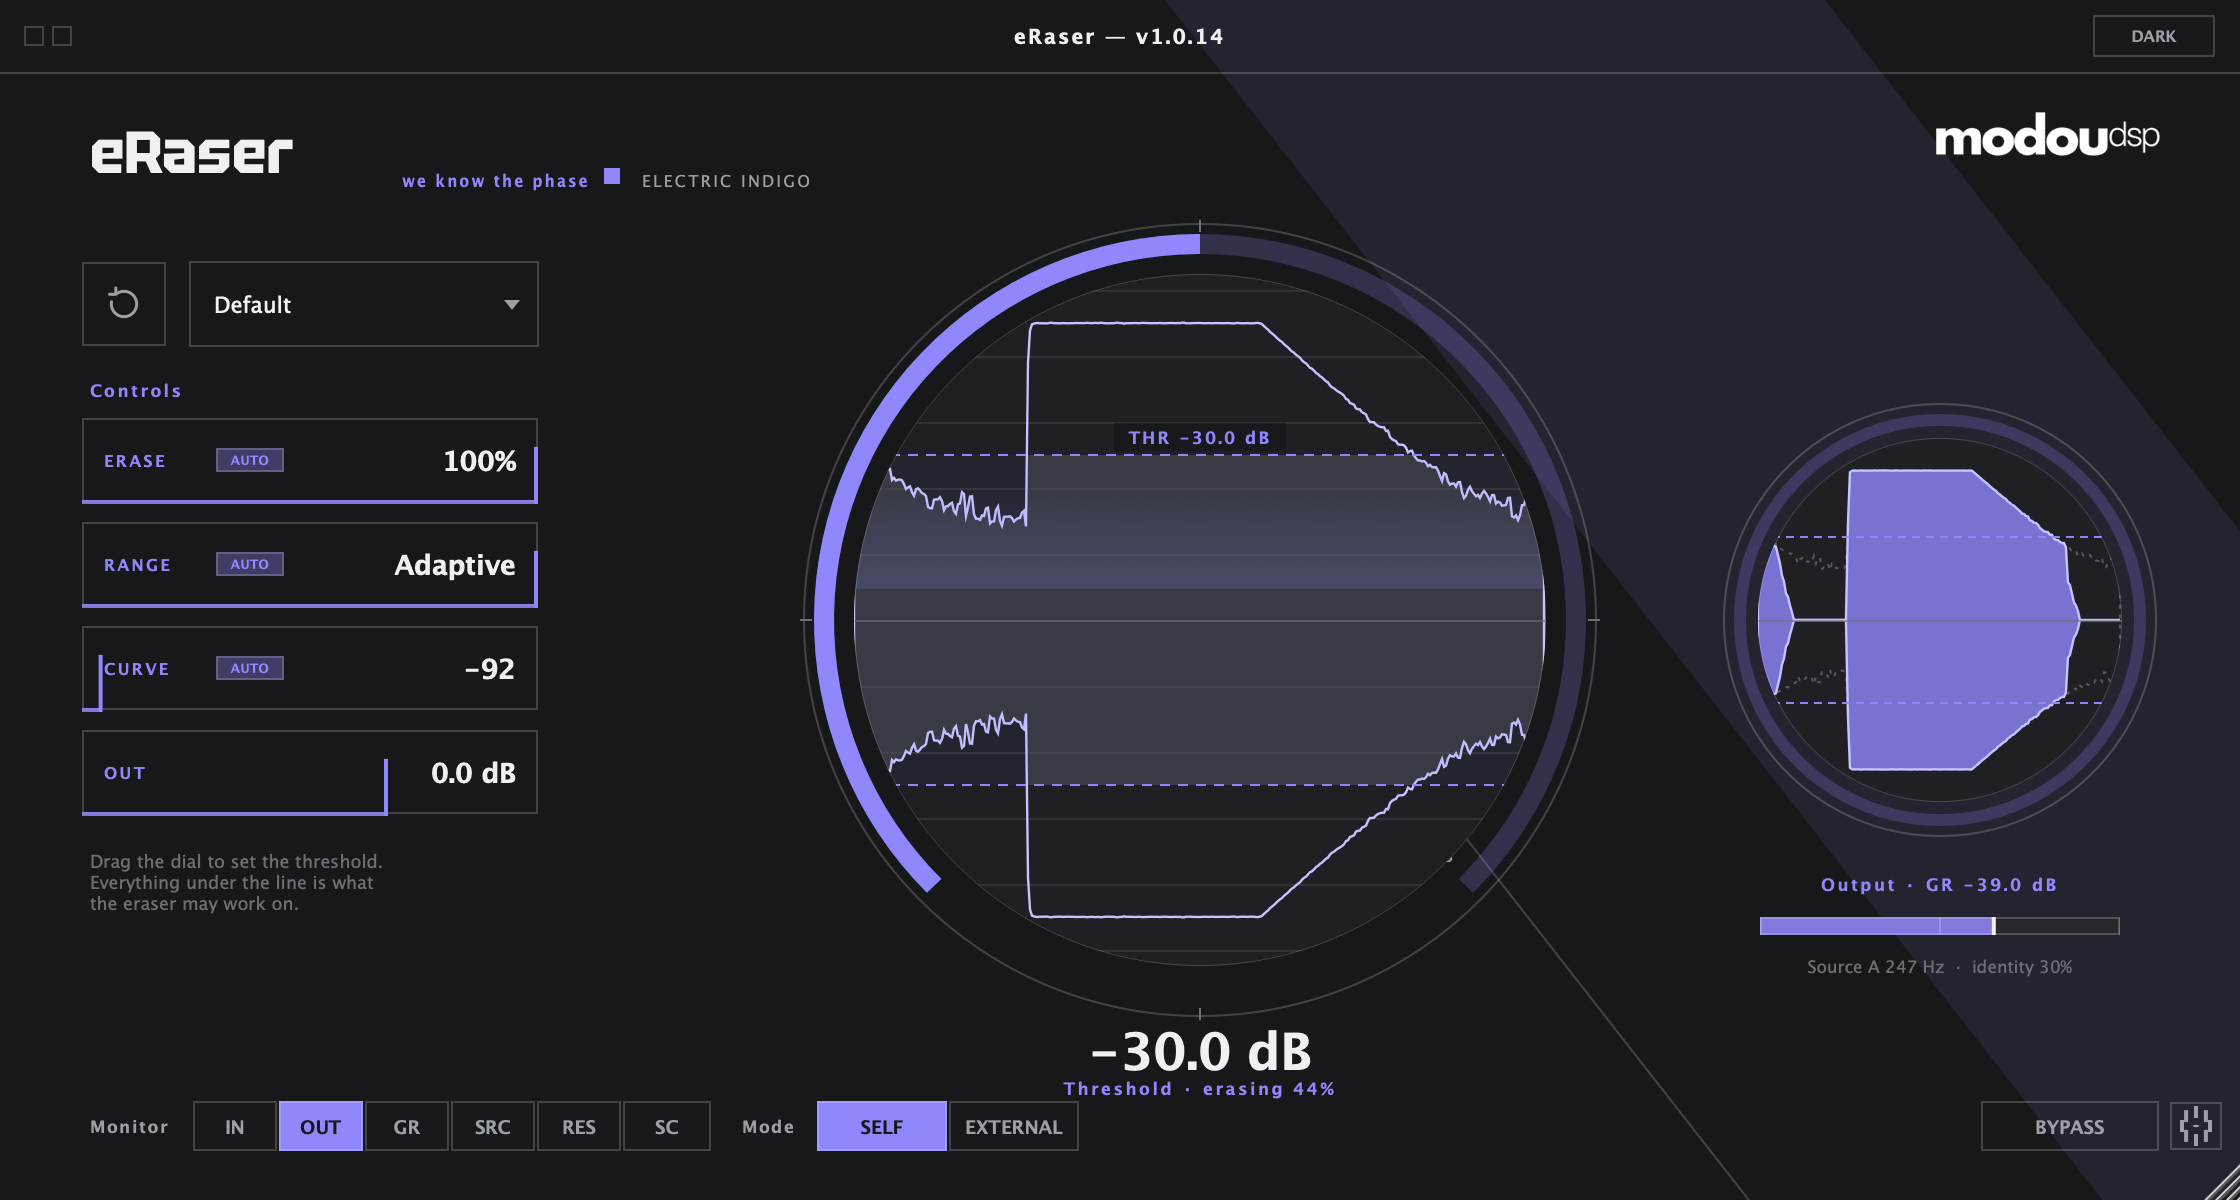
The window is built around one idea: you should always be able to see what eRaser is doing, not just hear it.
The Threshold Dial
The large dial at the centre is both the Threshold control and a live scope of your input. Its face draws the incoming signal; the tinted band between the dashed lines is the region eRaser is allowed to work in, and it washes gently while erasing is actually happening — so the animation tells you something, and costs nothing when idle.
The Output Scope
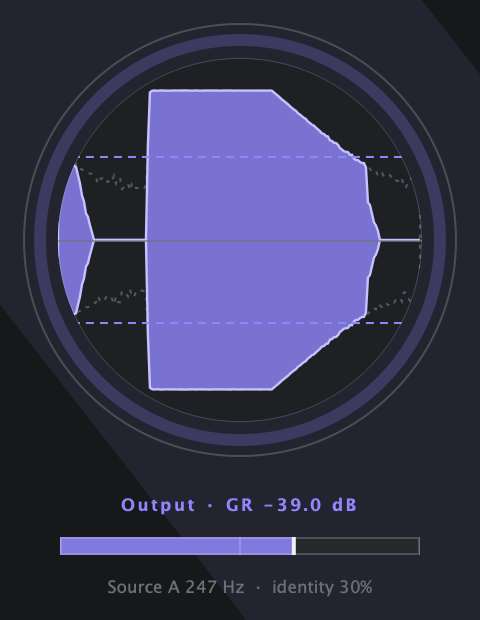
Beside the dial, a smaller scope shows the processed result filled in, with a dashed ghost of the input behind it. The gap between the two is the erase — you can watch it open and close in real time, together with a live gain-reduction read-out.
The Left Column
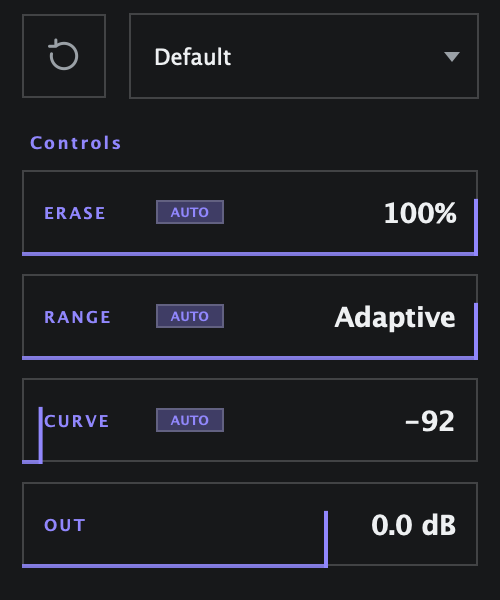
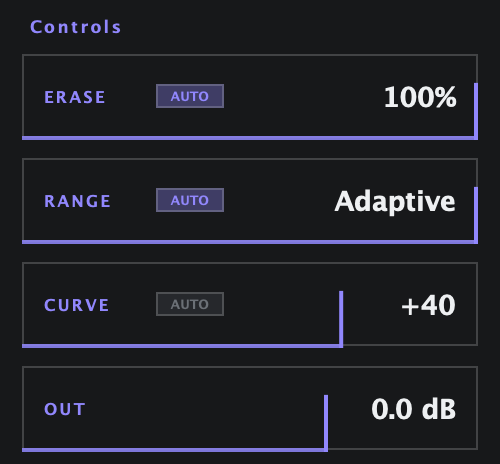
Presets, a reset button, and the five main controls as compact rows. Erase, Range and Curve each carry an AUTO chip: lit, the row shows eRaser's own live value; click it off and the row becomes a manual drag control.
Source Identity Read-out
Under the output scope, a small read-out shows eRaser's live confidence in what it's currently protecting — a quick way to see whether it has locked onto your source.
Theme
The interface follows your OS in Light or Dark automatically, or you can pin it to either one from the Settings panel — see Theme.
Keyboard & Mouse Shortcuts
Threshold Dial
| Gesture | Action |
|---|---|
| Drag | Move the Threshold up or down |
| Shift + Drag | Fine adjustment |
| Double-click | Reset to default (−30 dB) |
| Mouse wheel | Nudge the value up or down |
Parameter Rows & AUTO Chips
| Gesture | Action |
|---|---|
| Click AUTO chip | Switch that row between adaptive (AUTO) and manual |
| Drag (manual mode) | Adjust the value directly |
| Double-click | Reset that row to its default |
Global
| Gesture | Action |
|---|---|
| Click preset name | Open the preset menu (factory, user, Save / Save As / Load / Delete) |
| Click gear icon | Open Settings (Harmonic Range, Theme, License) |
| Click BYPASS | Bypass eRaser, click-safe and latency-constant |
| Click MONITOR segment | Switch between IN / OUT / GR / SRC / RES |
Product Overview
eRaser is built around a single job: separate what belongs to your source from what doesn't, and do it in a way that follows the sound instead of a stopwatch. It deliberately leaves out the controls a gate normally has — because none of them are the thing that actually decides whether a gate sounds natural or not.
Main Features
No Attack / Hold / Release
The release comes from the signal's own measured decay, re-derived continuously — not a fixed number you set once and hope fits everything.
Source-Aware Erasing
Before it erases, eRaser identifies what still belongs to the original source and excludes that from the erase — it doesn't just turn a signal down, it decides what to turn down.
Five Essential Controls
Threshold, Erase, Range and Curve, plus Out. Erase, Range and Curve default to fully adaptive, and each can be pinned to a manual value independently.
Five Monitor Buses
IN, OUT, GR, SRC and RES let you audit exactly what eRaser is doing to your signal, not just trust that it's working.
User Interface
Main Window Layout
The window scales to any size on a fixed proportion, so it stays legible whether it's docked small in a mixer lane or opened large.
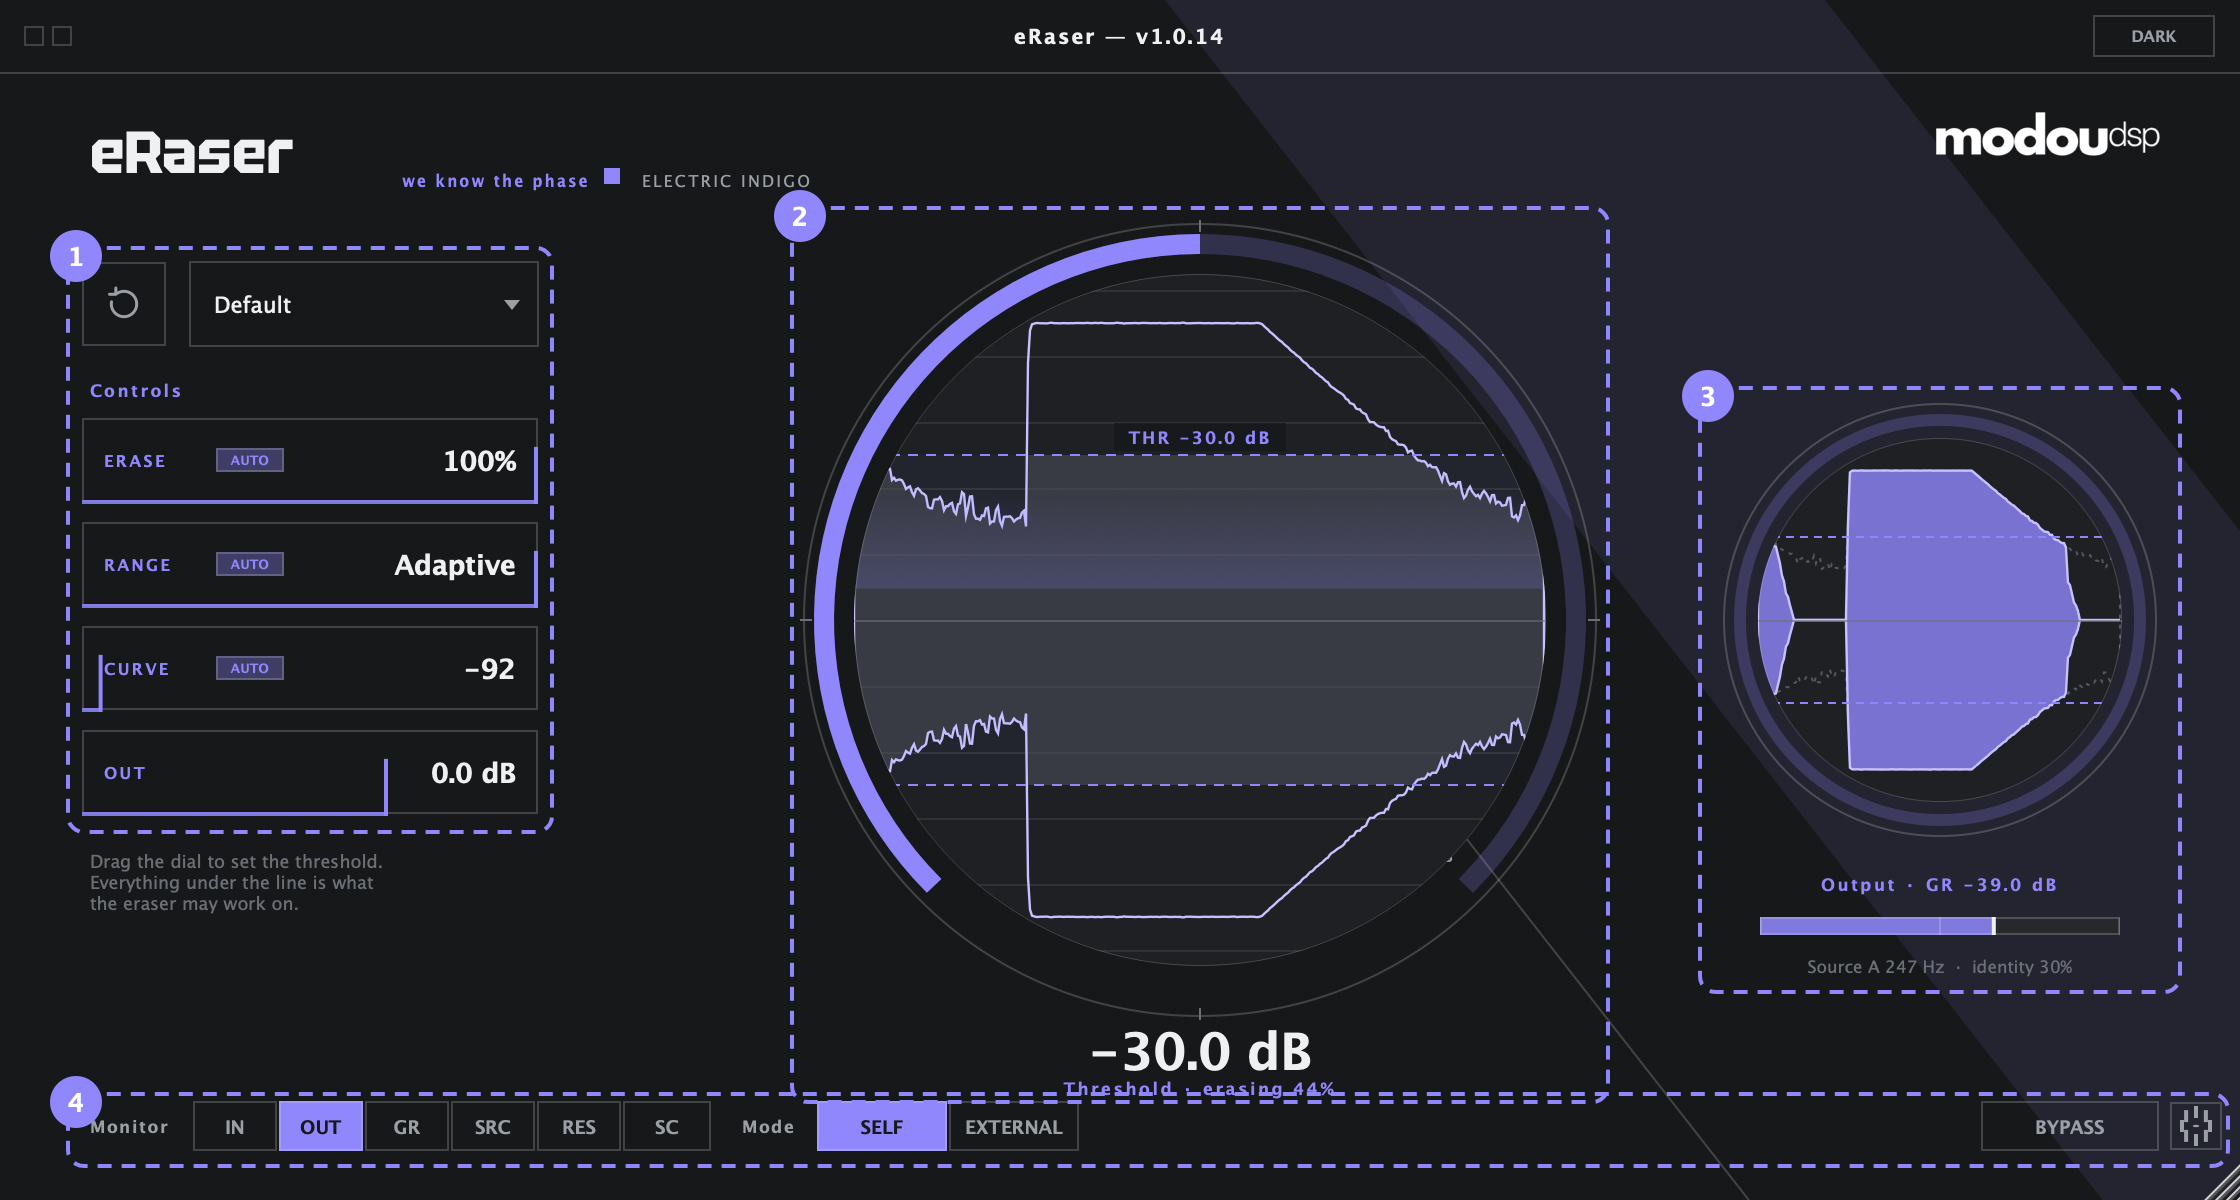
1Left — Presets & Parameters
Preset selector, reset button, and the five parameters as compact rows with their own AUTO chips.
2Centre — Threshold & Input Scope
One large dial: its ring is the Threshold control, its face is a live input scope drawn symmetrically about the centre line.
3Right — Output Scope
The processed result, gain-reduction read-out and meter, and the live source-identity confidence read-out.
4Bottom — Monitor, Bypass, Settings
The MONITOR segmented control, the BYPASS button, and the gear icon that opens Settings.
Settings Panel
Click the gear icon beside BYPASS to open Settings. It holds the two things you'll rarely need to touch after the first setup, plus your license information.
Harmonic Range
Sets how far above your source's fundamental pitch eRaser listens for related overtones when building its picture of what belongs to the source. A wider range gives eRaser more of a bright, detailed sound's character to recognise; a narrower range is lighter on CPU.
| Setting | When to use it |
|---|---|
| 6 kHz | Darker sources, or when CPU headroom is tight |
| 9 kHz (default) | A balanced setting that suits most voices and instruments |
| 12 kHz | Brighter sources with more high-frequency character to preserve |
| 18 kHz | The most detailed setting, for sources where the top end matters most |
Theme
Light, Dark, or System — System follows your OS appearance automatically and is the default. Your choice is stored with the plugin state.
License
Your plugin version, copyright and license status are shown at the bottom of the Settings panel.
Controls
Five controls are all eRaser needs. Erase, Range and Curve default to AUTO — eRaser derives all three from the signal — and each has its own independent chip so you can pin any one of them to a manual value without giving up adaptive behaviour on the other two.
About the AUTO Chips
Detection is always full-band and both channels are always linked — there's deliberately no HPF/LPF, Detect-mode or Stereo-Link control to configure. The three AUTO chips exist so you can trust eRaser's judgement by default, and only step in on the one aspect that needs a nudge for a particular source.
Monitor Modes
The MONITOR control lets you listen to any stage of the process on its own — the fastest way to check eRaser is doing exactly what you think it's doing.

IN
The input signal, delayed to line up sample-accurately with the output.
OUT
The final result — this is what your listener hears.
GR
What eRaser removed — the input minus the output, isolated on its own.
SRC
Only the part eRaser identified as your source and protected. No room, no bleed, no residual noise.
RES
What's left of the non-source material in the output — no source in it at all.
SC
External mode only: the aligned sidechain signal, gated by Threshold — exactly what eRaser is triggering from.
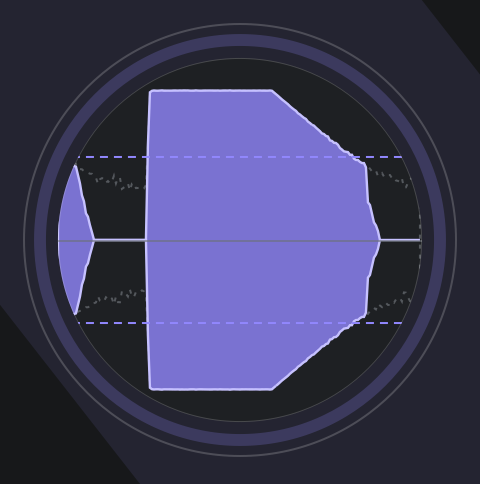
SRC and RES always add back up to OUT exactly — nothing goes missing between them. Use SRC to confirm your source's tail is intact, and RES to confirm nothing of the source is leaking into what's being removed.
Sidechain Cancellation — External Mode
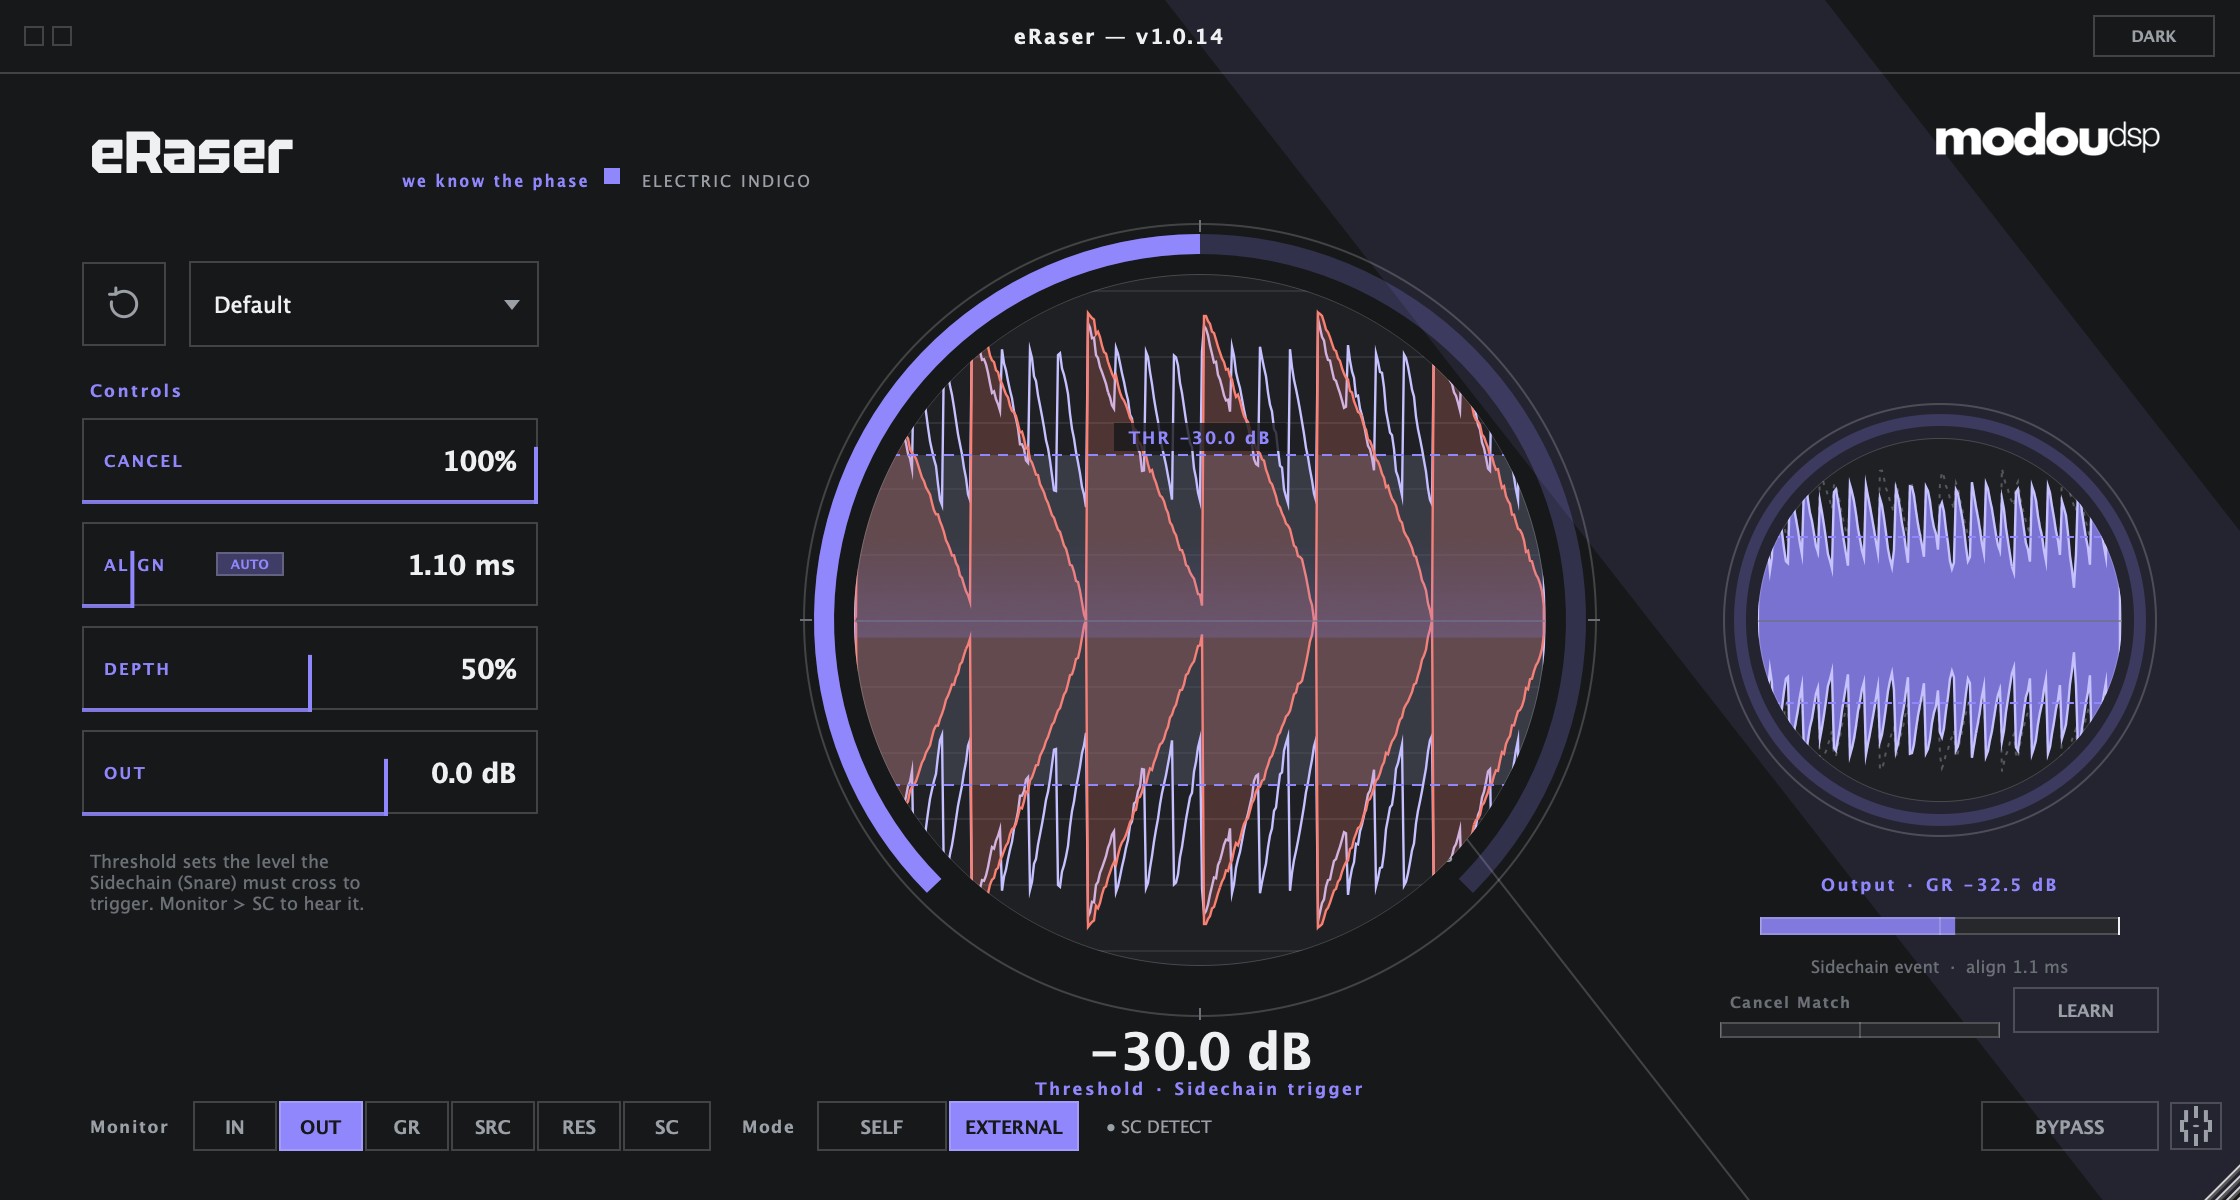
In EXTERNAL mode eRaser removes a source from your track by using a second microphone of that same source as a reference. Put eRaser on the hi-hat track and feed the snare mic into its sidechain: eRaser finds the snare bleed inside the hi-hat, matches it in time, level and phase, and subtracts it — the hi-hat itself is left untouched.
How It Works
- Align — eRaser measures how much later the bleed arrives in your track than in the sidechain mic (the mic spacing) and delays the sidechain to match, down to a fraction of a sample.
- Learn — while the sidechain is above Threshold, eRaser learns the level, tone and phase with which the source reaches your track.
- Cancel — the matched sidechain is inverted and added to your track. The bleed waveform itself is cancelled; the track is never simply turned down.
- Depth — what a real, never-perfect match leaves behind is suppressed further, but only where the bleed dominates.
Routing the Sidechain in Your DAW
Insert eRaser on the track you want to clean (for example the hi-hat), set Mode to EXTERNAL, then send the source mic (for example the snare) to eRaser's sidechain input:
| DAW | How to route the sidechain |
|---|---|
| Logic Pro (AU) | Choose the source track or bus in the Side Chain menu at the top of the plug-in window. |
| Pro Tools (AAX) | Choose the source bus in the key input (sidechain) selector in the plug-in header. Pro Tools provides a mono key input. |
| Cubase / Nuendo (VST3) | Enable Side-Chain in the plug-in header, then route a send from the source track to the eRaser side-chain input. |
| Studio One (VST3 / AU) | Click the Sidechain button in the plug-in header and add a send from the source track to eRaser. |
A mono or stereo sidechain works on a mono or stereo track, in any combination. Send the source mic pre-fader and unprocessed where you can — EQ, compression or a moving fader on the sidechain make the match harder.
Controls in External Mode
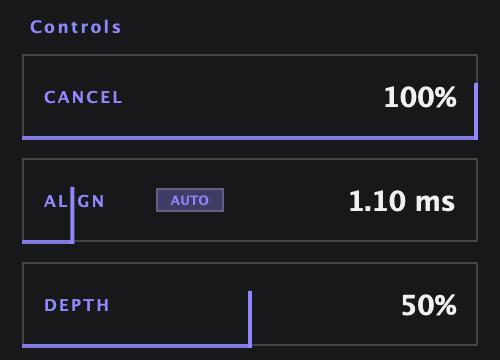
In External mode the ERASE / RANGE / CURVE rows are replaced by CANCEL, ALIGN and DEPTH. OUT and the Threshold dial stay where they are.
THRESHOLD
In External mode the dial is the sidechain trigger: cancellation only runs while the sidechain is above this level. Set it just under the source's hits so that spill from other drums in the sidechain mic doesn't trigger it.
CANCEL
How much of the matched bleed is subtracted. 100 % (default) removes exactly the measured bleed; lower it to leave some of the source in.
ALIGN
The time offset between the sidechain and your track. With AUTO on, eRaser measures it for you; switch AUTO off to set it by hand (0–10 ms).
DEPTH
How strongly the residue left by a real, imperfect match is removed. 0 % = matched subtraction only (the bleed stays faintly audible, like a distant mic); 50 % (default) removes it cleanly; higher values are more aggressive. If the track's own sound starts to thin out, lower DEPTH.
Status & Meters

| Status | Meaning |
|---|---|
| ○ NO SIDECHAIN | No sidechain signal reaches eRaser — check the routing in your DAW. The track passes through unchanged. |
| ● SC INPUT | The sidechain is connected but below Threshold — nothing is being cancelled at this moment. |
| ● SC DETECT | A sidechain hit is live and eRaser is building its match. |
| ● SC ISOLATED | The source is matched with medium confidence. |
| ● SC ERASING | High-confidence match — the bleed is being cancelled. |

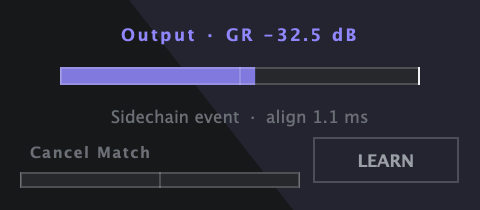
Cancel Match shows how closely the sidechain matches what is in your track. It reads lower when the track's own source is much louder than the bleed — cancellation still works. LEARN runs a fast, focused re-learn over the next few seconds; use it after changing the mic setup or the sidechain send level. The line above it shows whether a sidechain event is live and the measured alignment.
Hearing the Sidechain

Use SC to check the routing and the Threshold: you hear only the part of the sidechain that crosses Threshold. Use GR to hear exactly what was removed from your track.
Workflow: Snare Bleed on the Hi-Hat
- Insert eRaser on the hi-hat track and set Mode to EXTERNAL.
- Route the snare mic to eRaser's sidechain (see the table above). The status changes from NO SIDECHAIN to SC INPUT.
- Set Threshold just below the snare hits — check it with MONITOR → SC.
- Play a few bars. ALIGN AUTO locks within a couple of hits and the status moves towards SC ERASING.
- Switch MONITOR between OUT and GR to compare. Raise DEPTH if the snare is still audible; lower it if the hi-hat loses body.
Troubleshooting
| Problem | What to do |
|---|---|
| No Side Chain menu in Logic Pro | Logic caches each plug-in's capabilities. Quit Logic, open Plug-in Manager, select eRaser and choose Reset & Rescan Selection, then relaunch. Keep only one copy of eRaser installed (not both in /Library and ~/Library). |
| The status stays at NO SIDECHAIN | Check that the send or key input is really routed to eRaser and that the source track is playing. |
| The bleed is only partly removed | Keep ALIGN on AUTO, press LEARN after changing the setup, raise DEPTH, and send the sidechain pre-fader and unprocessed. |
| The track's own sound gets thinner | Lower DEPTH, or raise Threshold so that only the source's real hits trigger cancellation. |
Workflow Examples
Every workflow below starts from a factory preset — load it, listen, then nudge Threshold to taste. The starting Threshold values are the presets' defaults.
Vocal Breath & Tails
Setup
- Preset: Vocal Breath (Threshold −38 dB) or Vocal Room (−34 dB)
- Erase / Range / Curve: AUTO
- MONITOR: check SRC to confirm breaths and tails you want to keep are still there
Why eRaser excels: a vocal tail decays continuously and keeps its pitch — exactly the material phase-based identity is built to hold onto. Room tone underneath it has no such identity, so it's the part that gets erased.
Dialogue Cleanup
Setup
- Preset: Dialogue Cleanup (Threshold −40 dB)
- Erase / Range / Curve: AUTO
- MONITOR: RES to check for residual room tone between lines
Why eRaser excels: because the release follows the speaker's own decay rather than a fixed hold/release pair, it doesn't re-trigger or clip word endings the way a fast conventional gate can on natural speech.
Snare & Kick Bleed
Setup
- Preset: Snare Bleed (Threshold −24 dB) or Kick Bleed (−22 dB)
- Erase / Range / Curve: AUTO, or pin Range lower for a gentler pass
- MONITOR: SRC to confirm the ring/decay of the hit itself is untouched
Why eRaser excels: the ring of the drum you're miking has a stable identity of its own; bleed from other kit pieces doesn't share it, so it's what gets reduced.
Overhead, Guitar & Drum Room
Setup
- Preset: Overhead Cleanup (−36 dB), Guitar Room (−32 dB) or Drum Room (−30 dB)
- Erase / Range / Curve: AUTO
Why eRaser excels: room and spill sit continuously under the performance rather than only between notes, so a level-and-time gate really can't separate the two — eRaser's phase-based identity is what makes the split possible at all.
Bass, Acoustic Guitar & Piano
Setup
- Preset: Bass Noise (−36 dB), Acoustic Guitar (−36 dB) or Piano Room (−40 dB)
- Erase / Range / Curve: AUTO
Why eRaser excels: string and soundboard resonance decays smoothly and holds its pitch, which is exactly the shape a sustained source gives eRaser the most to work with.
Extreme & Natural Cleanup
Setup
- Preset: Extreme Cleanup (−26 dB) for problem tracks, or Natural Cleanup (−36 dB) for a light, transparent pass
- Pin Range manually if Extreme Cleanup is removing more than you want on a particular passage
Result: two ends of the same idea — the same source-aware erase, just at different depths, so you can go from "barely there" to "as clean as possible" without changing how eRaser identifies your source.
Pro Tips
Practical guidance for everyday use. For the thinking behind these behaviours, see How eRaser Thinks.
1. Set Threshold First, Everything Else Later
Get Threshold right with Erase, Range and Curve left on AUTO before you touch anything manually. Most sources never need more than that.
2. Use SRC and RES, Not Just OUT
OUT tells you if it sounds right. SRC and RES tell you why — SRC confirms nothing wanted was lost, RES confirms nothing unwanted was kept.
3. Trust AUTO Curve on Natural Sources
AUTO Curve re-derives its shape from the source's own release, which is usually more believable than any single manual curve you'd pick by hand.
4. Pin Range for a Gentler Pass
If AUTO is removing more than the mix needs, switch Range's chip off and pull it down rather than raising Threshold — you keep the same detection, just a shallower erase.
5. A Higher Threshold Is Not the Same as Less Erase
Raising Threshold changes what counts as "your source" in the first place. If you just want a lighter touch on material eRaser already recognises correctly, use Range instead.
6. Sustained Sources Are the Sweet Spot
Vocals, strings, cymbals, room tone under a held note — anything with a natural tail gives eRaser the most identity to hold onto. Short, percussive one-shots with no sustain benefit less; see Where It Shines.
7. The Fade Is Meant to Be Smooth
Right after a source drops below Threshold, the erase deepens gradually rather than slamming shut — that's what keeps it sounding like the room actually decayed rather than being switched off.
8. Check the Harmonic Range Setting for Bright Sources
If a bright vocal or instrument sounds slightly duller in SRC than the input, try raising the Settings panel's Harmonic Range so eRaser has more of the top end to recognise as part of the source.
9. Compare with BYPASS, Not Just by Ear Alone
BYPASS is click-safe and latency-constant, so it's a clean way to A/B against the untreated signal without a timing shift giving away which one you're hearing.
Presets
Factory Presets
Each factory preset sets a starting Threshold for a common source; Erase, Range and Curve stay on AUTO so they adapt to your actual material.
| Preset | Threshold | Use for |
|---|---|---|
| Default | −30 dB | A neutral starting point for anything |
| Vocal Breath | −38 dB | Breath noise and mouth sounds between vocal phrases |
| Vocal Room | −34 dB | Room tone under a vocal performance |
| Dialogue Cleanup | −40 dB | Spoken dialogue and voiceover |
| Snare Bleed | −24 dB | Bleed on a snare close mic |
| Kick Bleed | −22 dB | Bleed on a kick close mic |
| Overhead Cleanup | −36 dB | Cymbal/overhead mics picking up the rest of the kit |
| Guitar Room | −32 dB | Room mic on an electric or acoustic guitar cab |
| Bass Noise | −36 dB | Amp hiss and fret noise on bass |
| Acoustic Guitar | −36 dB | String and body noise on acoustic guitar |
| Piano Room | −40 dB | Room and pedal/mechanism noise around piano |
| Drum Room | −30 dB | Full-kit room mics |
| Extreme Cleanup | −26 dB | Problem tracks that need the deepest available erase |
| Natural Cleanup | −36 dB | A light, transparent pass for otherwise-clean material |
Saving User Presets
Use Save, Save As…, Load… and Delete from the preset menu. User presets are stored as individual XML files (*.eRaserPreset, public parameters only) at:
~/Library/Application Support/modou dsp/eRaser/Presets
Specifications
| Plugin Formats | AU, VST3, Standalone |
| Plugin Identity | Plugin code eRsr, manufacturer code Mdsp, bundle id com.modoudsp.eraser |
| Platform | macOS, Apple Silicon (Universal Intel + Apple Silicon build available) |
| Sample Rates | 44.1 kHz to 192 kHz |
| Channel Handling | Stereo, always fully linked — no separate stereo-link control |
| Detection | Always full-band — no HPF/LPF or detect-filter controls |
| Latency | Reported automatically to your DAW and compensated in real time; scales with sample rate |
| CPU | Light enough to run many instances in a session |
License & Support
License Status
Your version, copyright and license status are shown at the bottom of the Settings panel — click the gear icon beside BYPASS.
Support
eRaser is an early, actively-developed release. Its sound and interface are expected to keep evolving — check back for updates.
Chapter 1 — Why Not a Gate?
A conventional noise gate is a timer with a threshold. You tell it how fast to close (Attack), how long to hold open after the signal drops (Hold), and how slowly to fade out (Release) — and then it does exactly that, on every single passage, whether or not the timing actually fits what's happening in the audio.
The trouble is that no fixed timing fits everything. A slow release that sounds natural on a long, decaying vocal tail will smear right through a quick phrase that needs to close fast. A fast release that catches the quick phrase will chop the tail off the long one. You end up automating the gate itself, passage by passage, to chase a moving target.
eRaser removes the target from the equation. There's no Attack, Hold or Release to set, because the release isn't a setting — it's a measurement, taken from the signal itself, continuously.
Chapter 2 — Listening, Not Timing
When your source crosses below Threshold, eRaser doesn't start a stopwatch — it looks at how the signal has been decaying and lets that decay carry forward. If the tail is decaying slowly, the erase unfolds slowly. If it drops fast, the erase follows just as fast. The release trajectory accelerates if the level stalls on a floor, and it can re-open instantly the moment a genuine new onset arrives.
A short, signal-derived hold protects the quiet space between syllables or notes from being erased too eagerly — but again, that hold comes from what the material is actually doing, not from a number you typed in.
Chapter 3 — Knowing What Belongs
Listening to the decay solves the timing problem, but it doesn't solve a harder one: room tone, bleed and noise very often overlap the source in both level and frequency at exactly the moment it's fading out. A gate that only measures level and time cannot separate them — it has no way to know which part of what it's hearing is "the source, getting quieter" and which part is "the noise that was there all along."
eRaser builds a running identity for your source instead — tracking its pitch, the pattern of its overtones, and how that pattern behaves as it decays — and checks incoming material against that identity from moment to moment. What matches is protected. What doesn't is a candidate for erasing, no matter how loud or how close in frequency it is.
Chapter 4 — Why Phase, and Why Sustain
The identity eRaser builds relies heavily on phase — the way the peaks and troughs of a sound's overtones move together in a stable, predictable relationship as long as they're coming from the same vibrating source. Unrelated noise sitting at the same pitch or the same moment doesn't share that relationship; it has no coherent phase trajectory to follow, only coincidence. That difference is what lets eRaser tell "still your source" apart from "something else that merely sounds similar right now."
This is also why eRaser is, by design, at its best on sustained material. A phase relationship needs a little time to reveal itself — a note that rings, a voice that holds, a room that decays. The longer a sound sustains, the more evidence eRaser has to confirm it really is one continuous source, and the more precisely it can separate that source from everything crowding in around it. Short, purely percussive hits with almost no sustain give phase very little to work with, so eRaser leans more on level there — still useful, but not where it does its most distinctive work.
In short: eRaser is a noise gate built around phase, and it was built for the kind of material a stopwatch-based gate has always struggled with — anything with a real tail.
Chapter 5 — eRaser vs. a Conventional Gate
A conventional gate applies one broadband gain to everything at once — so whatever it does to the noise, it does to the tail sitting on top of it. There's no way around that trade-off with level and time alone.
| Aspect | eRaser | Conventional Gate |
|---|---|---|
| Release timing | Derived continuously from the signal | Fixed Attack/Hold/Release you set by hand |
| Keeping the tail while removing noise underneath it | Yes — the two are separated, not tied together | No — one gain affects both together |
| Noise at the same pitch as the source | Told apart by phase identity, not just frequency | Indistinguishable — it's all just "signal" |
| Setup per source | One Threshold, usually nothing else | Attack, Hold, Release re-tuned per passage |
| Best suited to | Sustained, tonal, decaying material | Short, percussive, well-separated hits |
Chapter 6 — Where It Shines, and Where a Gate Still Wins
Where eRaser Shines
Vocal tails and breaths, dialogue, sustained strings and pads, cymbal and room decay, bleed under an ongoing performance — anywhere a source and unwanted noise overlap in time and the source has a real tail to protect.
Where a Gate Still Wins
Very short, purely percussive one-shots with no sustain at all — a single clean tap with silence immediately after — give eRaser's phase-based identity little to grab onto, and a well-tuned conventional gate can do the job just as well with less to think about.
Two Honest Limits
- Very low bass notes are harder for eRaser to pin down with full confidence, so it deliberately stays conservative there — under-erasing rather than risking a wanted low note.
- The fade is intentionally gradual, not instant. If a passage needs something gone the moment it crosses Threshold, try Erase or Range pinned to a higher manual value — the natural AUTO fade is usually what makes the result convincing, but it does mean the deepest erase arrives a little after the crossing, not at it.