What is mSC
mSC (modou Studio Control) is an immersive monitor controller and personal-monitor system for macOS (a Windows port exists). It sits between your DAW or playback sources and your speakers: it switches sources and speaker sets, shows the sound field in 3D, measures and aligns speakers, meters loudness to EBU R128, and — through QMix — gives every performer their own mix on headphones.
mSC has no renderer for the immersive formats. It does not render Dolby Atmos or any other object or immersive format itself: the multichannel signal (for example 7.1.4, 9.1.6, or a 22.1.8 Custom layout in Ultimate) must be rendered by your DAW or an external renderer. mSC takes the input channels as they are and sends each one to the output you assign, adding only monitoring processing: level, trim, delay, EQ, solo and mute.
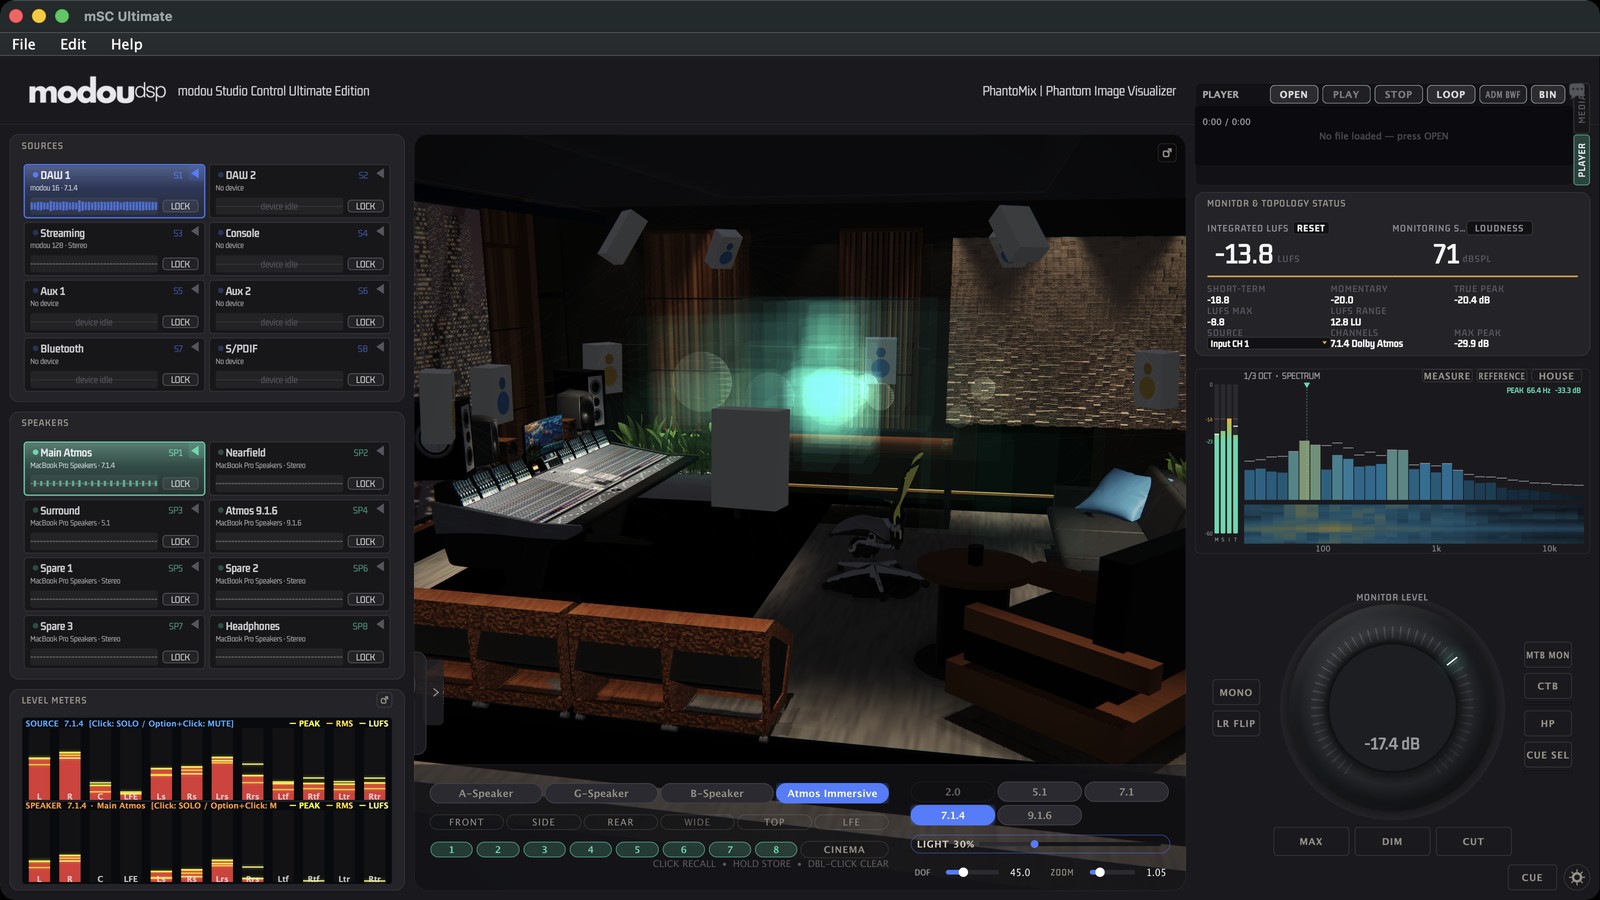
Monitor control
>8 sources × 8 speaker sets, level, CUT, DIM, mono, L/R flip, talkback.
3D sound field
>Speaker layouts up to 9.1.6 (Ultimate: Custom up to 32), soundball, engineer POV with binaural HRTF.
Measure & align
>Sweep calibration, delay / trim / 10-band EQ per speaker, loudness and 1/3-octave analyser.
QMix personal mixes
>Up to 48 mixes × 48 channels × 16 DCAs, binaural pan, cues, phone/tablet control.
Editions
| mSC Ultimate | mSC Studio | mSC Music | |
|---|---|---|---|
| For | Studios and engineers who monitor immersive and stereo work | Stereo / binaural studios and personal studios | Musicians and producers who check a mix on their own |
| User interface | Studio shell: sources, speakers, 3D view, status and monitor knob (this manual) | The same Studio shell as Ultimate | Its own simpler layout: My Mix / Reference, 3D room, translation check (AirPods, Car, Laptop, Club), A / B / C and volume bar |
| Speaker outputs | Mono to 9.1.6 multichannel layouts (5.1, 7.1, 7.1.2, 7.1.4, 9.1.6) and Custom; Binaural, Virtual and Apple downmix | Mono, Stereo, 5.1, 7.1 and 7.1.4 (headphones: Binaural); no 7.1.2, 9.1.6 or Custom | 4 inputs × 4 outputs |
| Setup Wizard templates | Stereo to Atmos (default Atmos) | Stereo only (default Stereo) | Own setup screens |
| QMix mixers | Up to 48 (default 16) | 8 or 16 (default 8) | Own CUE panel |
| Settings folder | mSC Ultimate | mSC Studio | mSC Music |
Ultimate and Studio look the same: Studio simply stops at 7.1.4 (no 7.1.2, 9.1.6 or Custom speaker layouts) and has fewer QMix mixers and channels; sources are also limited to 7.1.4 (9.1.6 is not offered). The screenshots in this manual are from mSC Ultimate; in Studio those layout options are not shown. mSC Music is a separate app with its own, simpler screen for musicians; it shares the audio engine, so features such as binaural monitoring behave the same, but its screens differ from the ones described here. The editions are separate licences. A fourth app, mSC Session, is described under Network & Integration.
Key Concepts
| Term | Meaning |
|---|---|
| Source | Anything you listen to. Each of the 8 source slots maps device channels to a format (Stereo, 5.1, 7.1.4, Binaural…). Selecting a source routes it to the active speaker set. |
| Speaker set | A group of output channels that form one monitoring system (a stereo pair, a 7.1.4 room, headphones). Each of the 8 speaker slots holds one set with its own calibration and inserts. |
| Format | The channel layout of a source or speaker set. The 3D view and the downmix follow it. |
| Lock | The padlock on a slot keeps it selected and summed while you pick others — for example to hear a DAW and a player together. |
| CUE / QMix | The performer-monitor side of mSC. A mix (Q01…) is one performer's headphone mix; a cue is a stored snapshot of all mixes. |
| DCA | A group fader. In QMix every channel belongs to one of the DCAs (8 or 16), and effective gain = channel × DCA. |
| CTB / MTB | Control-room talkback to the performers, and musician talkback back to the control room. |
Architecture
- Monitor path: 16 buses. Each bus is 16 channels wide by default (enough for 9.1.6) and grows with the CUSTOM setup of Ultimate: when a source or speaker set uses CUSTOM, the bus has exactly as many channels as there are CUSTOM speakers (17–32, for example 22.1.8 = 31). The source router takes up to 146 physical inputs, 16 player inputs and 24 session inputs; the speaker router drives up to 128 physical outputs. The UI exposes 8 source and 8 speaker slots. Default host buffer 512 samples.
- CUE path: a second audio device (up to 256 in / 256 out). If input and output are different devices, macOS builds a drift-corrected private aggregate device; if that fails the app falls back to a plain combined device that does not correct drift. The CUE quantum is held at 64 samples whatever the host buffer is.
- Real-time safety: the audio thread reads parameters from atomics and receives commands through a lock-free queue; the UI never blocks it.
- Unlicensed: the engine fails closed — audio output is restricted and a red bar “NO LICENSE – Audio output is restricted.” appears.
Device interconnection: modouPatchBay & modou128
>Connecting separate audio devices (the DAW, the monitor device, the CUE / Dante device) is delegated to modouPatchBay. This keeps clock-domain management and drift handling out of mSC's monitoring engine.
modou128 (the modou audio driver) provides the DAW-facing virtual I/O, while mSC and QMix keep their own monitoring responsibilities.
This separation avoids duplicating device-bridging logic inside mSC and makes synchronization behaviour easier to configure, validate and troubleshoot.
Installation: Download and install the modou audio driver through modou Central.
Requirements
| Item | Requirement |
|---|---|
| macOS | Universal binary (Apple Silicon and Intel). macOS 10.13 (High Sierra) or later (Apple silicon: macOS 11 or later). |
| Windows | 64-bit installer (admin rights). WASAPI and DirectSound; ASIO only in builds made with the ASIO SDK. EUCON is macOS-only. |
| Audio | A multichannel interface or virtual device (modou128) for the monitor path; an optional second device for CUE / QMix (for example Dante Virtual Soundcard). |
| Network | Phones, tablets and the Mac on the same LAN or Wi-Fi. |
| Plug-ins | Hosts VST3 and Audio Unit plug-ins as inserts. The app itself is standalone (no plug-in versions). |
Recommended deployment
>Running mSC on the same Mac as the DAW works and is fully supported. For a major studio, however, we recommend running mSC on a dedicated Mac (an Apple Silicon M1 Mac mini is sufficient) connected to the DAW over Dante.
Why: the monitor path, calibration, inserts, 3D view and QMix no longer compete with the DAW for CPU, GPU and audio-driver time; a DAW restart or crash never interrupts monitoring; and the DAW's output is just another Dante source for the monitor controller.
PhantoMix — Phantom Image Visualizer
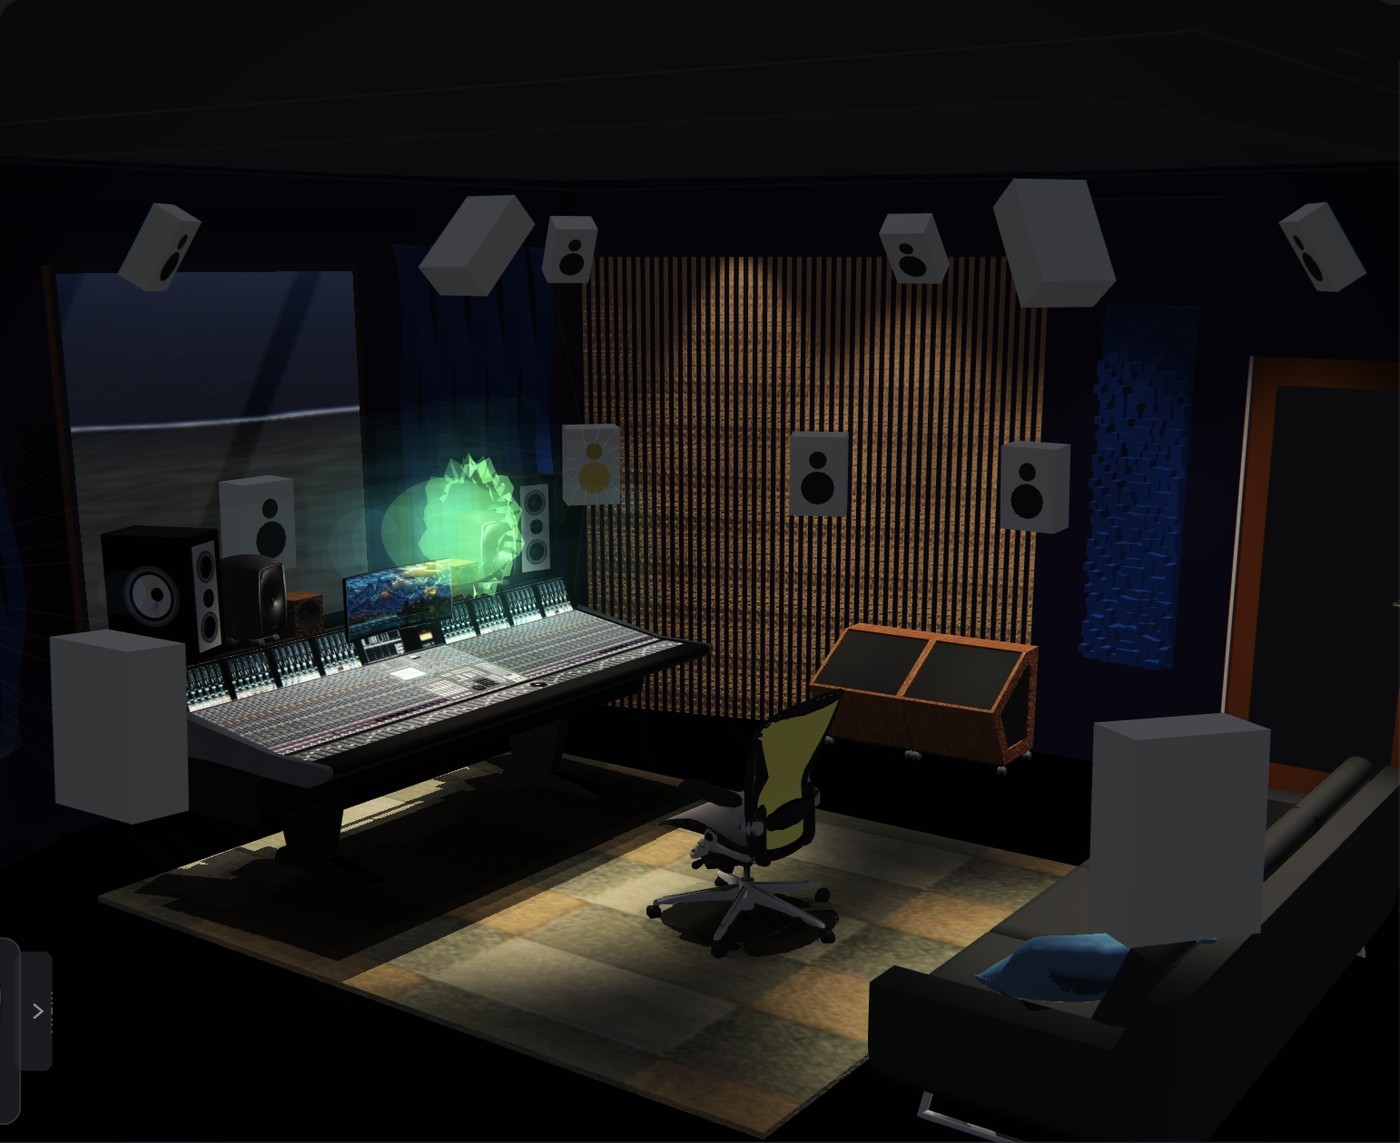
PhantoMix is mSC's way of seeing sound. It draws where the listener perceives each sound in the room — the phantom image — as a glowing soundball, and shows the surrounding sound field (pads, reverb, ambience) as a cloud, all inside a 3D model of your control room.
Why it matters
In stereo you can imagine the picture between two speakers. With 5.1, 7.1.4 or 9.1.6 you cannot: a mix is a pile of channels, and nothing on a normal meter says where the sound ends up. Phantom images — sounds that seem to come from a point where there is no speaker — are exactly what an immersive mix is made of, and they are exactly what level meters cannot show.
Localisation you can see
The position, width and movement of each sound is drawn in the room, so you can judge a mix by looking as well as listening.
No metadata needed
Objects are computed from the audio itself — the levels of the speaker feeds — so it works on any 2.0 to 9.1.6 source, from any DAW, player or stream.
Relationships between channels
The cloud shows how the channels relate — the sustained field that joins them — as a continuous, flowing shape rather than separate bars.
Rare in practice
Meters show level; panners show intent. Showing the localisation the listener actually receives, in the listening room, is uncommon.
Objects without metadata
Dolby Atmos can carry object positions as metadata, but a monitor controller usually receives only the rendered speaker feeds — the metadata is gone. PhantoMix therefore calculates the objects. Every few milliseconds it does the following for the channels that are audible:
- Take the direction from the listening position to each speaker in the current layout (LFE is left out).
- Weight each direction by that channel's power (its level squared), so louder channels pull the image toward their speaker.
- Add them up and normalise. The result is an energy vector: its direction is where the phantom image sits, its length is how focused the image is (a single speaker = fully focused, equal level everywhere = diffuse, no point).
- Place the soundball there. Its size follows the level, its brightness the density, and its spread follows the stereo width of the channels that feed it.
Because the calculation is repeated for separate frequency bands, kick, snare and hi-hat each get their own soundball instead of collapsing into one point — a low band, a mid band and a high band each find their own position in the room. A signal that stops does not simply vanish: see Memory below.
What it is, honestly
The position comes from channel levels and the speaker layout — an energy-vector model of how level differences between speakers form a phantom image. It is an estimate of where the image falls, not a measurement of the room or a model of phase and timing differences between channels, and it does not read Atmos object metadata.
Soundball states and memory
| State | What you see |
|---|---|
| Active | A filled, glowing ball. Size follows the level, brightness the density; it breathes with the signal and deforms with attack and stereo width. |
| Ghost | When the sound stops the ball stays behind as a marker for the time you choose (Memory Time 0–30 s or ∞). Styles: Outline, Sphere, Dissolve. |
| Fade | The ghost fades out smoothly and disappears. |
Ghost memory turns a moving sound into a trail: a vocal that travels around the room, or an effect that jumps from front to rear, leaves its path behind so the movement can be read afterwards. Right-click the 3D view for SOUNDBALL TOOLS: Memory Time, Size, Ghost Style, Reactivation, Ball Size (Level / Fixed) and Reset.
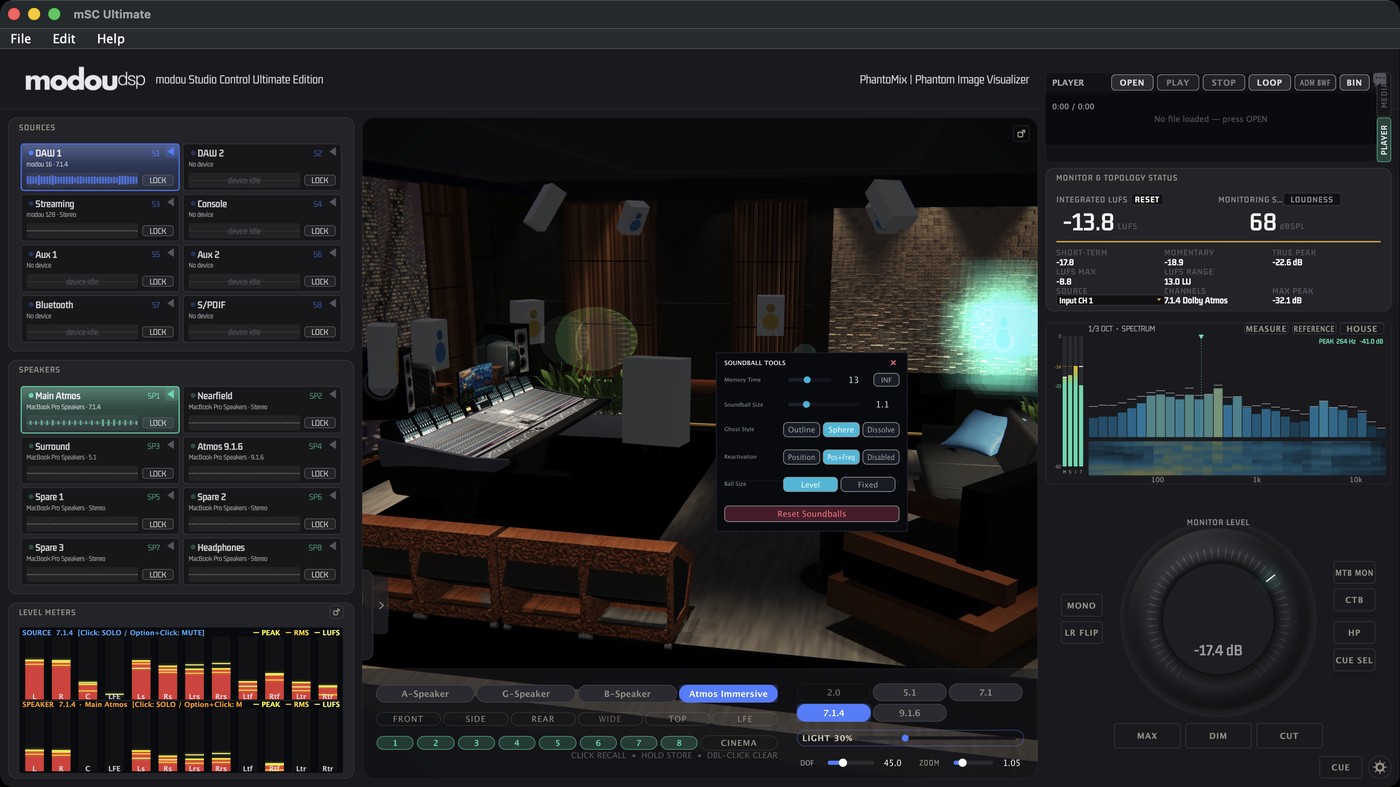
The cloud: how the channels connect
A soundball marks a point. Most of what makes an immersive mix feel immersive is not a point — it is the sustained field that surrounds it. The cloud draws that field around the phantom image and lets you see how the channels are tied together:
- Pad (violet) — sustained, tonal material such as pads, strings and held notes.
- Reverb (aqua) — the diffuse tail. It grows and spreads over time, so you see how far the space opens up.
- History — when the image moves, the cloud keeps the places it passed through, fading by the same Memory Time as the soundball.
- Speaker links — the wave modes (MODE knob, 1–7 plus the particle and ring forms) connect the speakers with lines and rings whose strength follows the channel levels, so a pair of channels carrying the same content is visibly joined.
Where a level meter shows sixteen separate bars, the cloud shows one connected shape. A mix that is too narrow, too front-heavy, or has a reverb that collapses into the centre is visible at a glance.
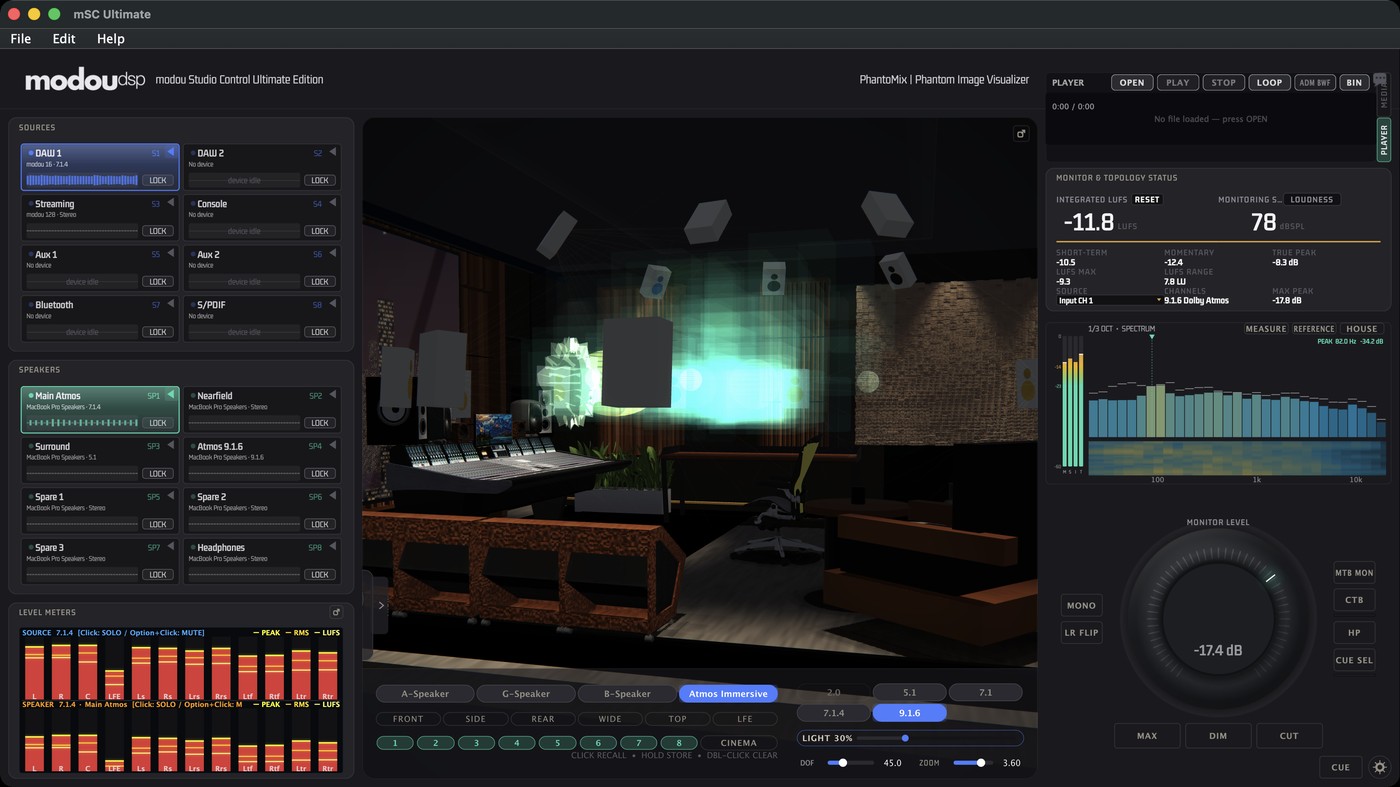
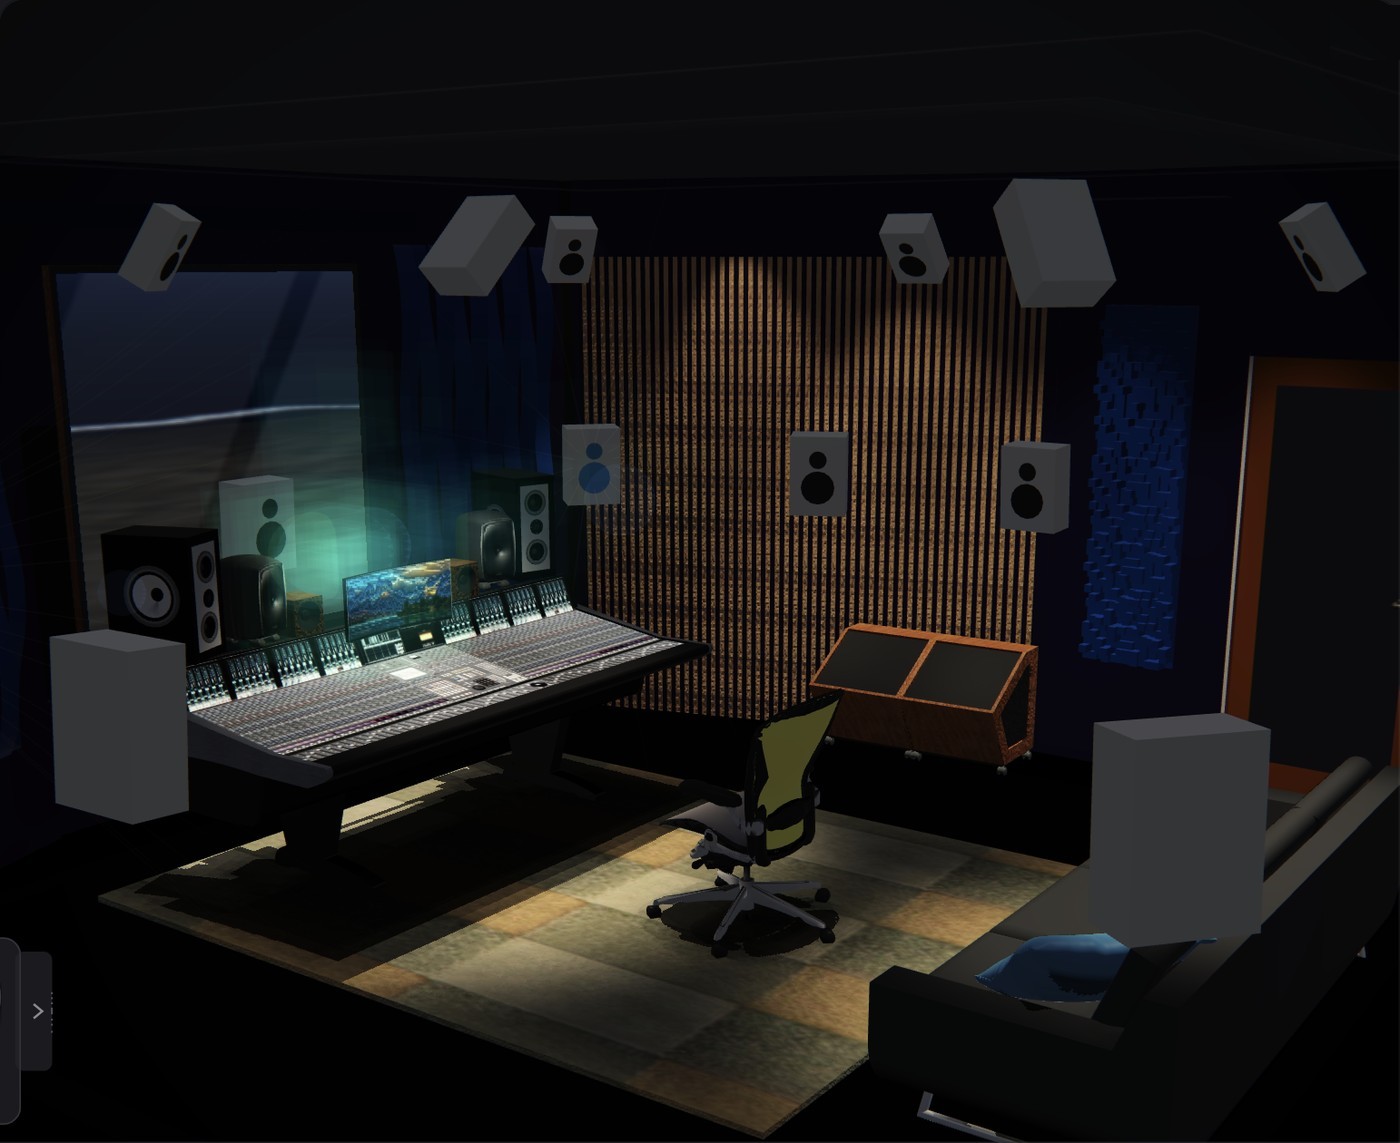
Seeing the speakers too
Each speaker draws a faint bundle of lines along its directivity — a wide fan for a wide-dispersion monitor, a narrow one for a tight monitor — so you can judge the sweet spot together with the image. Click a speaker in the 3D view to solo it (Option+click to mute) and hear which feed a ball is made of. With ADM BWF files the player can also read the object metadata that the file does carry, for comparison with the calculated image.
Using it
- Pick the source and the speaker set in the 3D view, and choose the layout that matches the programme (Atmos Immersive for 7.1.4 / 9.1.6).
- Play. Watch where the soundballs sit: a centred dialogue, a wide music bed, an object flying overhead.
- Set Memory Time (a few seconds) to read movements as trails, and the MODE and CLOUD knobs for the cloud style and brightness.
- For a binaural check switch to Speaker 8 and Engineer POV to stand inside the picture.
Installation & Licence
- Install modou Central (get it at modoudsp.com/central). Installation and licence management are both handled in Central, not in mSC.
- In Central, sign in, install your edition of mSC and the modou audio driver, and activate the licence (or request a trial). Central writes
license.jsonfor mSC to read. - Start mSC. Without a valid licence a red bar appears with Get Licensed, which opens Central. Settings › License shows the state; Verify re-reads the local file. If Central is not installed, the button opens modoudsp.com/central instead.
- A licence is bound to the machine's hardware ID and is signed (Ed25519). Up to 3 devices per licence. Trials are one per hardware ID and expire; full licences do not.
- Re-verification with the server happens about every 24 hours when online; the local file keeps working offline.
- Licence file:
~/Library/mSC/license.json(Ultimate),~/Library/mSC Studio/license.json(Studio) or~/Library/mSC Music/license.json(Music); on Windows%APPDATA%\mSC/mSC Studio/mSC Music.
macOS Permissions
| Permission | Why mSC asks |
|---|---|
| Microphone | Measurement microphone, talkback and CUE inputs. If denied, output keeps working: “Microphone access denied – input disabled (output OK)”. After allowing it in System Settings, restart the app. |
| Camera | CUE video source. |
| Automation (Music) | To read and control Apple Music for the MEDIA panel. |
| Documents / Downloads / Desktop | To open and save sessions, reports and audio files. |
| Local network | macOS may ask when phones first connect. |
Setup Wizard
The wizard runs automatically on the first launch (no saved system) and any time from File › Setup Wizard…, pre-filled with the current system. Skip All (after a confirmation) builds a system from the recommended defaults.
| Step | What you set |
|---|---|
| 1 Welcome | Start with “Get Started”. |
| 2 System Profile | Studio name, a template (Stereo, Surround, Dolby Atmos (default), Immersive, Live / Broadcast, Custom) and the Studio model for the 3D room: Medium (bluesono, smaller room) or Large (default). |
| 3 Audio System | Shows device, channels, sample rate; buffer 64 / 128 / 256 / 512 / 1024 / 2048. |
| 4 Input Sources | 1 – 8 sources (the wizard starts with 2: “DAW 1” and “Mac Audio”): name, format (Stereo, 5.1, 7.1, 7.1.4, 9.1.6, Binaural, Mono), device, start channel. |
| 5 Monitor Outputs | 1 – 8 speaker sets with the same fields (the wizard starts with 2: “Main Atmos 7.1.4” and “Nearfield Stereo”). |
| 6 Speaker Alignment | Set Up Now / Import a Profile / Do This Later (default). Profiles are loaded later from the Alignment panel's OPEN button. |
| 7 QMix Setup | Mixer count 8 / 16 (default) / 24 / 48 (Studio: 8 / 16), output pair per mixer, performer names, CUE device, and toggles for 3D binaural panning, automatic DCA groups (Drums, Bass, Guitars, Keys, Vocals, FX) and the LAN remote server. |
| 8 Review | Summary, including the performer web mixer address. |
| 9 Complete | “Open My Studio”. |
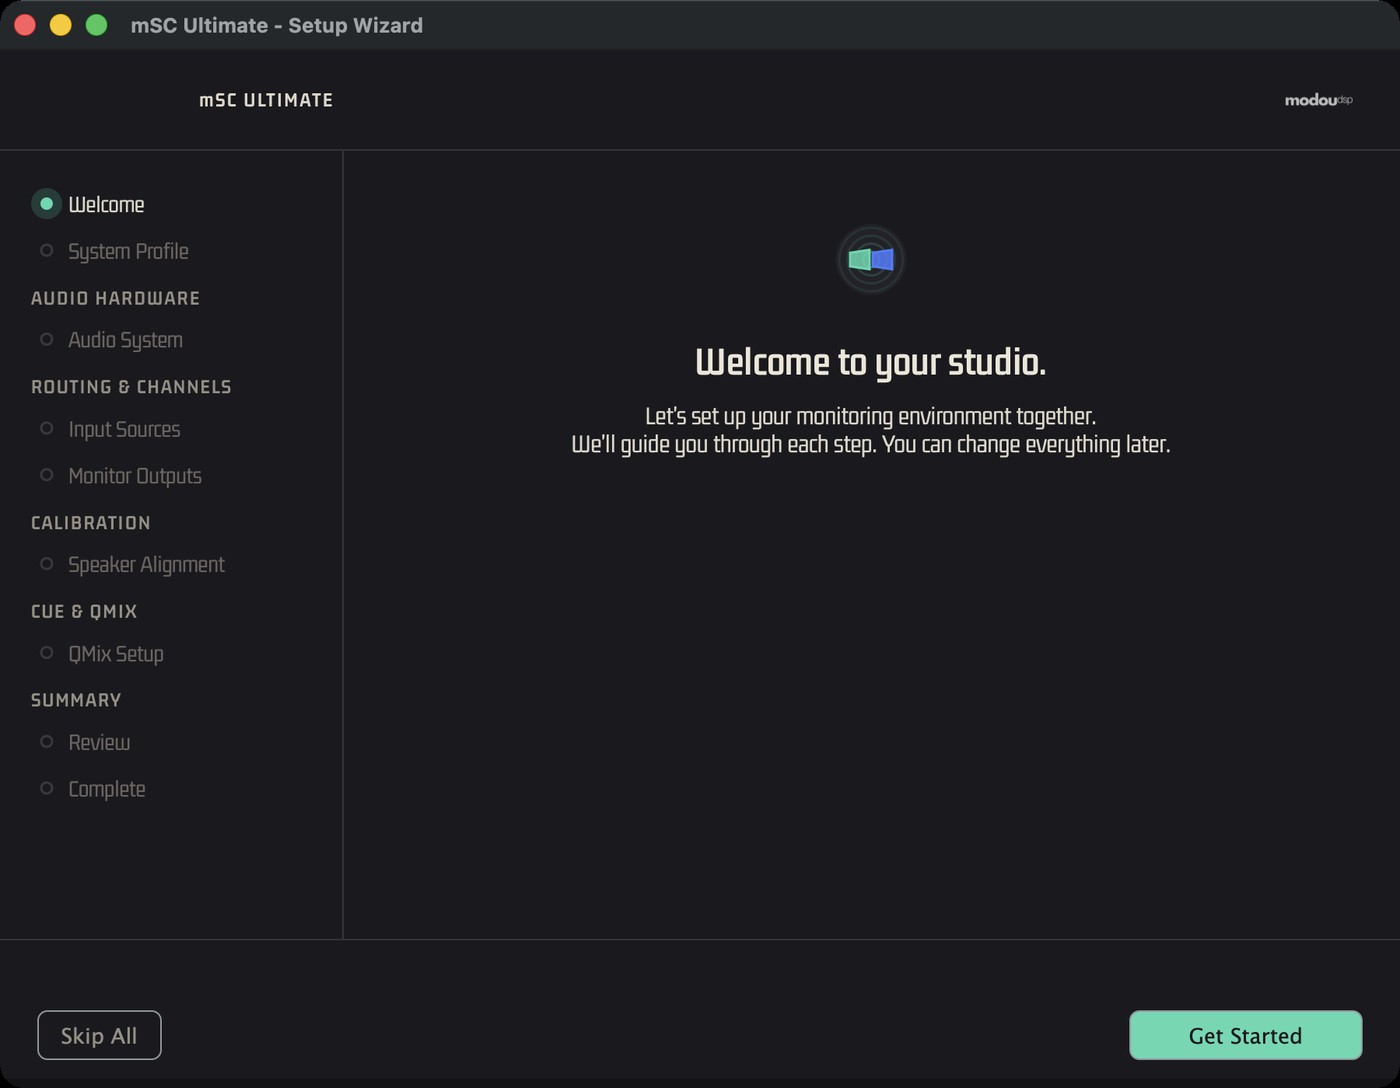
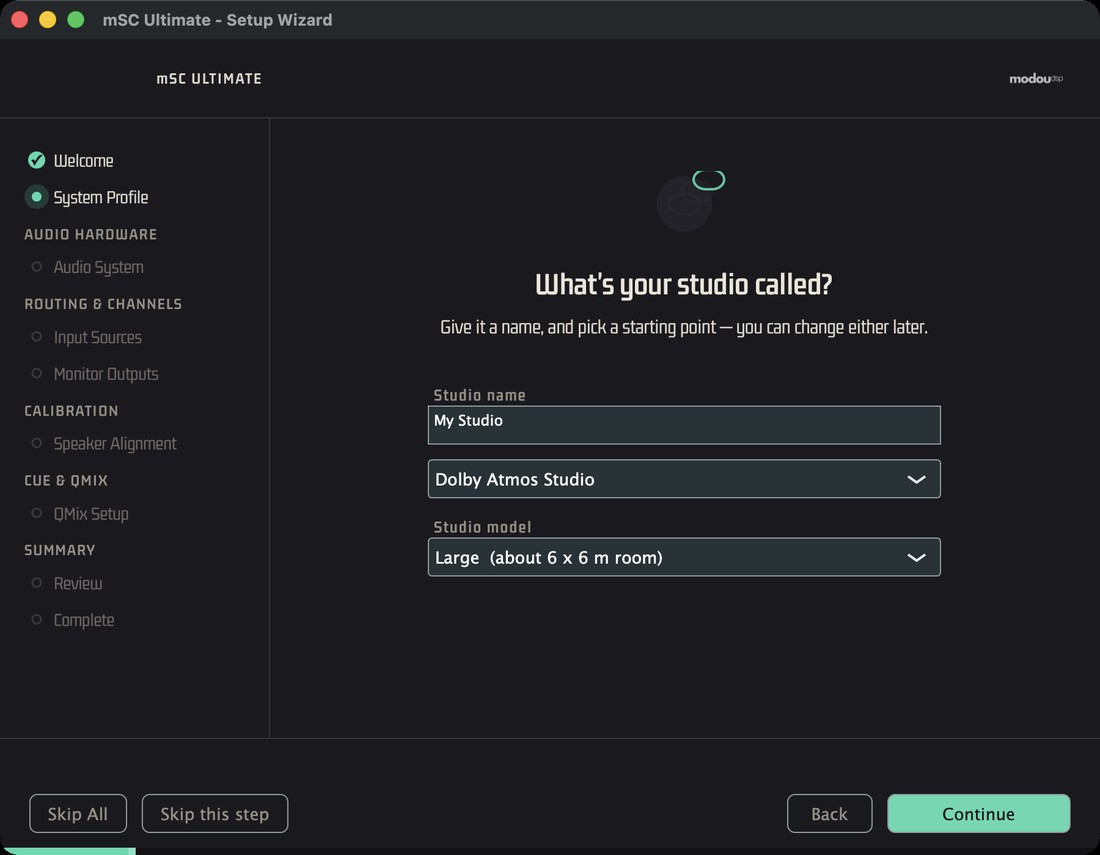
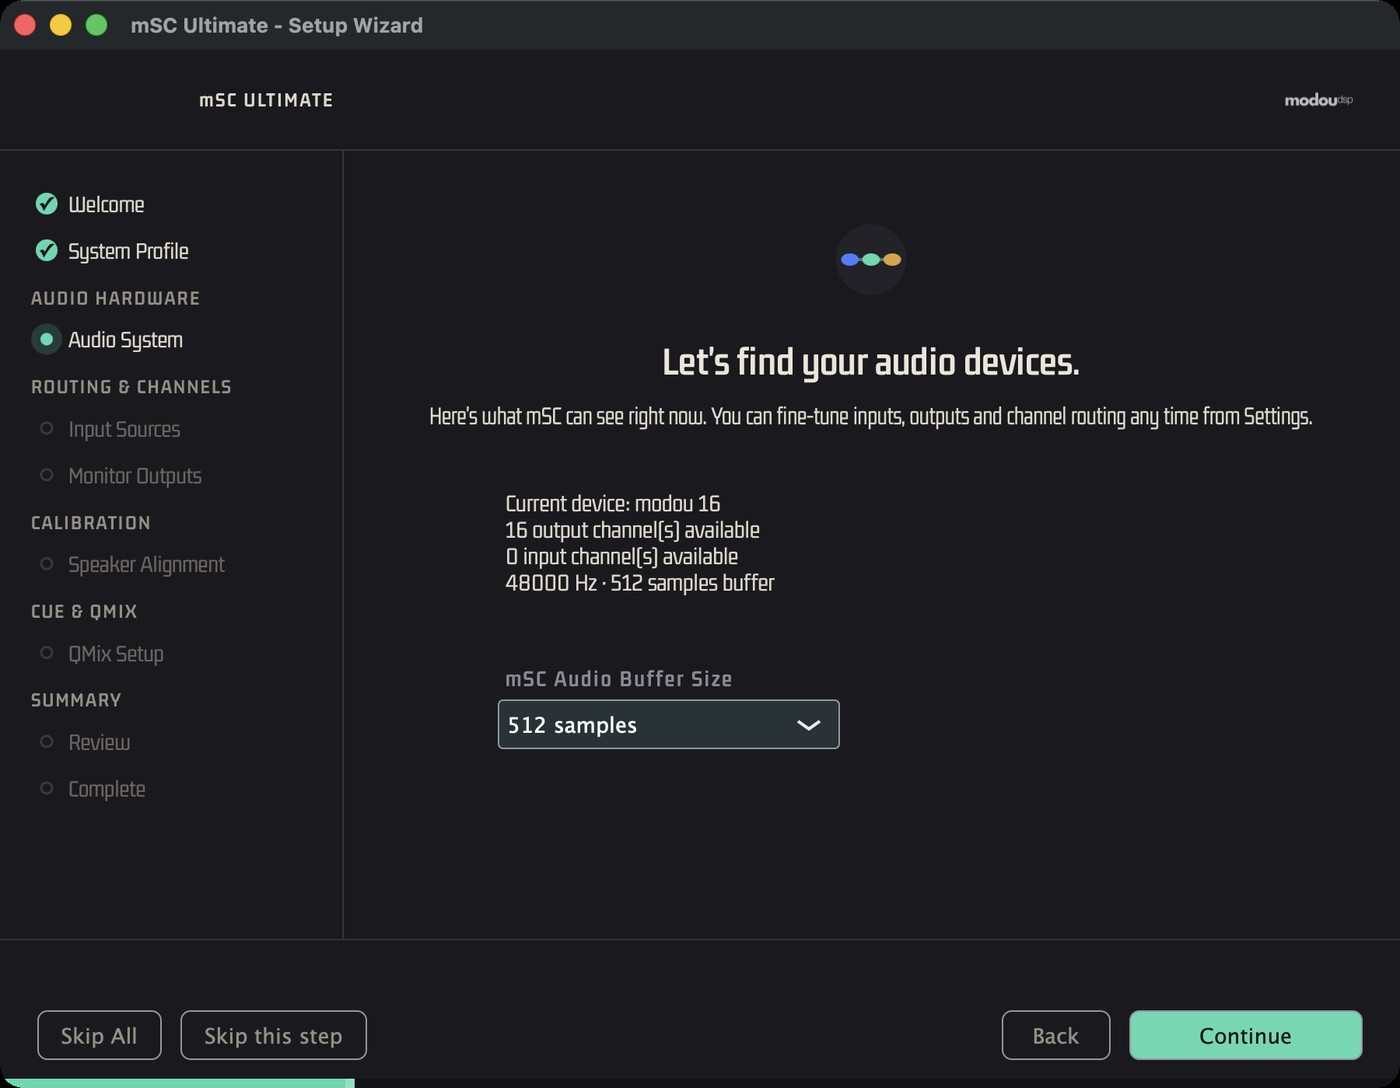
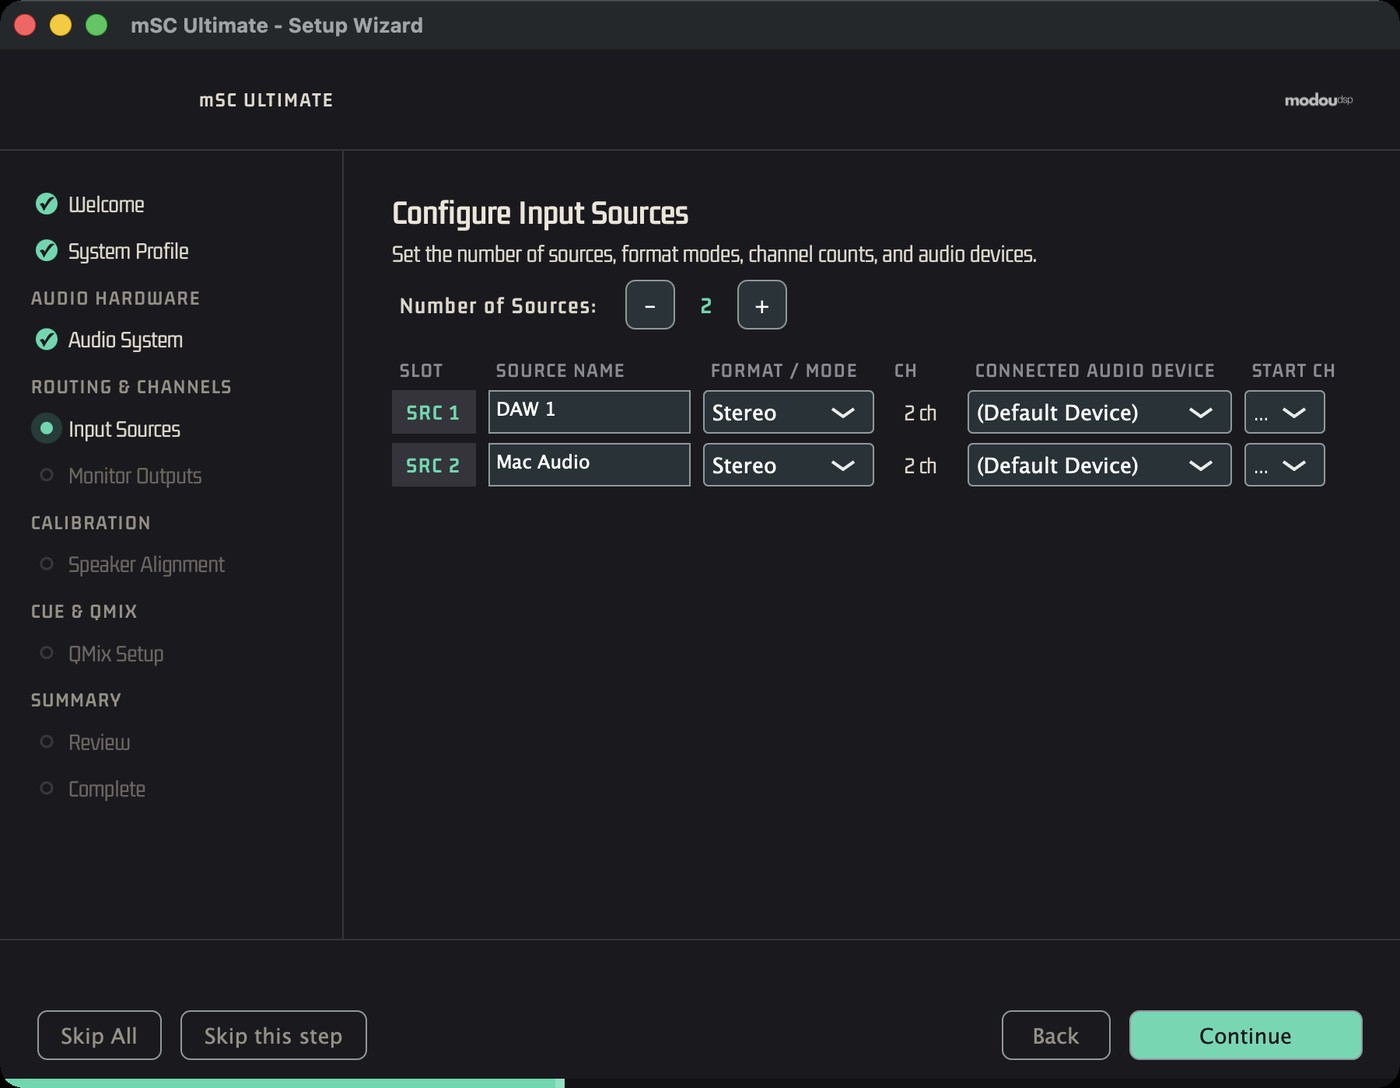
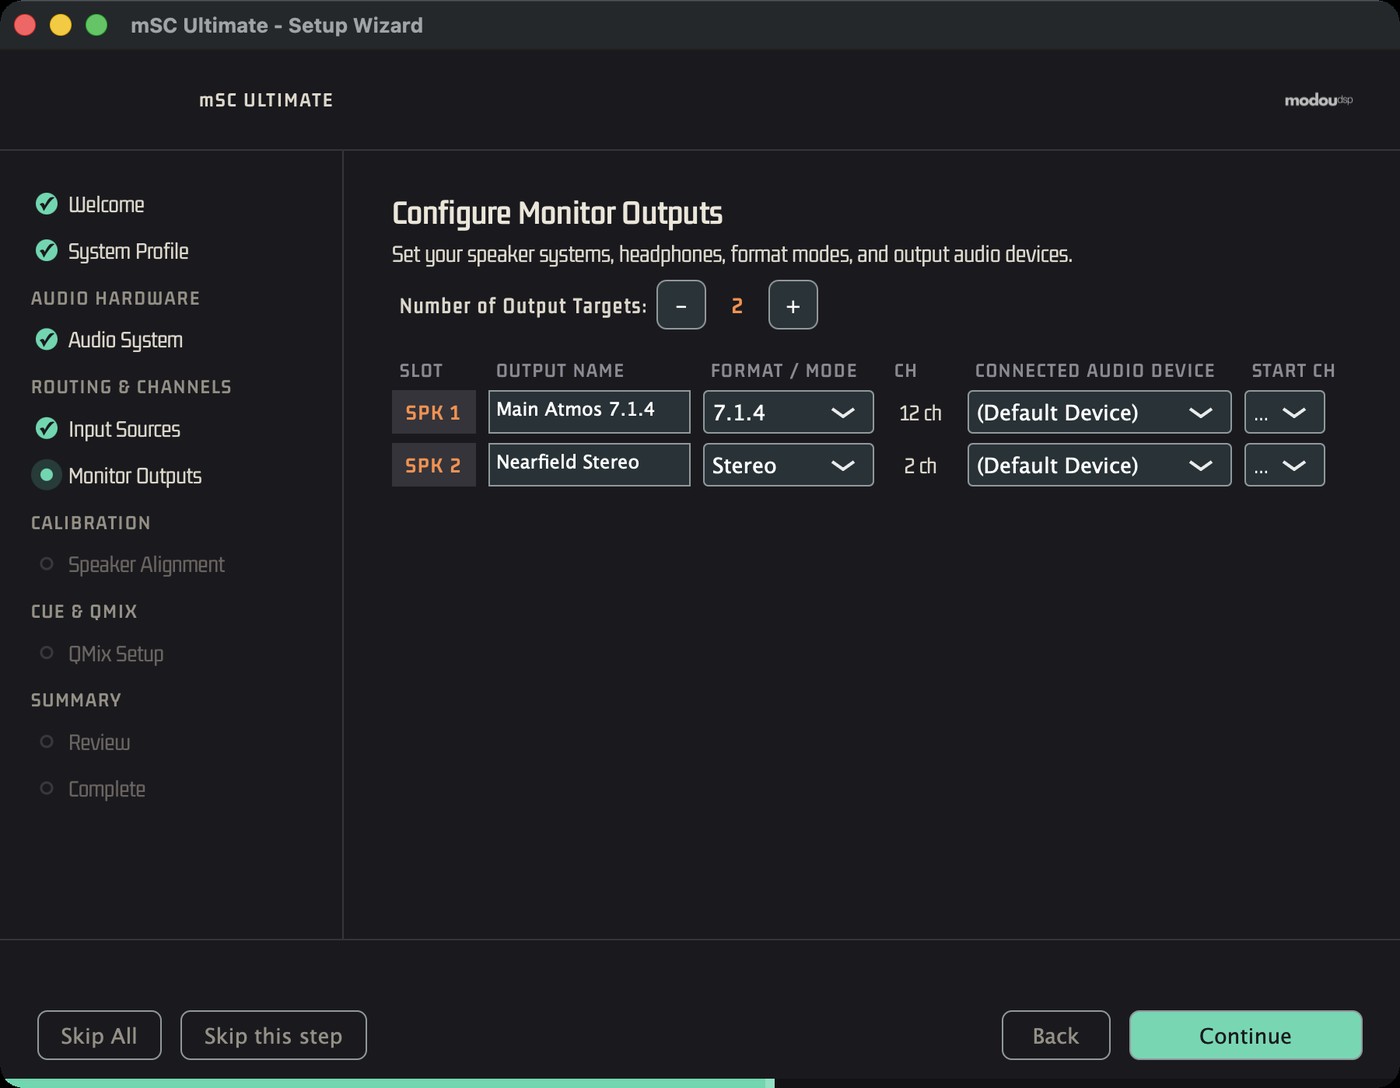
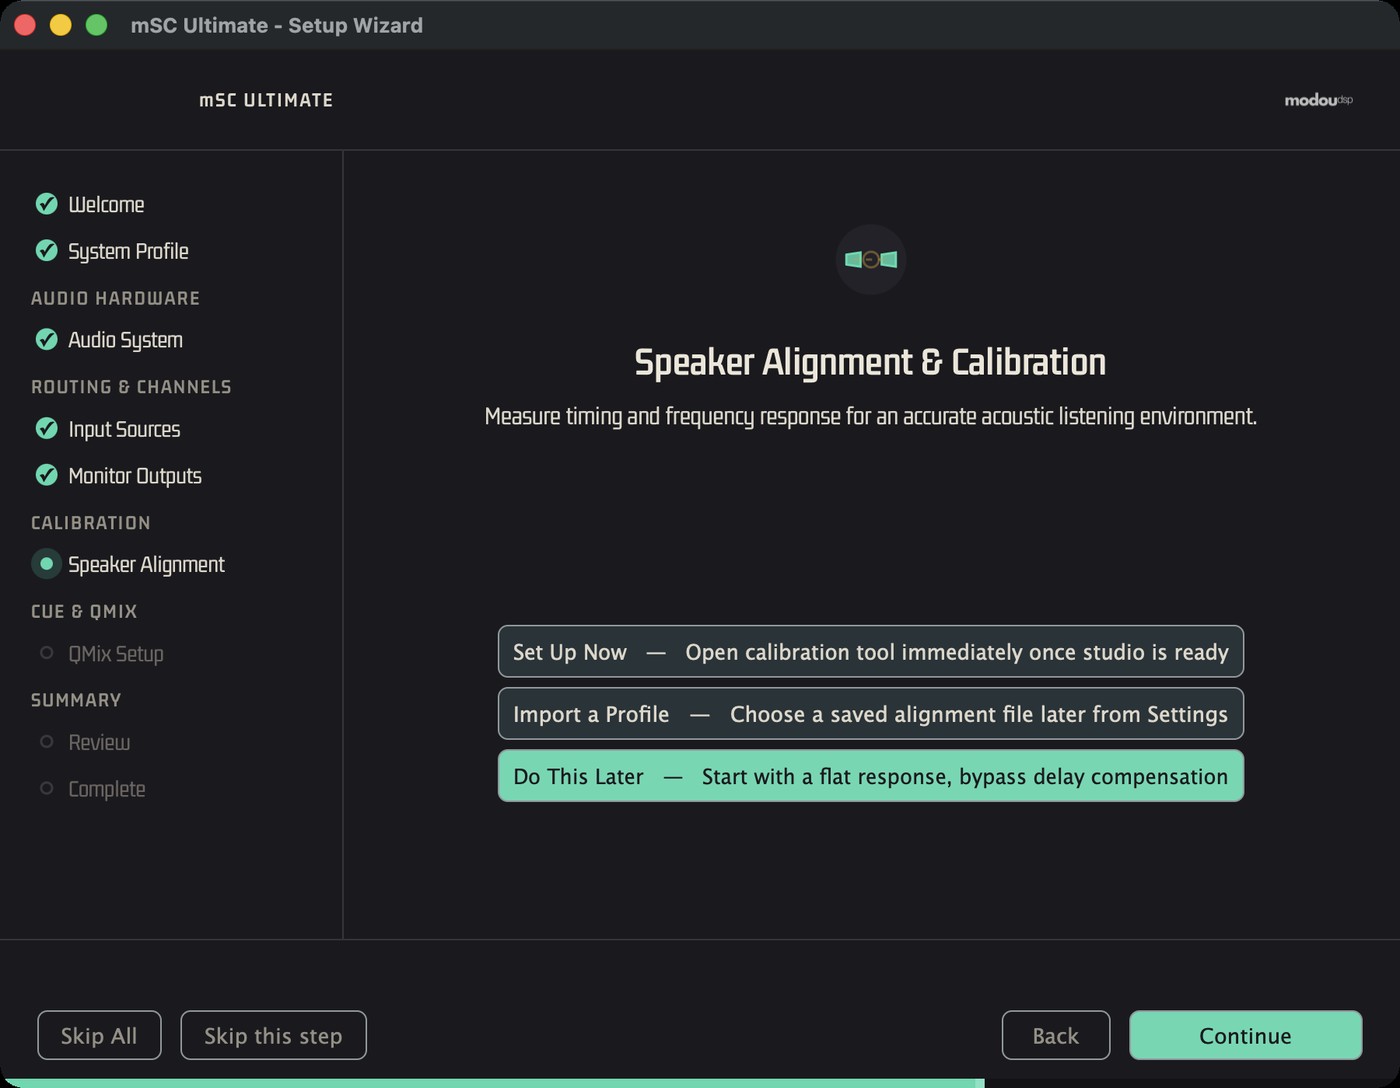
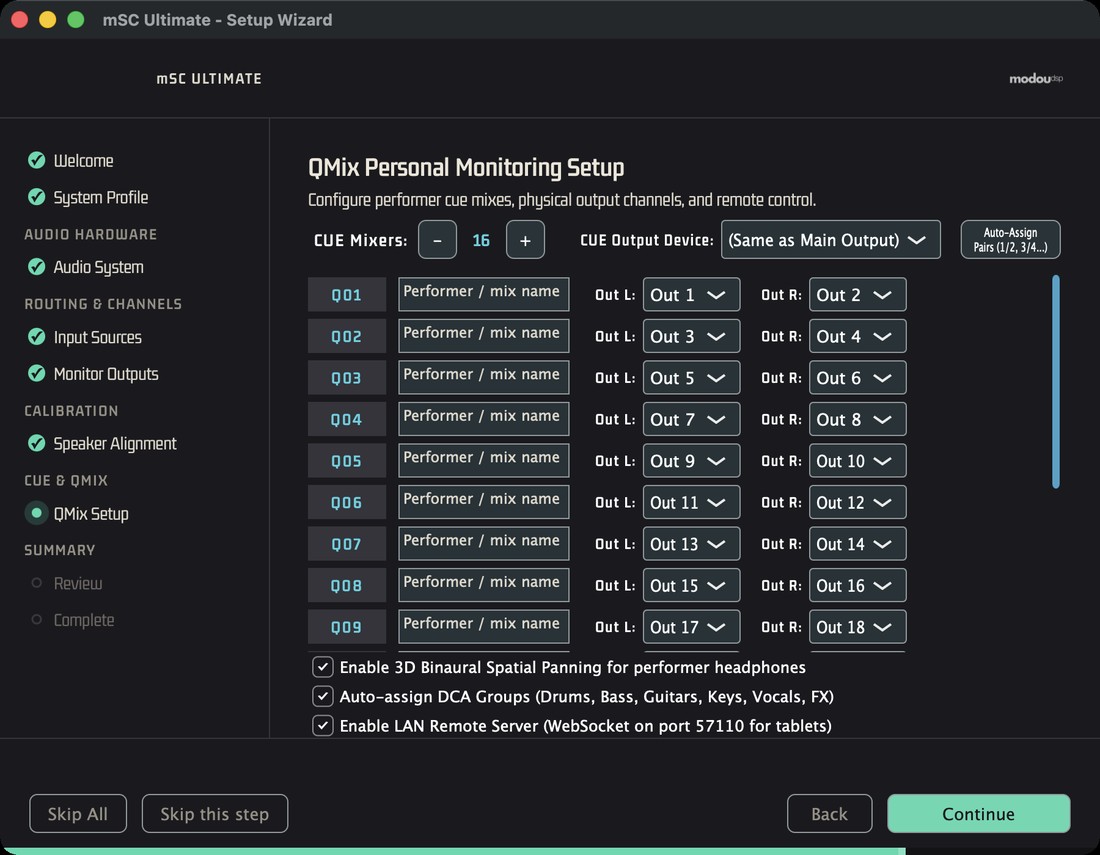
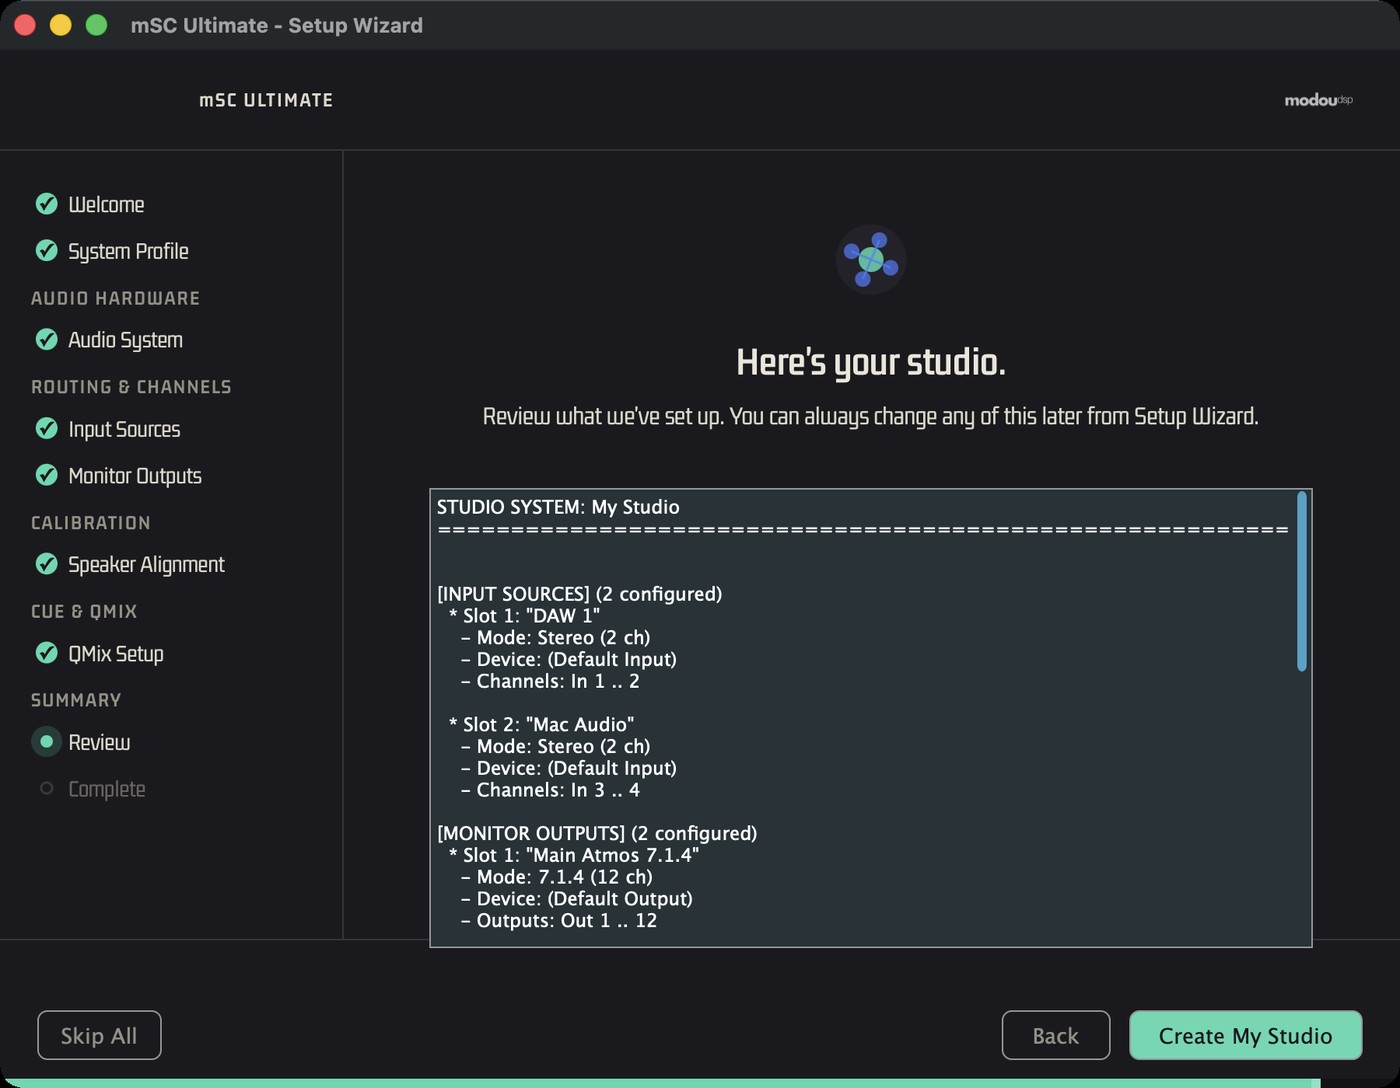
The system is saved as Systems/<name>.mscsystem (written to a temporary file, verified, with the previous version kept as .bak) and the active one is noted in currentSystem.txt.
Where files live
| Item | macOS location |
|---|---|
| Settings | ~/Library/Application Support/mSC Ultimate.settings (mSC Music.settings) |
| Wizard systems | ~/Library/mSC Ultimate/Systems/*.mscsystem |
| Alignment profiles | ~/Library/Application Support/mSC/AlignmentProfiles/ |
| QMix session | ~/Library/Application Support/mSC/QMix/Session.json |
| Licence | ~/Library/mSC/license.json (mSC Studio/, mSC Music/) |
| Web UI override | ~/Library/mSC/webui |
Exact folders can differ between versions; the --config-dir=<path> option or the MSC_CONFIG_DIR environment variable relocates configuration. Sessions use .umsession, settings exports .umset.
DAW System — modouPatchBay & modou Audio Drivers
Bundled with mSC
>mSC includes modouPatchBay and the modou virtual audio drivers as bundled components. Together, they establish a dedicated DAW audio-routing system that is independent of mSC's monitoring controls and the QMix personal-monitoring engine.
These bundled components need no separate purchase or download. When you buy mSC, the licence for the bundled apps is granted automatically through the store checkout; install them with modou Central.
| System | Responsibility |
|---|---|
| DAW System — modouPatchBay & modou drivers | Physical audio input connection, device-to-device patching, DAW recording and playback through modou128. |
| mSC Monitoring System | Listening to the DAW return and other sources; speaker selection, calibration and monitor level. |
| QMix Personal Monitoring System | Separate CUE device and personal mixes; performer outputs and communication. |
modouPatchBay connects physical audio devices to the modou virtual driver. The DAW uses that driver (modou128) as its audio engine, receiving recording inputs and sending playback outputs through explicitly configured routes.
Recording is independent of monitoring
>Recording input routing remains active regardless of monitor source selection, monitor level, DIM or CUT. QMix is configured separately and is not required to establish the DAW recording path.
Device bridging, and the clock-domain and drift-management work that comes with it, belongs to this routing layer, so it is not duplicated inside the mSC monitoring engine.
Setup order
- Install through modou Central: mSC, modouPatchBay and the modou audio driver.
- Prepare the physical audio devices: check the input and output devices and their sample rate.
- Patch inputs in modouPatchBay: connect the physical inputs to the DAW input channels of modou128.
- Set up the DAW: in Pro Tools choose modou128 as the Playback Engine; in other DAWs choose it as the audio device. Then assign the Input and Output paths.
- Verify recording: confirm the input reaches the track input meters and a recorded file.
- Patch playback and cue mixes: the DAW outputs its main mix and its cue mixes through modou128; use modouPatchBay to route them to the destinations you want — the mSC monitor input and the QMix input patch.
- Connect the separate systems: set up control-room listening following the mSC Monitoring part, and personal monitoring following the QMix part.
Roles at a glance
DAW input connection: the bundled modouPatchBay. DAW audio interface: modou128. The mSC user interface: monitoring.
Main Window
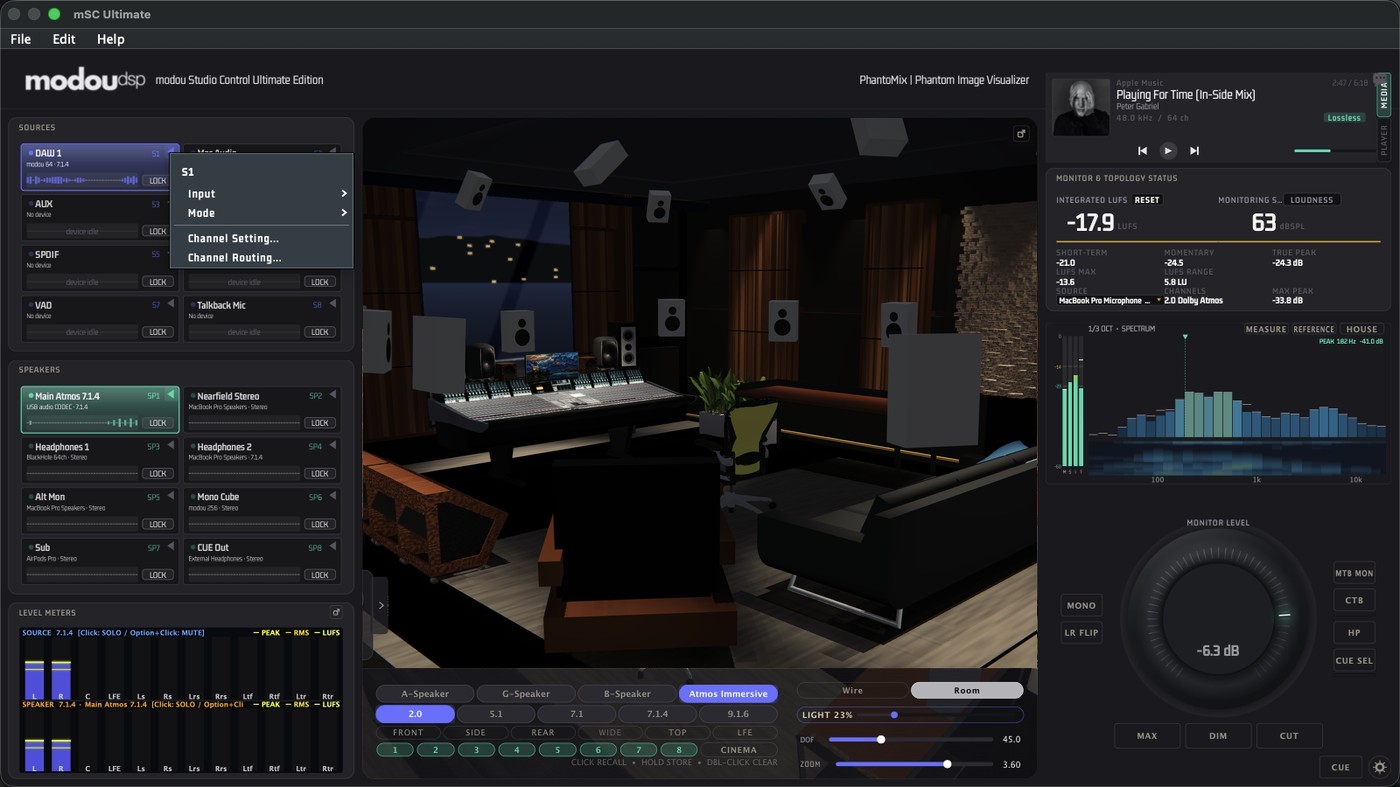
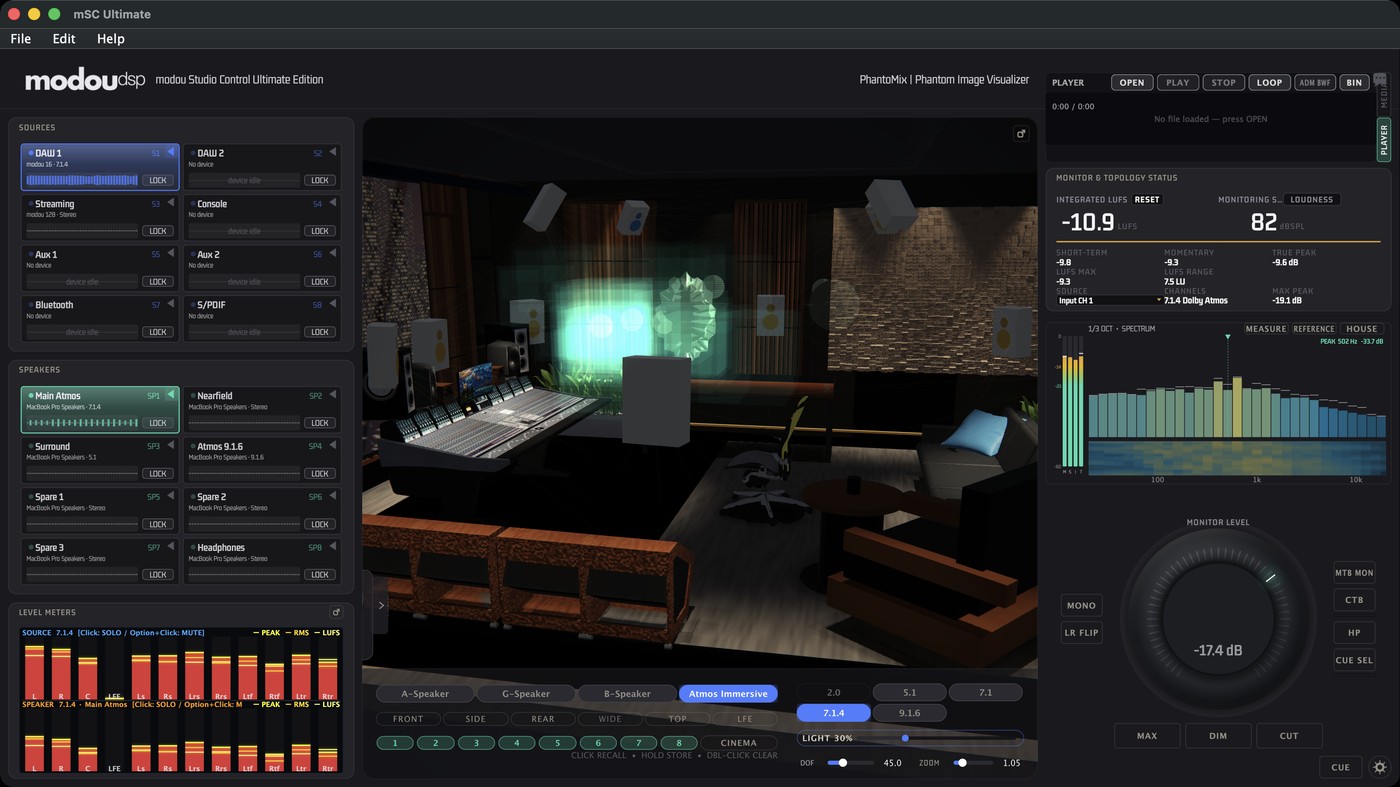
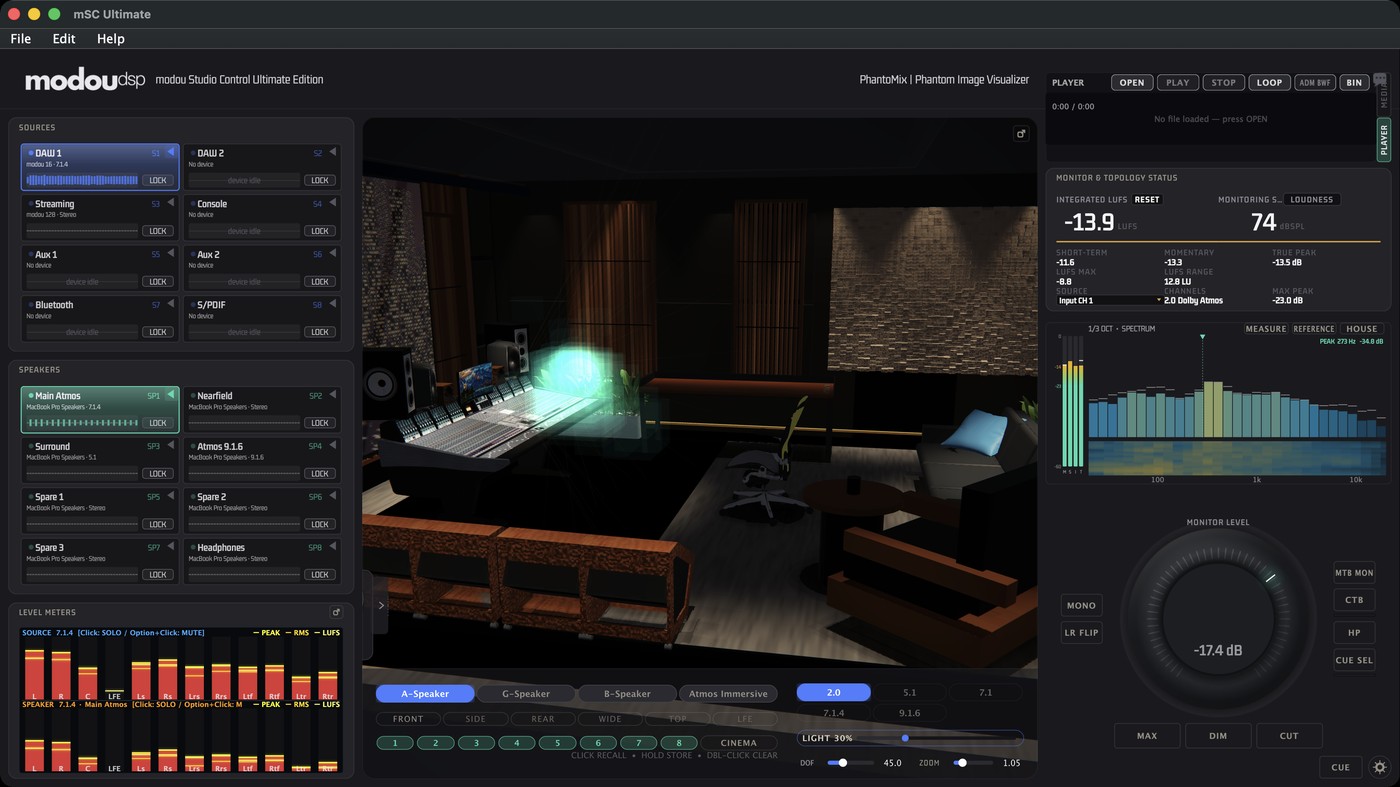
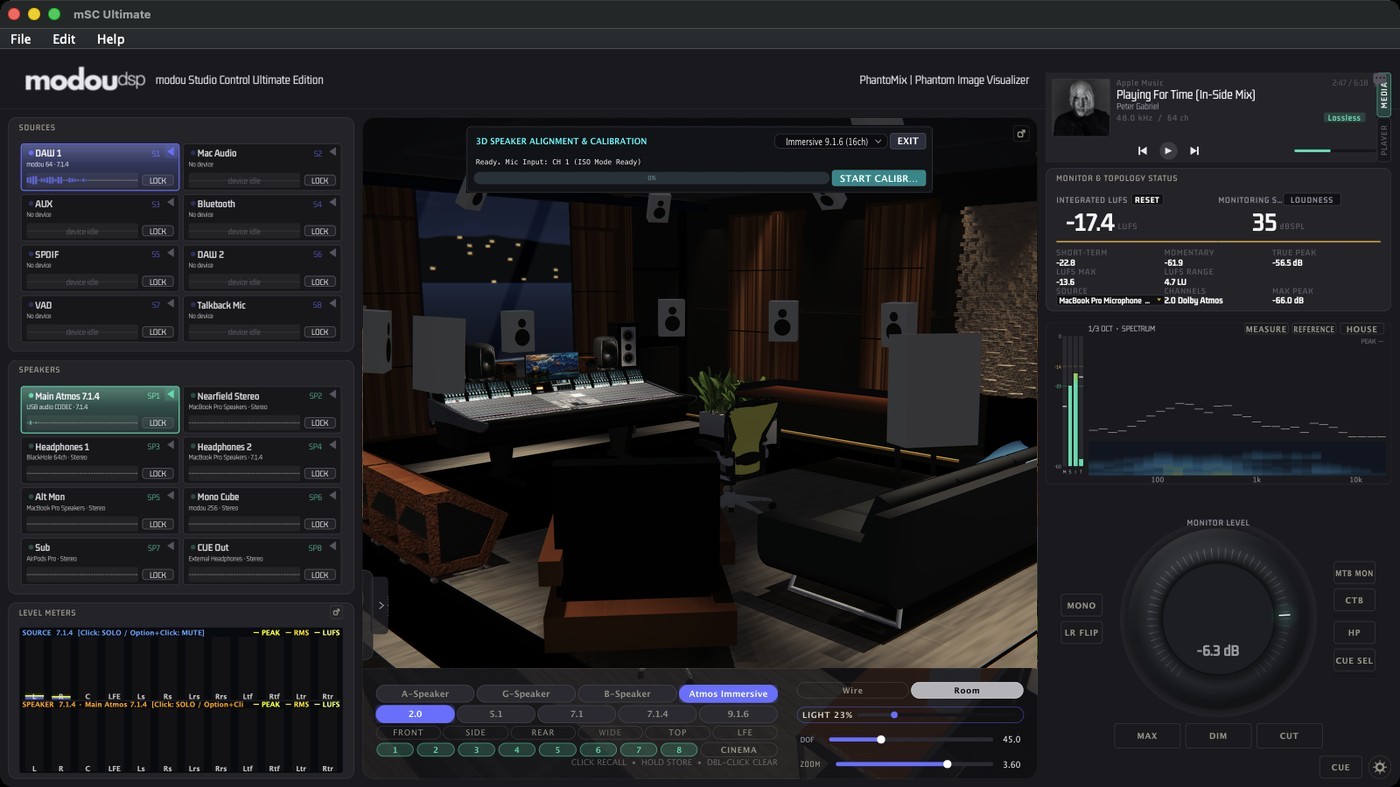
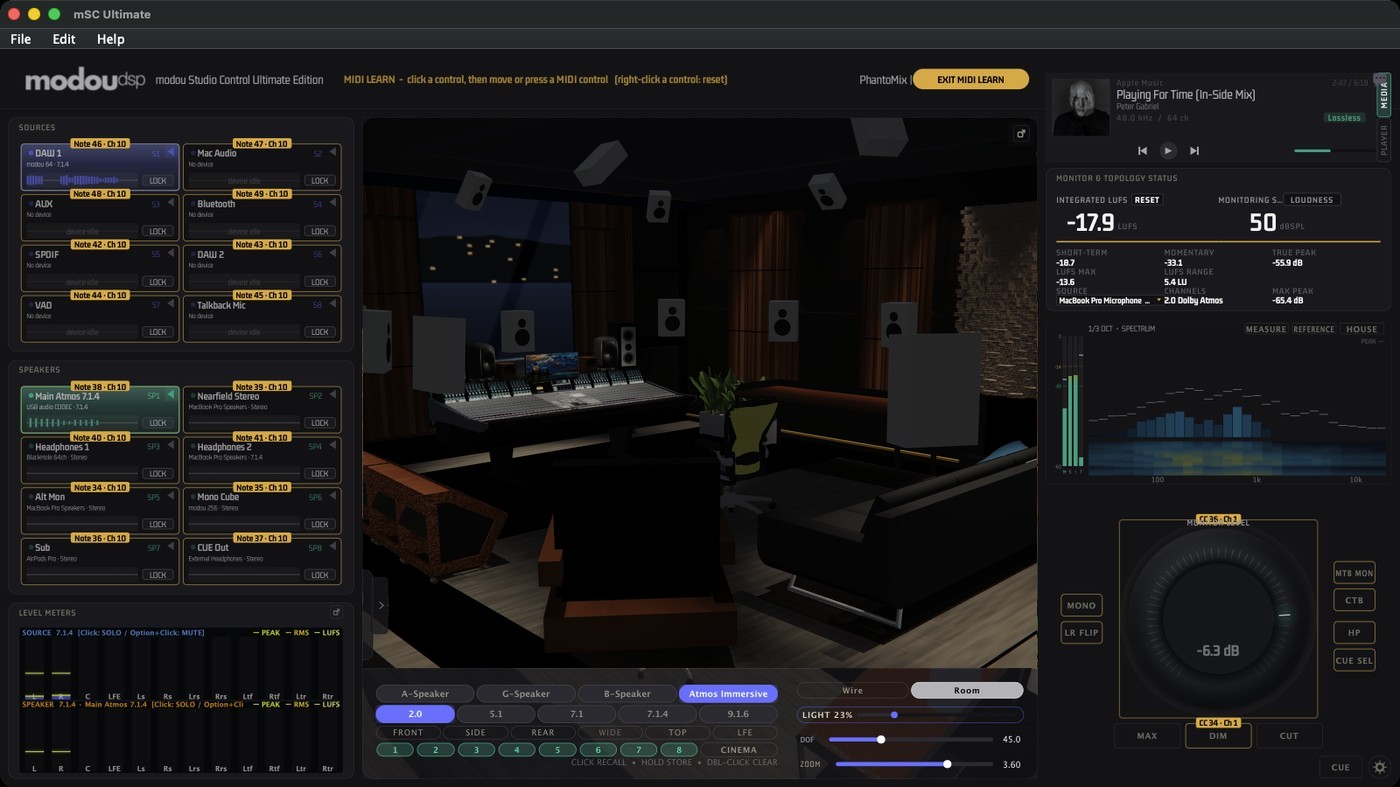
The main window (Studio shell) is built around a full-bleed 3D view. An 88 px top bar carries the logo, the notice line (used by MIDI Learn) and the messenger button.
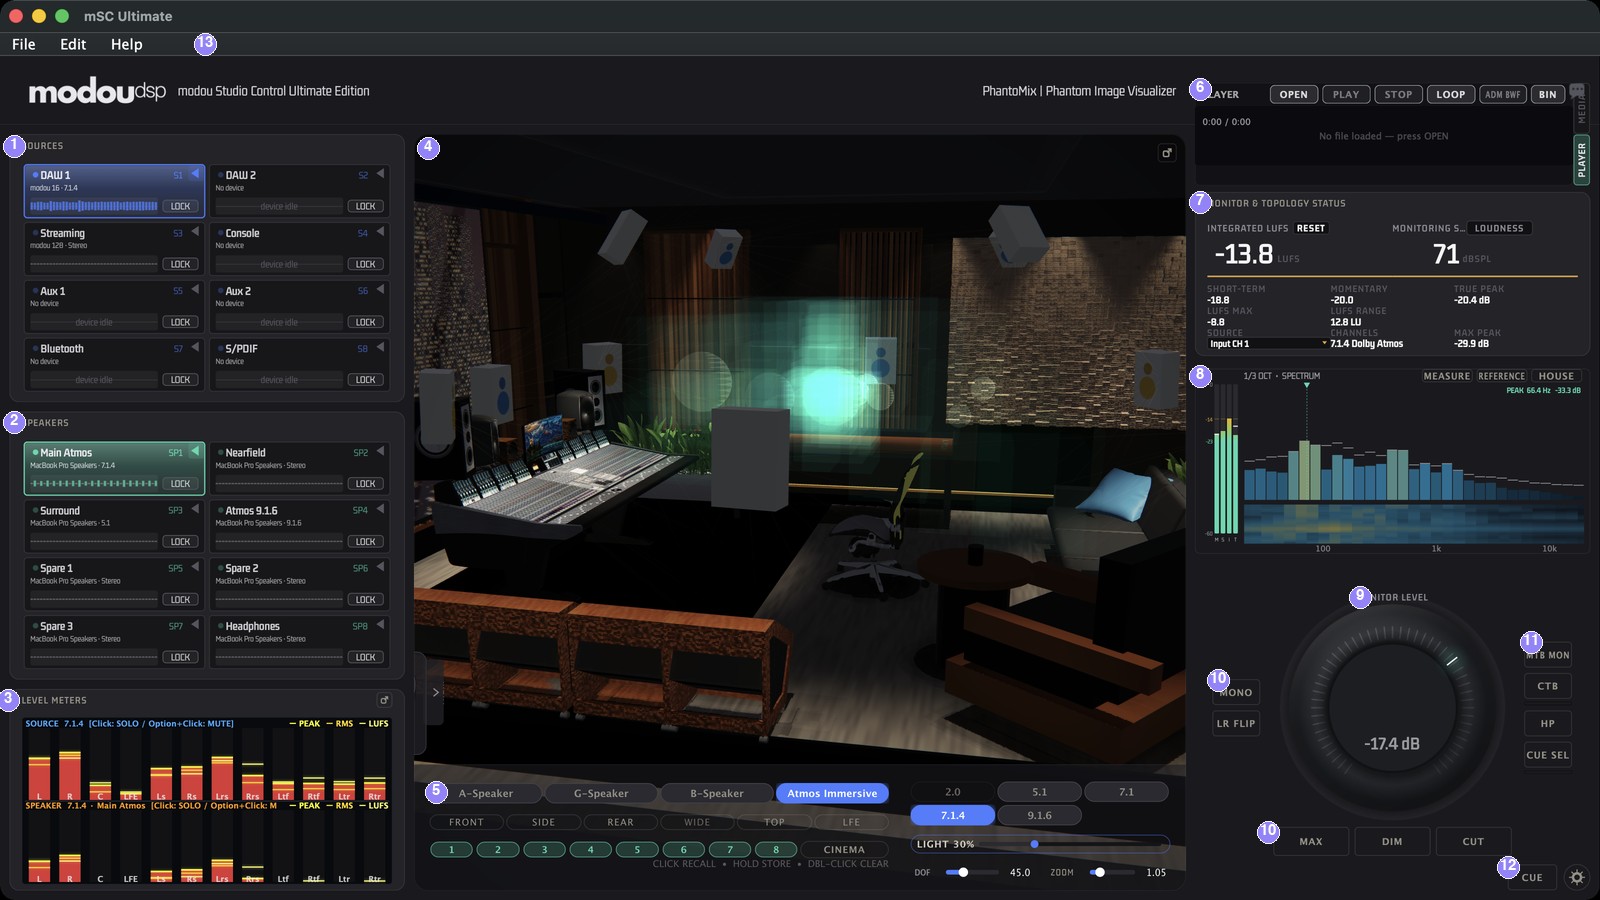
- 1SOURCES — eight slots, S1–S8: whatever you want to listen to (DAW, player, Bluetooth, TV…).
- 2SPEAKERS — eight slots, SP1–SP8: monitor sets and headphone outputs.
- 3LEVEL METERS — SOURCE (top) and SPEAKER (bottom) meters with PEAK / RMS / LUFS lines over a solid fill in the colour chosen in Settings › View › Meter colors (Blue / Green / Red / Purple); the icon detaches them into their own window. Each section draws as many bars as its format has channels, up to 32 for a CUSTOM layout, labelled with the speaker names.
- 43D view — the room, the speakers and the sound field; the icon at its top right detaches it.
- 5Layout bar — speaker-set pills, format pills (2.0 … 9.1.6, plus 7.1.2 or CUSTOM in Ultimate), speaker groups, presets, LIGHT, DOF, ZOOM.
- 6MEDIA / PLAYER — what is playing, with transport; the two vertical tabs switch panels.
- 7MONITOR & TOPOLOGY STATUS — integrated LUFS, SPL, short-term / momentary / true peak, LUFS range, source and channel format.
- 81/3-OCT SPECTRUM analyser with the vertical M · S · I · T loudness bars and the MEASURE / REFERENCE / HOUSE overlays.
- 9MONITOR LEVEL knob.
- 10Left buttons: MONO · LR FLIP. Under the knob: MAX/MINI/KNOB · DIM · CUT.
- 11Right buttons: MTB MON · CTB · HP · CUE SEL.
- 12CUE is a toggle: ON opens the CUE MIXER, OFF closes it; the gear opens Settings.
- 13Menu bar — File, Edit, Help (inside the window).
The window title bar reads “mSC Ultimate” (or “mSC Studio”) and the header shows the modou dsp logo and “modou Studio Control”. The names on the slots (Pro Tools, Logic Pro, NearField, Dolby Atmos…) are examples: you choose them in the Setup Wizard or Channel Setting.
Menu bar
| Menu | Items |
|---|---|
| File | New, Open…, Save, Save As… (session files .umsession), Export Report… (.txt), Save Settings… / Load Settings… (.umset), Settings…, Setup Wizard…, mSC Session…, Exit |
| Edit | Undo, Redo, Cut, Copy, Paste, Select All. Copy and Paste are placeholders in this version. |
| Help | About mSC, User Manual, Quick Start Guide, Check for Updates, Visit Website, Report Bug |
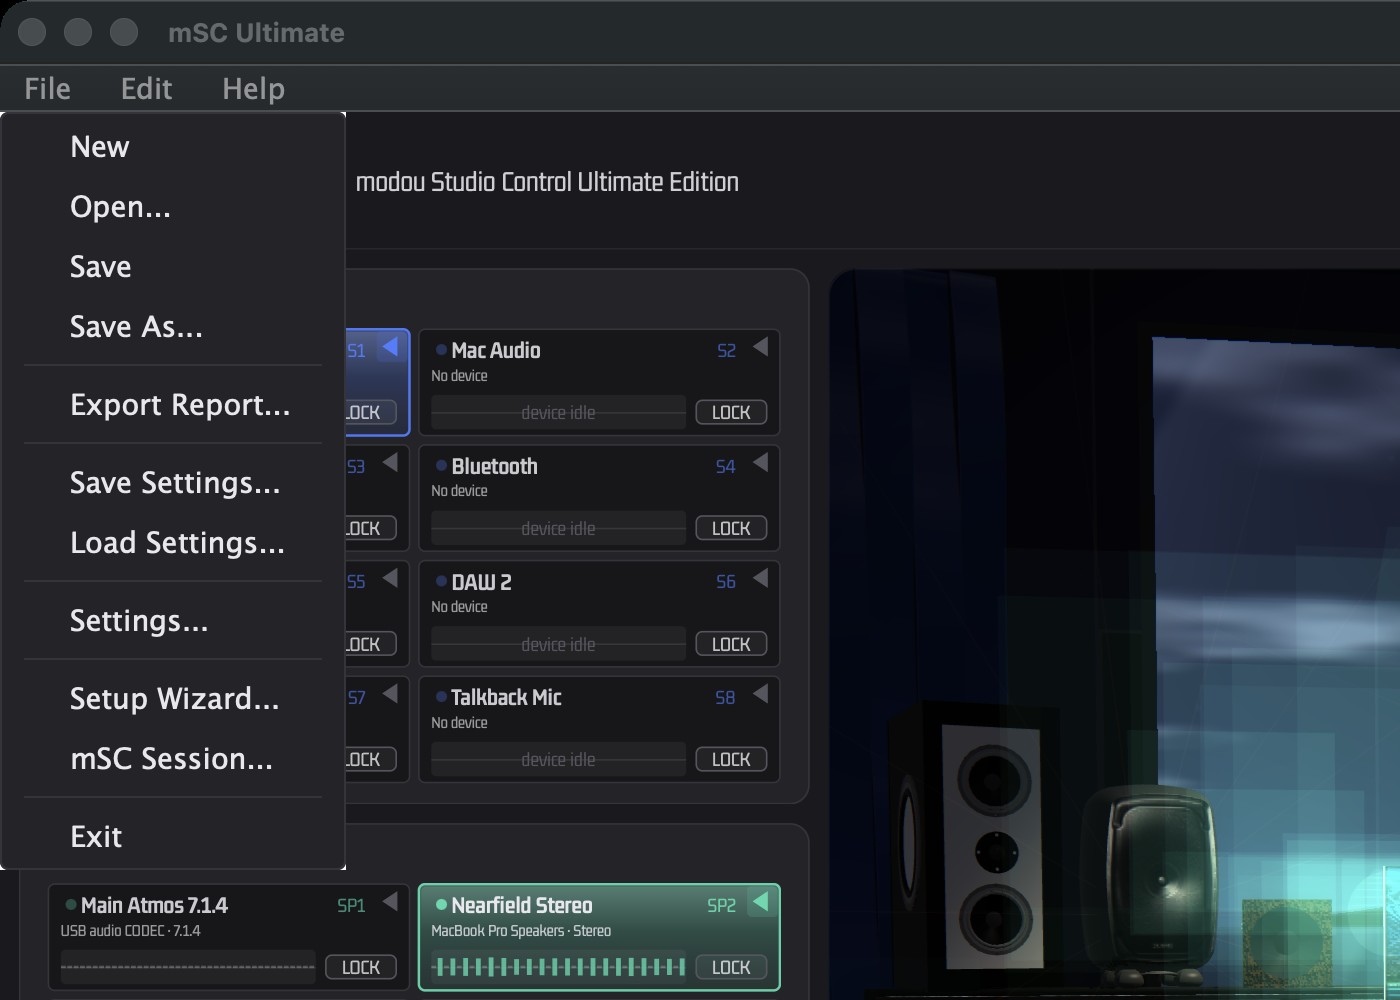
The only global keyboard shortcut is Space, which toggles play/pause of the built-in player.
Monitor Level & Buttons
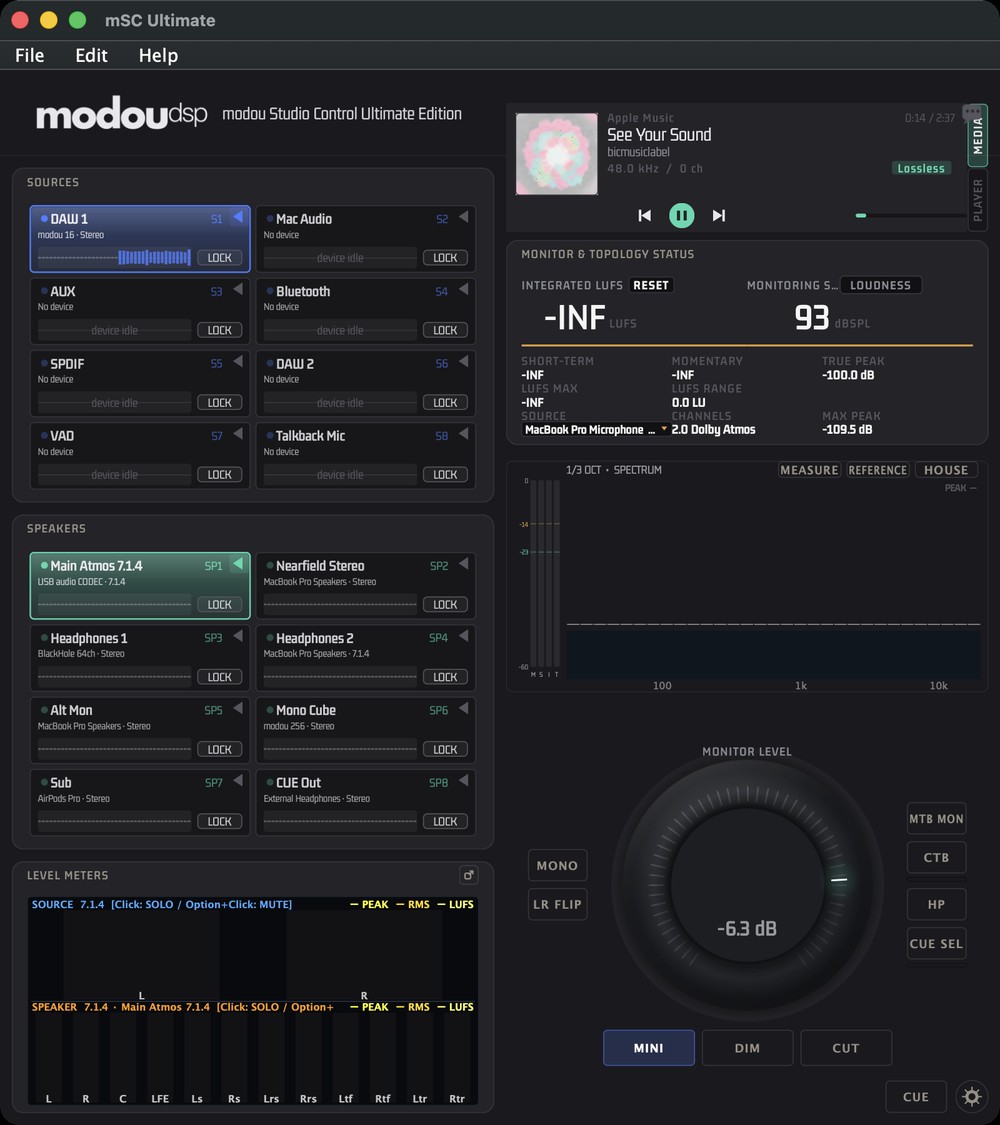
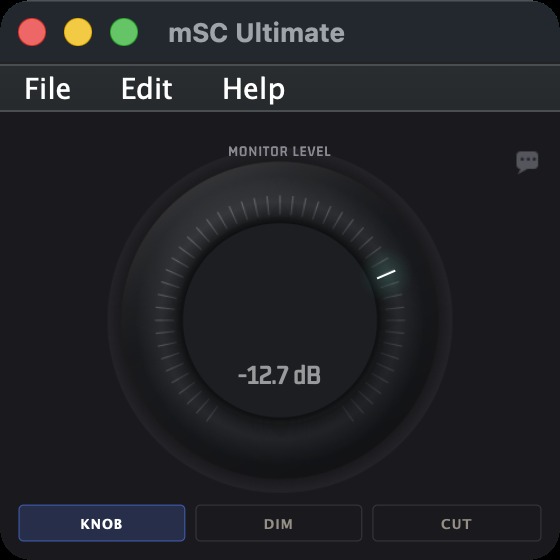
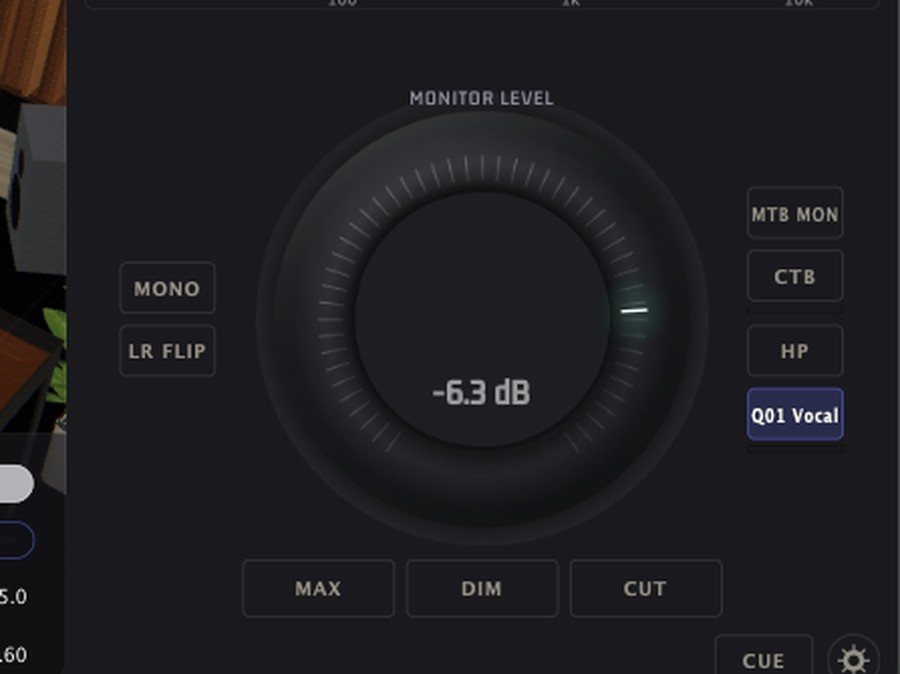
Startup level
>Settings offers a Startup Monitor Level (Last Level / −20 dB / Min), but in the current build the app starts at −10 dB regardless. Check the level before you play anything loud.
Sources & Speakers
There are 8 source slots (S1–S8) and 8 speaker slots (SP1–SP8), each shown as a card in 2 columns × 4 rows with its name, device and a live level waveform (the selected speaker shows its output waveform too). A source is anything you listen to (a DAW, a player, Bluetooth, S/PDIF); a speaker slot is a monitor set or headphone output. The Setup Wizard starts with two sources (DAW 1, Mac Audio) and two speaker sets (Main Atmos 7.1.4, Nearfield Stereo); add more there or in Channel Setting.
| Gesture | Action |
|---|---|
| Click (source) | Make it the only active source (locked ones stay). Clicking the active one turns it off, but never the last one. |
| Double-click (source) | Add / remove it from a multi-selection (at least one stays on). |
| Click (speaker) | Select that set (locked sets keep playing, unchanged); clicking an active unlocked set turns it off, never the last one. |
| Shift + click (speaker) | Add or remove the set from the selection; locked sets cannot be removed. |
| Option + click | Open Channel Routing. On Speaker 8 (headphones) it toggles Engineer POV instead. |
| Padlock (bottom right) | Lock the slot: its signal keeps flowing and is summed with the others when you choose another slot. Locking a source also turns it on, without moving what you are listening to. Trim, delay, solo and mute edits in the source table apply to all locked sources. |
| Triangle (top right) | Slot menu (below). |
| Insert plug-in name | Click to open / close that plug-in's editor. |
| Right-click | Only used in MIDI Learn mode. |
Selection, summing and lock
Selected sources (locked ones included) are summed channel by channel, S1 channel 1 + S2 channel 1 and so on, and the same sum goes to every selected speaker set. A speaker takes only as many channels as its format has: a 7.1.4 source on a stereo speaker plays its first two channels (L R). A locked slot is never changed by selecting another one: lock Speaker 8 (headphones), then select Speaker 1, and both keep playing. Selected and locked slots show a background tinted in the slot's own colour, so the active set is visible at a glance.
Devices in one selection
Sources and speakers in the same selection may use different audio devices. mSC combines them into one private aggregate device (drift-corrected by CoreAudio), so a locked headphone output and the speakers you are switching between play at the same time. With one input device and one output device (or fewer) nothing is combined and the devices open as before. If devices cannot be combined, the status line says why and the previous device stays open.
Slot menu
- Input (sources) / Output (speakers): devices and channel configurations. Sources also offer Player, which routes the built-in player into the slot.
- Mode: Stereo, Binaural, 5.1, 7.1.4, 9.1.6. (Mono and 7.1 are chosen in the Setup Wizard.)
- Channel Setting… and Channel Routing….
Channel Setting
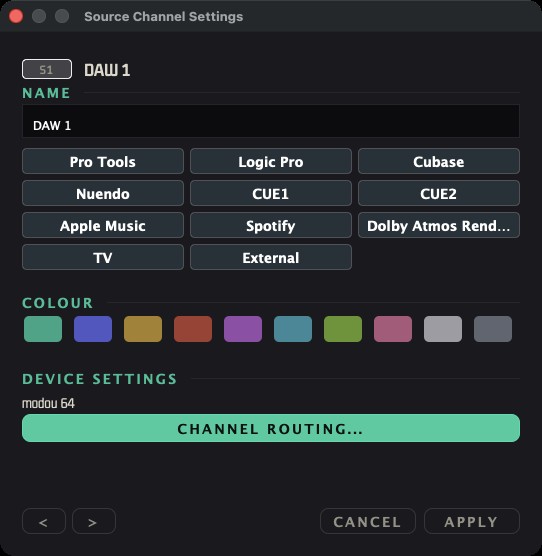
Name, colour, device settings and, for speakers, a Speaker Character Profile (A-Brand, G-Brand, B-Brand, Dolby Atmos). Picking Dolby Atmos forces the slot to 7.1.4 and sets the 3D view to the Atmos Immersive preset. Name chips: Pro Tools, Logic Pro, Cubase, Nuendo, CUE1, CUE2, Apple Music, Spotify, Dolby Atmos Renderer, TV, External (sources) and NearField, CloseField, MidField, Headphones, Consumer, TV, Stereo, Dolby Atmos (speakers). The < > buttons step to the neighbouring slot.
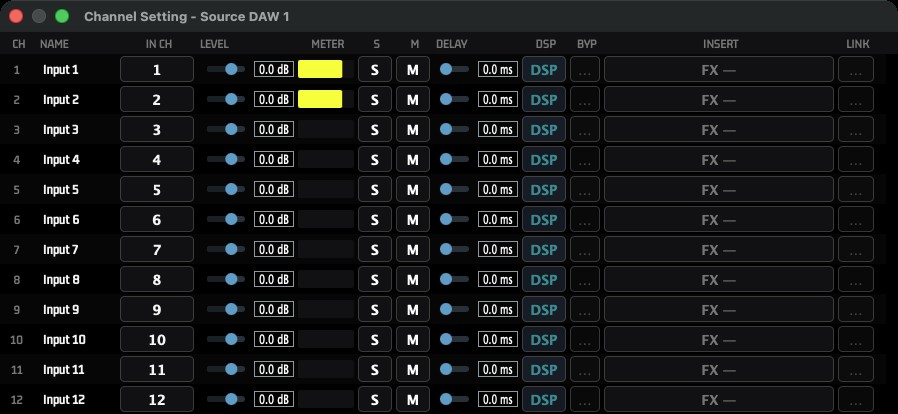
Channel Routing table
| Column | Function |
|---|---|
| CH / NAME | Row number; editable channel name (default “CH n”). |
| IN CH / OUT CH | Physical device channel or “Unassigned”. Option+click assigns the choice sequentially to the rows below. Source mapping is strictly 1:1. |
| LEVEL | Trim, −24 … +12 dB. |
| METER / S / M | Level meter, per-channel solo, per-channel mute. |
| DELAY | 0 … 500 ms. |
| DSP | Opens the Alignment panel (speaker tables only; disabled for inputs). |
| BYP / INSERT / LNK | Bypass, FX slot and link for multichannel plug-ins. Only the first 16 rows can host inserts. INSERT: click = editor (or menu if empty), right-click = replace / clear menu, double-click = clear. Plug-ins load in the background; the status line shows “Loading insert…” and, if it fails, the reason. A stereo-only plug-in placed on a single channel still works (the missing channel is silent). |
3D View
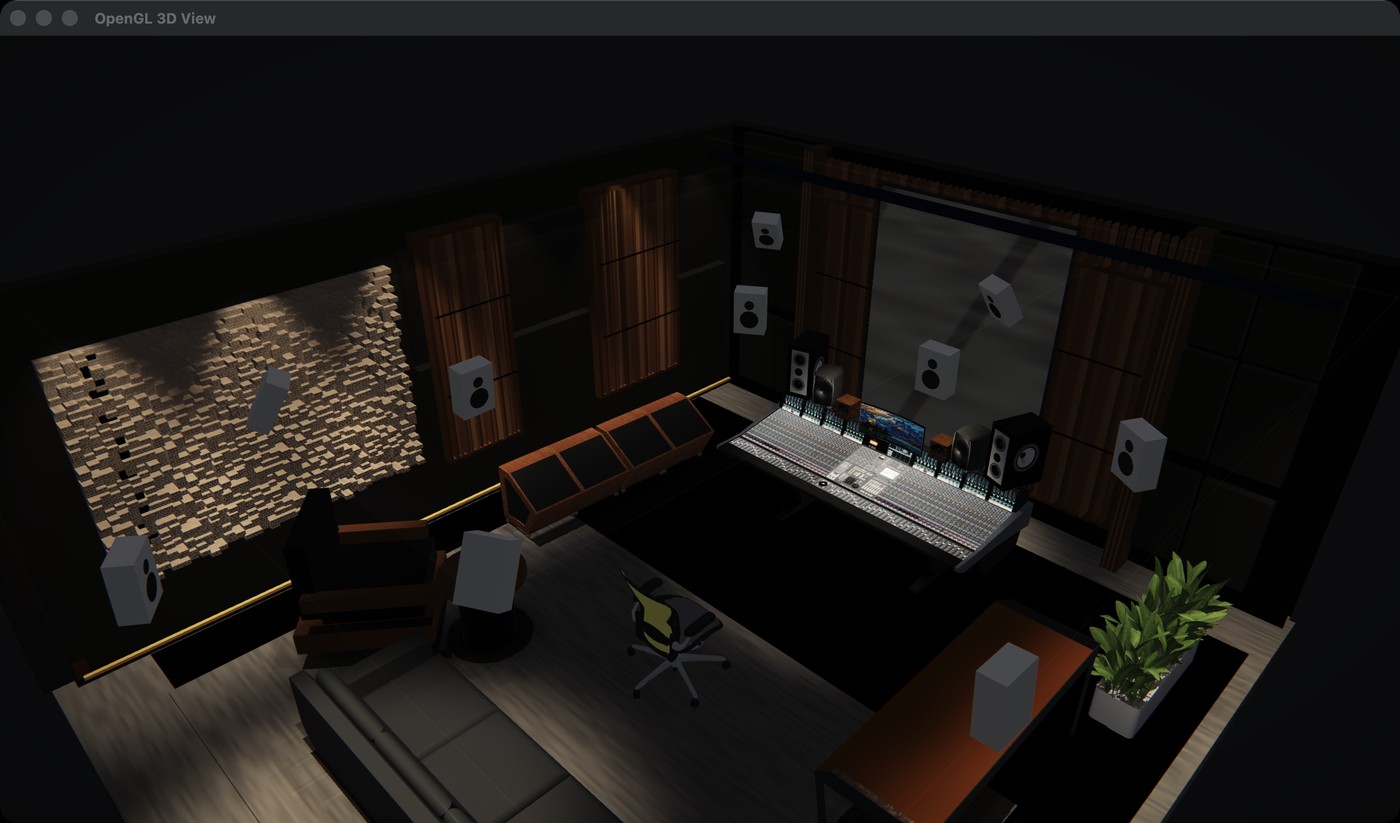
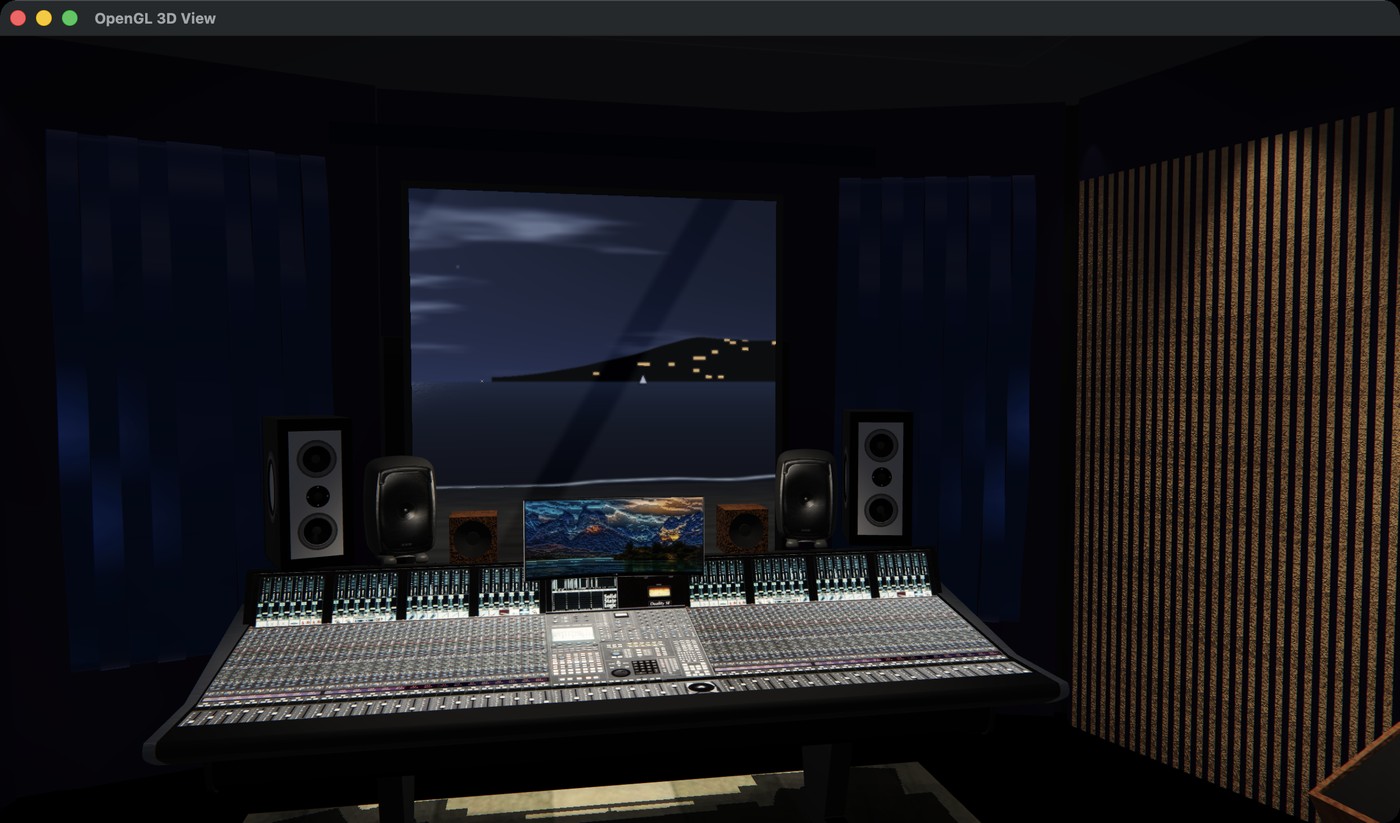
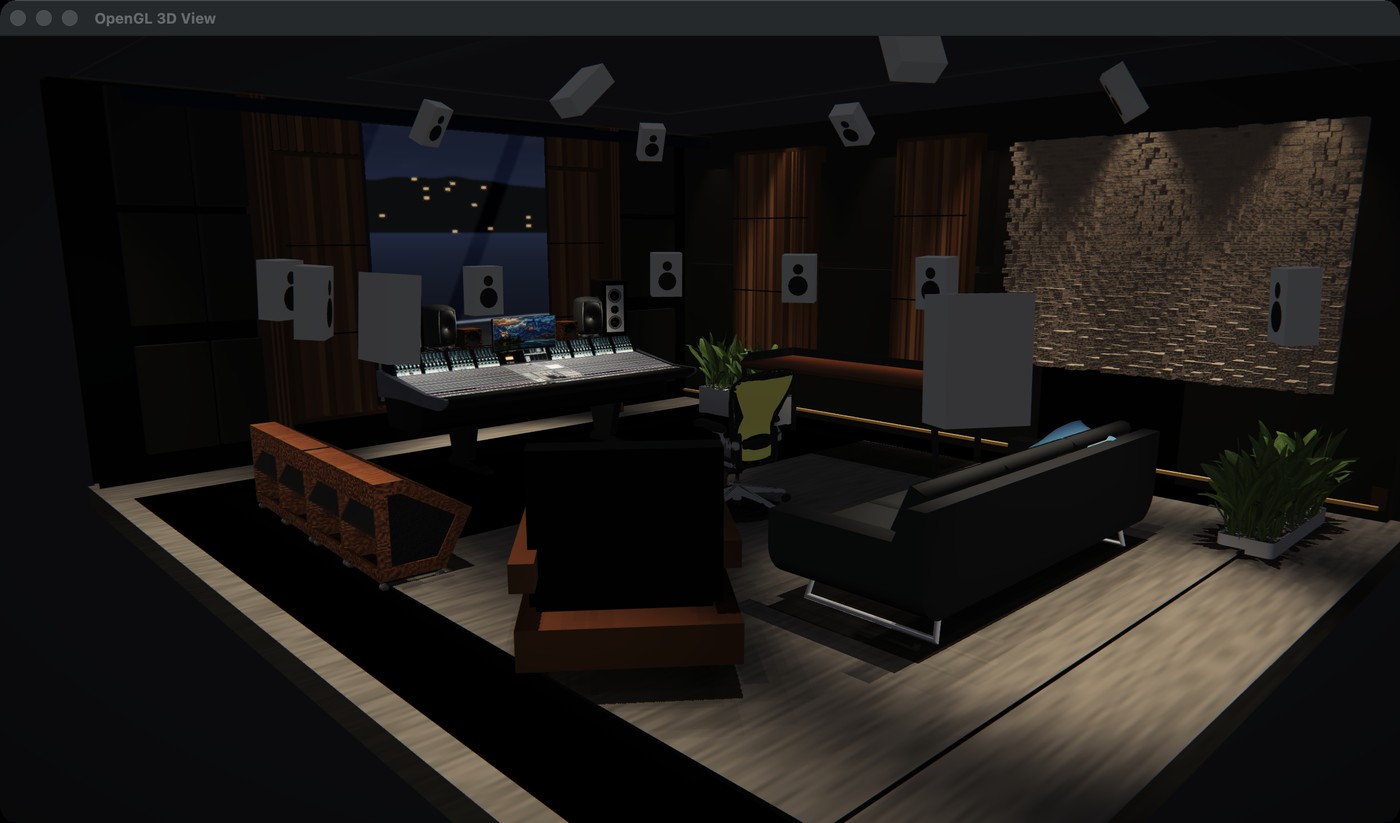
The centre view is a real-time 3D model of a control room — console, speakers, acoustic panels, curtains, carpet and the engineer's chair — drawn with textures, spot lighting and shadows. On top of it mSC draws the speaker layout, live level per speaker and the “soundball”, the visual centre of the sound field. Overlay controls sit on the view itself.
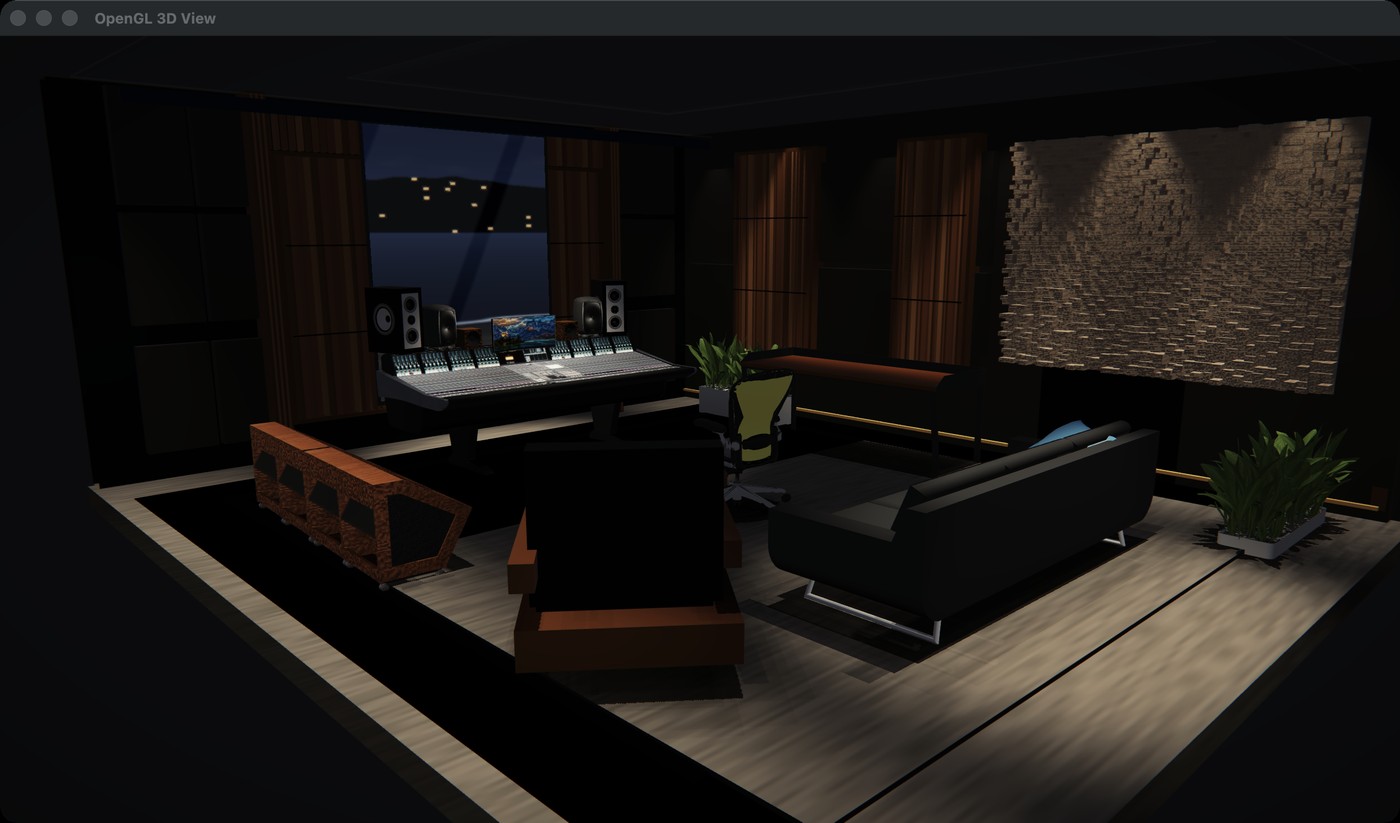
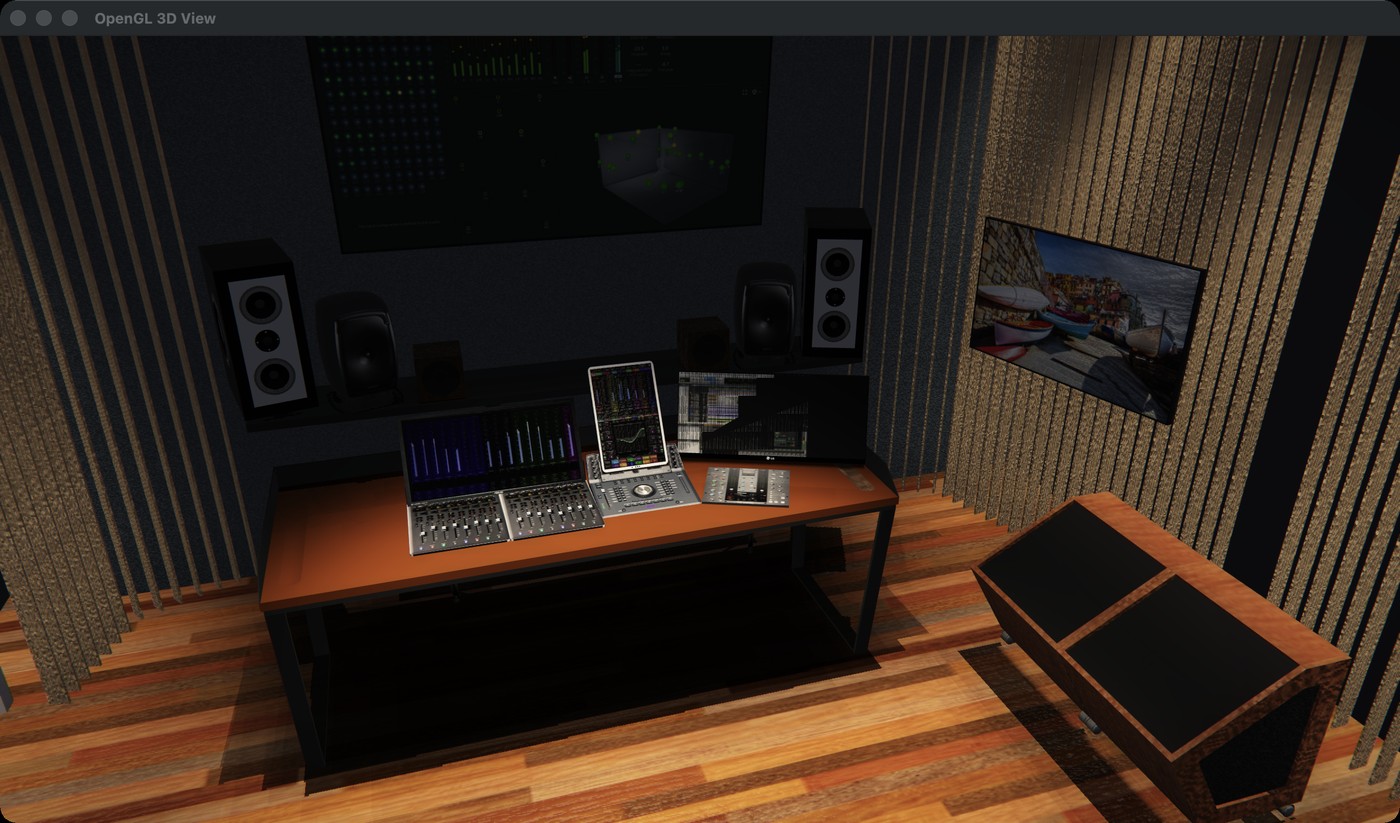
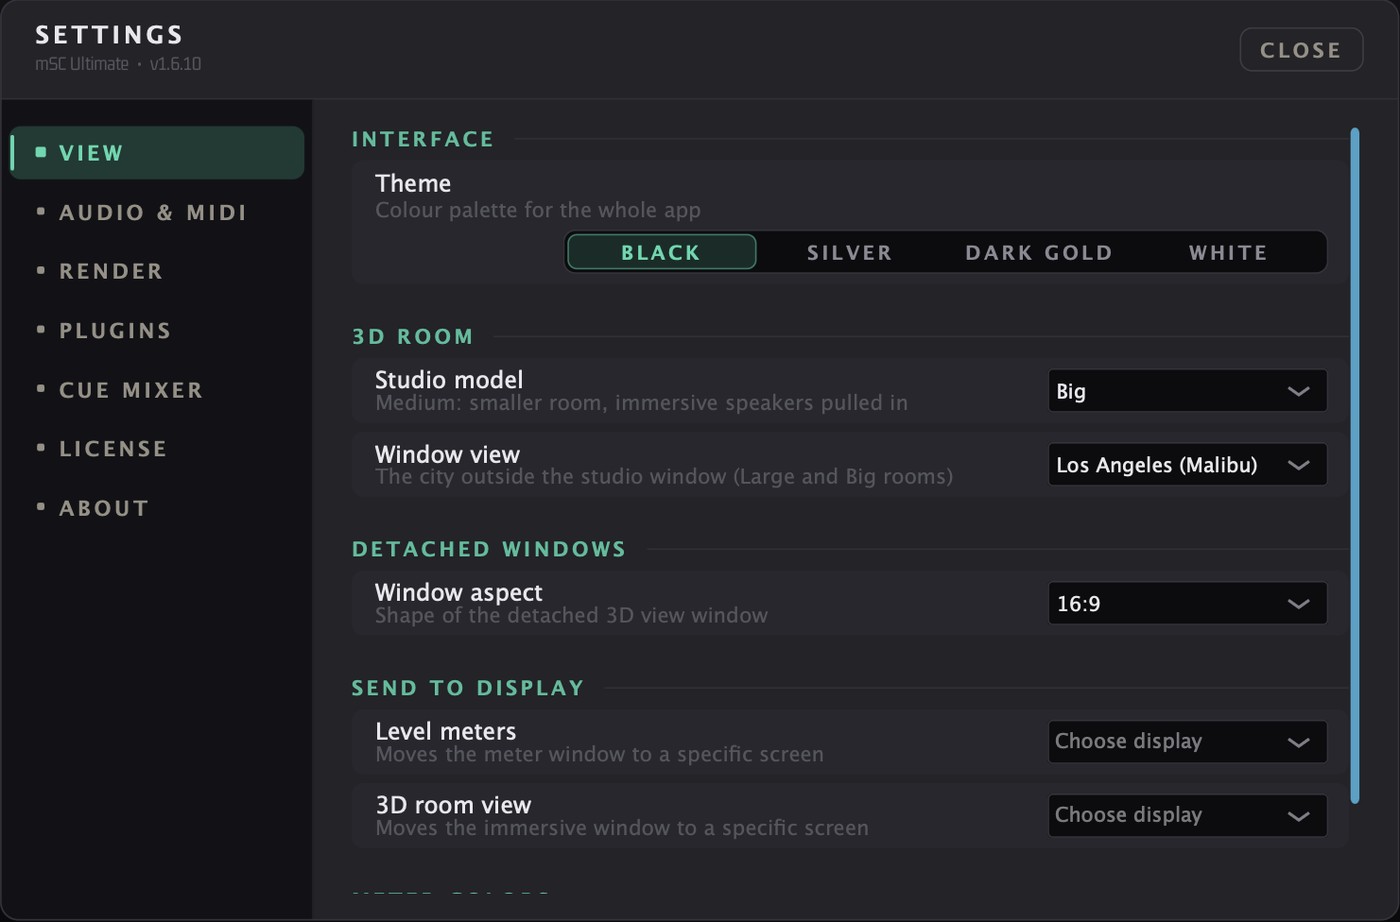
Studio model: Medium, Large or Big
Three room models are available. Choose one in the Setup Wizard (System Profile › Studio model) or later in Settings › View › 3D room › Studio model. The change applies immediately and is saved with the system.
| Medium | Large | Big | |
|---|---|---|---|
| Model file | bluesono.glb | studiofixtures.glb | BigStudio.glb |
| Room | About 5 × 6 × 3 m: wooden floor, desk with monitors and laptops, wall display, sofa. | About 6 × 6 × 3 m: large console, carpet, curtains and slat panels. | About 6.3 × 7.4 × 2.7 m: console in front of a three-section slat wall. |
| Immersive speakers | Pulled in to fit: left-right to 72 %, front-back to 80 % of the Large layout; heights unchanged. | Reference layout. | Slightly wider: left-right 88 %, front-back 115 % of the Large layout. |
| Walls in side view | The four walls and ceiling are picked out by position; the ones between the camera and the room are hidden. | Named wall objects in the model. | Picked out by position, like Medium. |
| Window | — | The front wood panel between the main speakers is a single glass window. | The centre section of the front slat wall is a single glass window. |
City view: in Large and Big the window looks out over a night city from a high floor — lit office windows, aviation lights, street lights and moving car lights, a 60-second loop. It is drawn by the graphics card from the camera position, so it shifts with the viewpoint like a real window, and the view outside is very slightly soft to give a sense of distance. It does not use a video file. Choose the scenery in Settings › View › 3D room › Window view: Dubai, Seoul (Lotte World Tower), New York, or Los Angeles (Malibu), a moonlit beach at night with clouds, the sea, distant ships and hills.
| Gesture | Action |
|---|---|
| Left-drag | Orbit (pitch limited to ±70°). |
| Right-drag, Option/Cmd + left-drag | Pan the camera. |
| Mouse wheel | Zoom (0.1 … 5.0). |
| Click a speaker | Solo it (one at a time). Option+click = mute. |
| Right-click (no drag) | SOUNDBALL TOOLS: Memory Time 0–30 s / INF, Size 0.5–3.0, Ghost Style (Outline / Sphere / Dissolve), Reactivation (Position / Pos+Freq / Disabled), Ball Size (Level / Fixed), Reset Soundballs. |
How the room is rendered
The model comes from studiofixtures.glb (about 160,000 triangles, 21 textures) and is drawn with OpenGL shaders. The original materials are kept: colours and photos come from the file's own textures, and only the reflectivity comes from its specular / glossiness values (the file's metallic / roughness fields are identical placeholders and are not used).
| Element | What you see |
|---|---|
| Materials | Wood slats and cherry wood with grain, curtains, carpet and absorber panels with surface relief, glossy speaker cones and console edges, and self-lit console screens, meters and the monitor picture. |
| Spot lights | Console and wall lighting: one warm cone light down on the console, one on the sofa at the back, and a row of six downlights along each side wall, mirrored left and right so both walls are lit equally. Each has a soft cone edge; the first eight cast shadows. |
| Shadows | Contact shadows and directional shadows under the console, speakers and chair. The chair updates its shadow whenever it turns. |
| Tone | Filmic tone mapping keeps highlights from clipping to white; the general room light is kept low so the spot pools read as light. |
LIGHT and FOCUS sliders
FOCUS (next to LIGHT) is the lens focus. 50 % focuses on the console and the chair, lower values focus nearer the camera, higher values farther away; the depth of field itself is kept shallow and gentle. The camera treatment also adds a soft bloom, film-like grading, a light vignette and fine grain.
LIGHT slider
The LIGHT slider under the view scales all of this lighting (spot, console, wall and ceiling lights, and the ambient fill). 100 % is deliberately dim — the overall light is 30 % of what it used to be — so use the spot light pools rather than a bright room as the reference. 0 % switches the room lights off.
Engineer POV (binaural)
Select Speaker 8 and turn on POV (Option+click Speaker 8, the POV button, or the slot menu's “SPATIAL MONITORING”) to put the camera at the engineer's seat. Choose the HRTF in the HUD: CIPIC, ARI (default) or ACOUSTIC EMULATION. Arrow keys move (Shift for larger steps), Esc exits, a plain drag looks around, Shift+drag moves, and double-clicking the picture-in-picture swaps views. Moving in the picture-in-picture moves the sound with you: the listening position and head direction feed the binaural renderer. Selecting another speaker slot turns POV off. The avatar can also be moved with Shift+drag, turned with Shift+Cmd+drag, and returned to the sweet spot with Option+click.
HRTF personalisation — ear-to-ear distance
Headphone binaural monitoring uses a head model. By default it uses the ARI average head (ear-to-ear 164 mm). In Settings › Render › HRTF personalisation › Ear-to-ear distance (mm) you can enter your own distance (120 – 220 mm) so that mSC uses it as a custom HRTF built on the ARI model. A virtual speaker 30° to the right still stays at 30°, but the difference in arrival time between your two ears (ITD) and the head shadow are adjusted to your head size, so the left–right placement of the virtual speakers is more accurate for you. It replaces the head size of every HRTF mode (CIPIC, ARI, ACOUSTIC EMULATION) in all headphone binaural monitoring — Binaural on a speaker slot, Engineer POV and the binaural CUE mixes — and head tracking works the same way with it. If you do not set it, mSC uses the standard head size of the selected HRTF (ARI 164 mm, CIPIC 175 mm). Leave the field empty (or press Use ARI default) to return to the standard size. The value is saved with the app settings.
| How to get the distance | What to do |
|---|---|
| Quick estimate (easy) | It is hard to measure your real head width, so use your hand as in the picture below: hold your spread hand across your face at ear height with the tip of your index finger at one ear; the base of your thumb then lands near the other ear. Measure that length — from the tip of the index finger to the base of the thumb — with a ruler and enter it in mm. On average it is close to the ear-to-ear distance, within the usual error range. This is only a statistical shortcut, not your own measurement — for an accurate personal HRTF, measure your actual ear-to-ear distance (next row) and use that value. |
| More accurate | Measure the straight-line distance between the centres of the two ear-canal openings — not the length around the back of the head. For example, hold a ruler horizontally in front of your face beside your ears and read the distance between the ear openings (use a mirror or ask someone to help), or use calipers. For an accurate personal HRTF, always prefer this real measurement over the hand estimate: entering it gives more accurate HRTF monitoring. |

What this does and does not change
The distance sets the size of the head model, so the left–right time difference and the head shadow change together. The head model is parametric and has no ear (pinna) shape, so height and front–back cues do not depend on this value. If you have reference speakers, switch between them and the headphones and adjust the value by a few millimetres until the left–right placement matches.
Analyser & Loudness
The analyser shows 31 ISO 1/3-octave bands (20 Hz – 20 kHz, 2048-point FFT) of the selected source, with a scrolling spectrogram underneath and a PEAK frequency readout. To its left are four vertical loudness meters.
| Overlay | Meaning |
|---|---|
| MEASURE | Orange outline of the measurement-microphone trace. |
| REFERENCE | Blue. Click toggles; a 0.5 s hold opens the popup: TRACK → Select… (an audio file, analysed in the background), GENRE TARGET (Pop, Rock, Hip-Hop, R&B, EDM, Electronic, Acoustic, Jazz, Classical, Metal, Country), None, Close. |
| HOUSE | Mint. Click toggles; a hold opens HOUSE CURVE: Flat, “AES-like”, “Harman-like”, Custom… (up to 24 points), None. The two named curves are curated approximations, not measured data. |
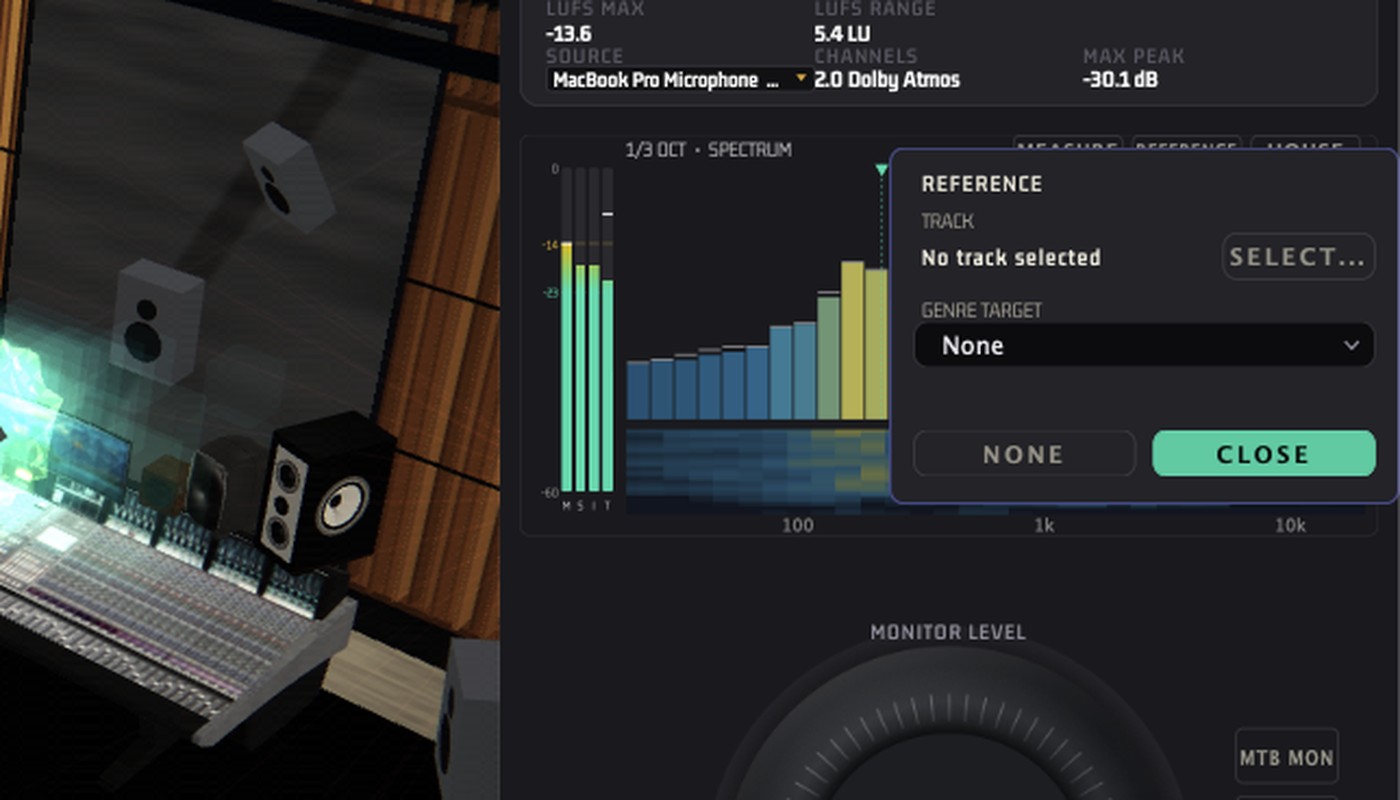
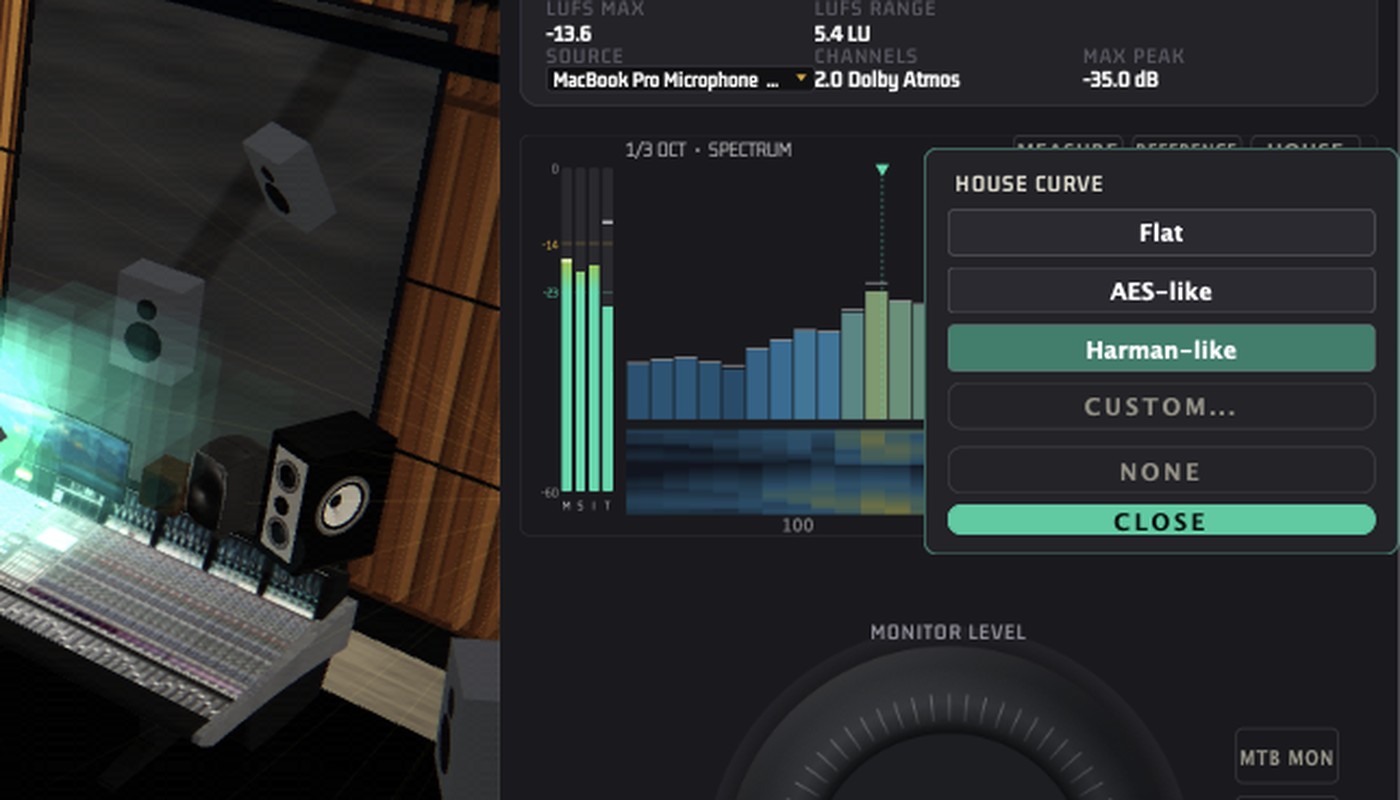
Click a channel meter to solo it; Option+click to mute it. The level meters can be detached into their own window (header icon), whose TOPOLOGY overlay repeats the loudness values.
Media & Player
- MEDIA shows artwork, title, artist, source, position/duration, format details and a “Dolby Atmos” badge, with previous / play-pause / next. It reads Apple Music through macOS automation and a browser bridge for web players. The first time, macOS asks to let mSC control Music; if you decline, the panel shows nothing and retries after 60 s.
- PLAYER plays files straight into a source slot (up to 16 discrete channels; WAV, BWF, AIFF, FLAC, Ogg and, via CoreAudio, MP3/AAC). OPEN, PLAY/PAUSE, STOP, LOOP, ADM BWF (shows ADM metadata, enabled for ADM files) and BIN (binaural monitoring). Movies (mp4, mov, m4v, mkv, avi) open in a picture-in-picture view. Click the waveform to seek, drag to set a loop region, double-click to clear it.
Calibration & Alignment
Speaker Setup (Settings › Audio & MIDI)
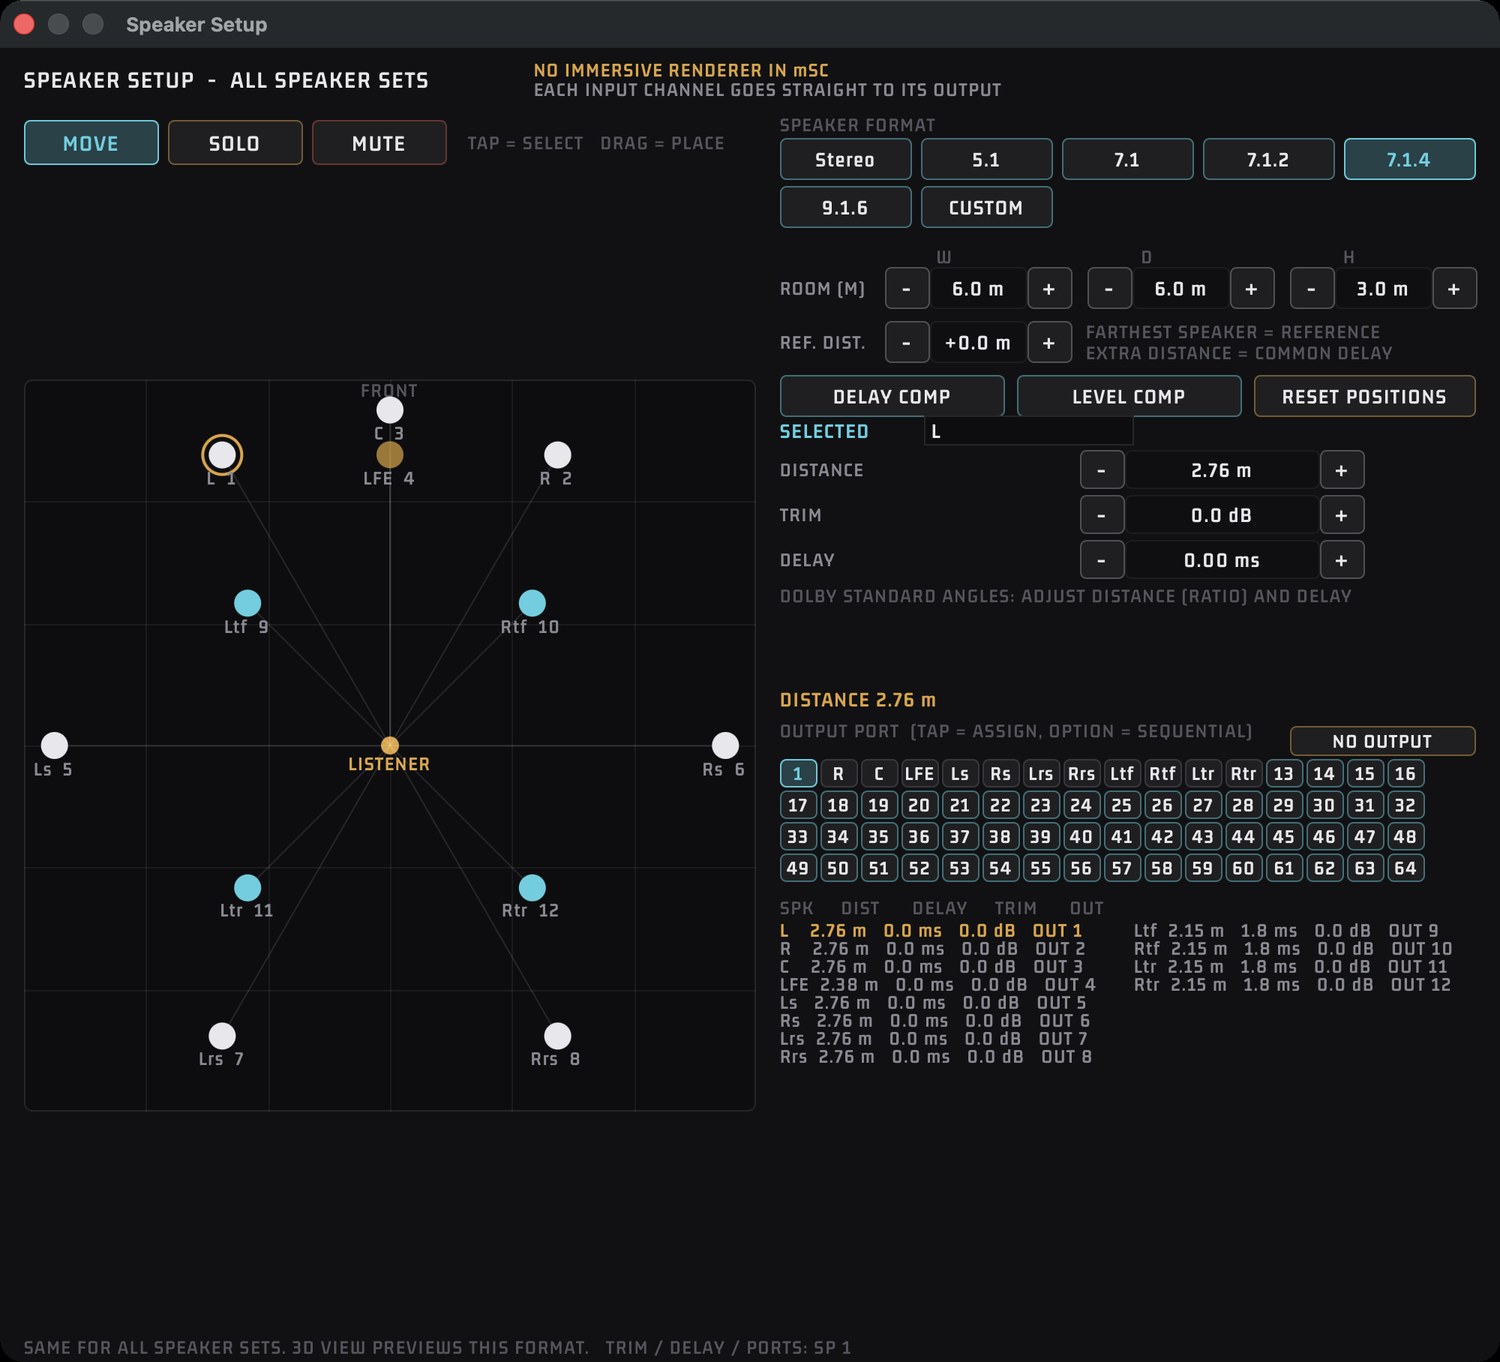
Speaker Setup describes where the speakers of each format are installed. It is shared by the whole mSC: there is one setup per format (5.1, 7.1, 7.1.2, 7.1.4, 9.1.6 and, in Ultimate, CUSTOM), not one per speaker set, so every speaker set that uses 7.1.4 shows the same 7.1.4 layout. Choose the format of an output in the speaker slot's Mode menu; choose which format's setup you are looking at with the format buttons in the Speaker Setup window, and the 3D view previews it while the window is open. mSC has no renderer for the immersive formats: it monitors multichannel signals rendered outside (a DAW or renderer), and each input channel goes straight to the output you assign, with no up- or downmix.
The source bus and the output speaker bus have the same channel layout: a 7.1.4 source on a 7.1.4 speaker set goes through channel for channel, and if the speaker set is stereo, only the first two channels (L and R) of the source are passed on, in order. Open Settings › Audio & MIDI › Speaker Setup and press Speaker Setup...: it opens in its own window. Every speaker faces the centre point (the listening position) in the 3D view.
Guided Calibration (Settings › Audio & MIDI)
A 3D-HUD wizard for delay and level alignment. Pick a layout (Stereo S1/S2/S3, Immersive 7.1.4 or 9.1.6) and press START CALIBRATION: each speaker gets two passes of a 1.8 s sweep and two impulse passes. Then compare ALIGNED / BYPASS, open DSP, REDO, and SAVE & APPLY (turns alignment on; the button then reads “SAVED (Active)”) or EXIT.
Alignment panel (DSP button)
Settings (page by page)
Open Settings with the gear or File › Settings…. The left rail has seven pages.
| Page | Settings |
|---|---|
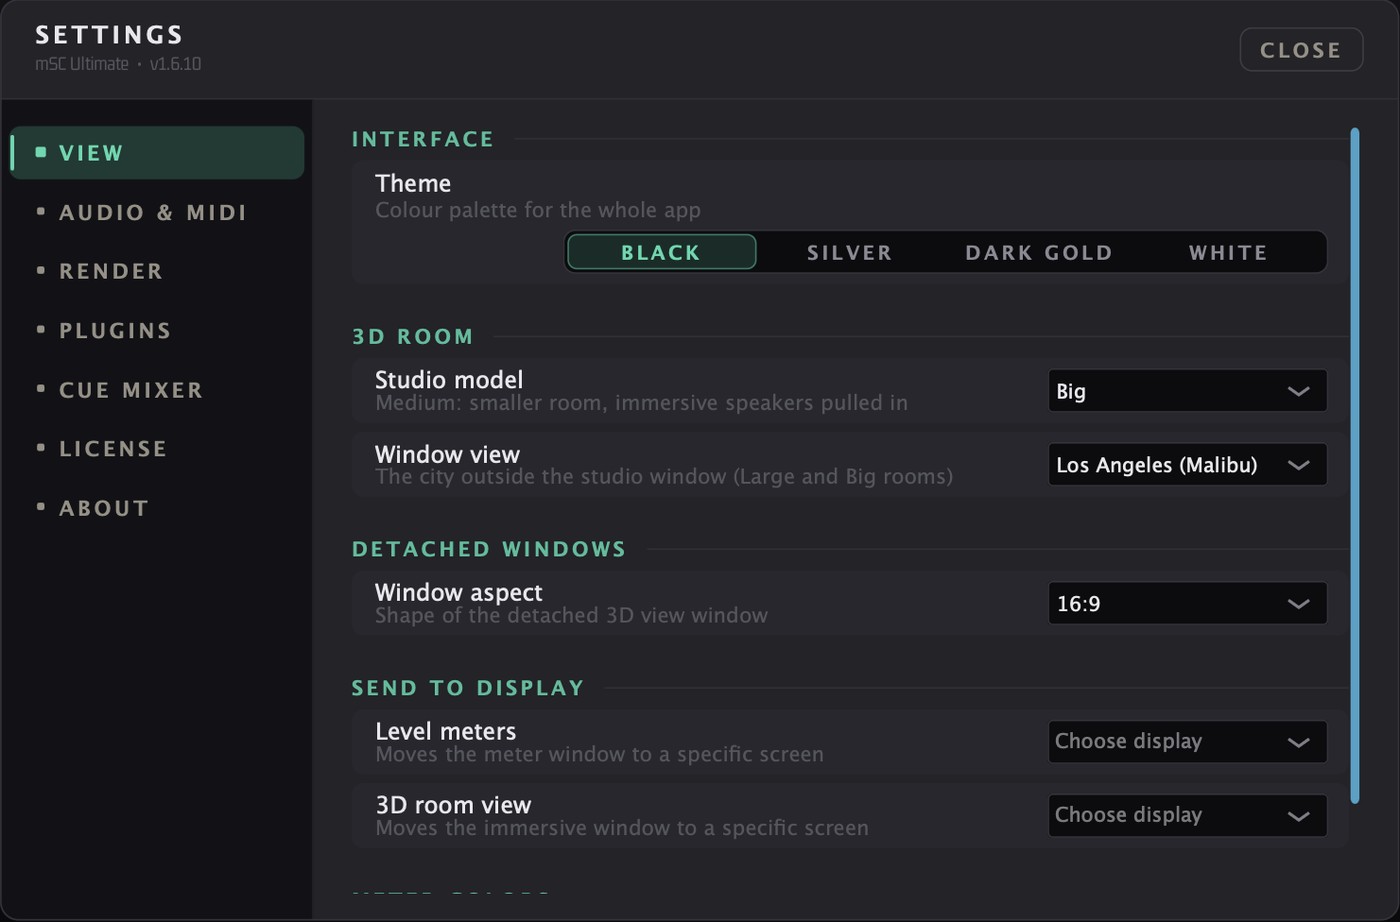
| View | Theme (Black default / Silver / Dark Gold / White) · Studio model (Medium / Large / Big) · Window view (Dubai / Seoul (Lotte World Tower) / New York / Los Angeles (Malibu)) · Window aspect for detached windows (4:3 / 16:9 default / 21:9) · Send to display (Level meters, 3D room view) · Meter colors › Level meter color (Blue / Green / Red / Purple). |
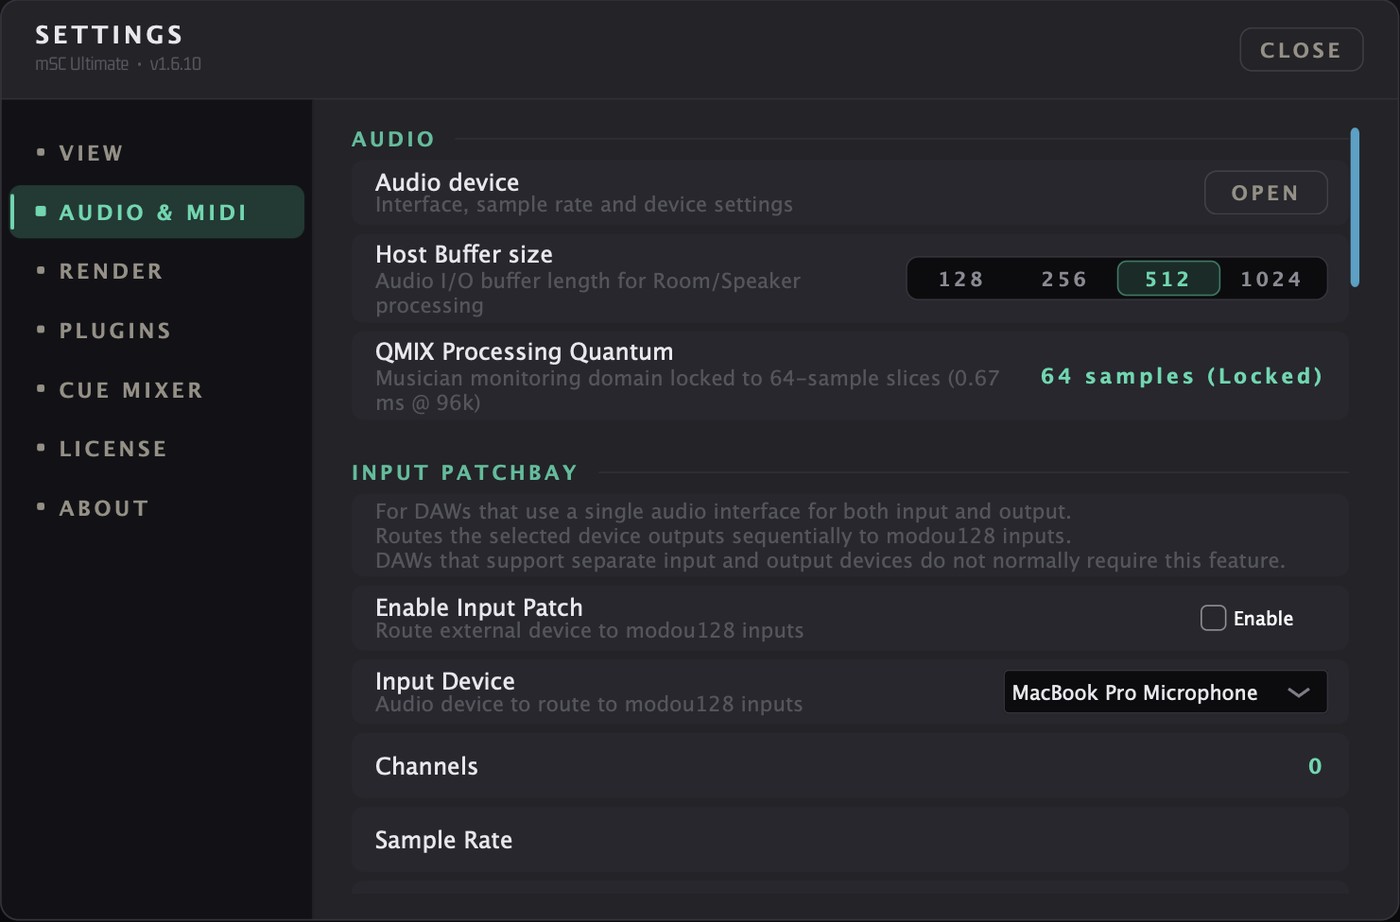
| Audio & MIDI | Audio device [Open] · Host Buffer size 128 / 256 / 512 (default) / 1024 · QMIX Processing Quantum (read-only, 64 samples, locked) · Input Patchbay · Talkback · EUCON Monitor Remote · MIDI controller / MIDI learn · Spatial Upmix Engine (Cinema / Spatial / Height) · Guided Calibration · Startup Monitor Level · Remote control · Network Calibration. |
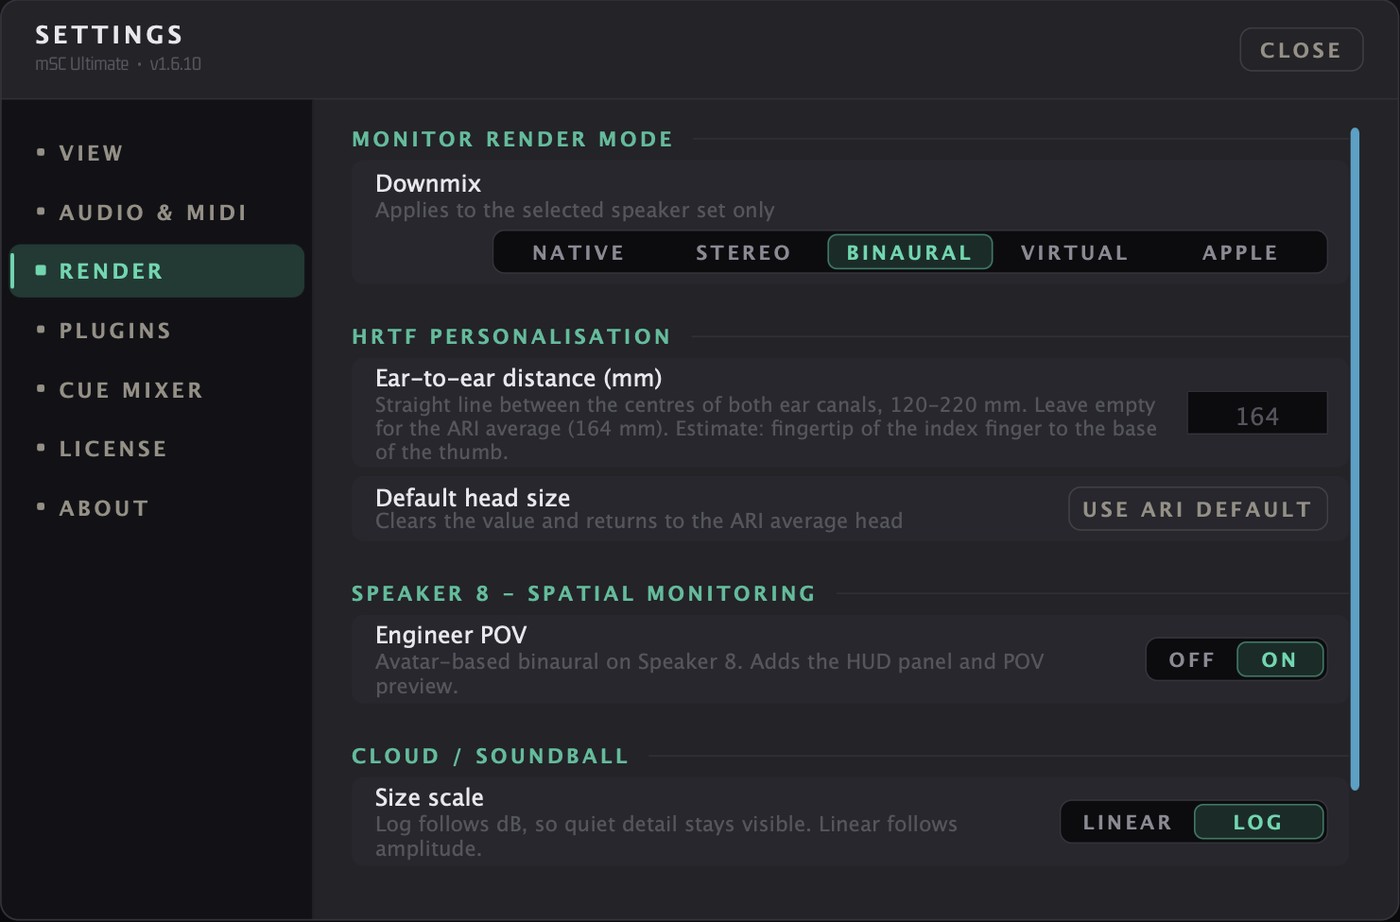
| Render | Downmix (Native / Stereo / Binaural / Virtual / Apple) for the selected speaker set · HRTF personalisation: Ear-to-ear distance 120 – 220 mm (empty = ARI average 164 mm) · Engineer POV Off / On (default On) · Soundball size scale Linear / Log (default Log) · Crossfade time 10 – 2000 ms (default 500). |
| Plugins | Plugin scan [Scan] (re-reads VST3 and Audio Unit folders) · Plugin library [Open]. A scan also runs in the background at each launch. |
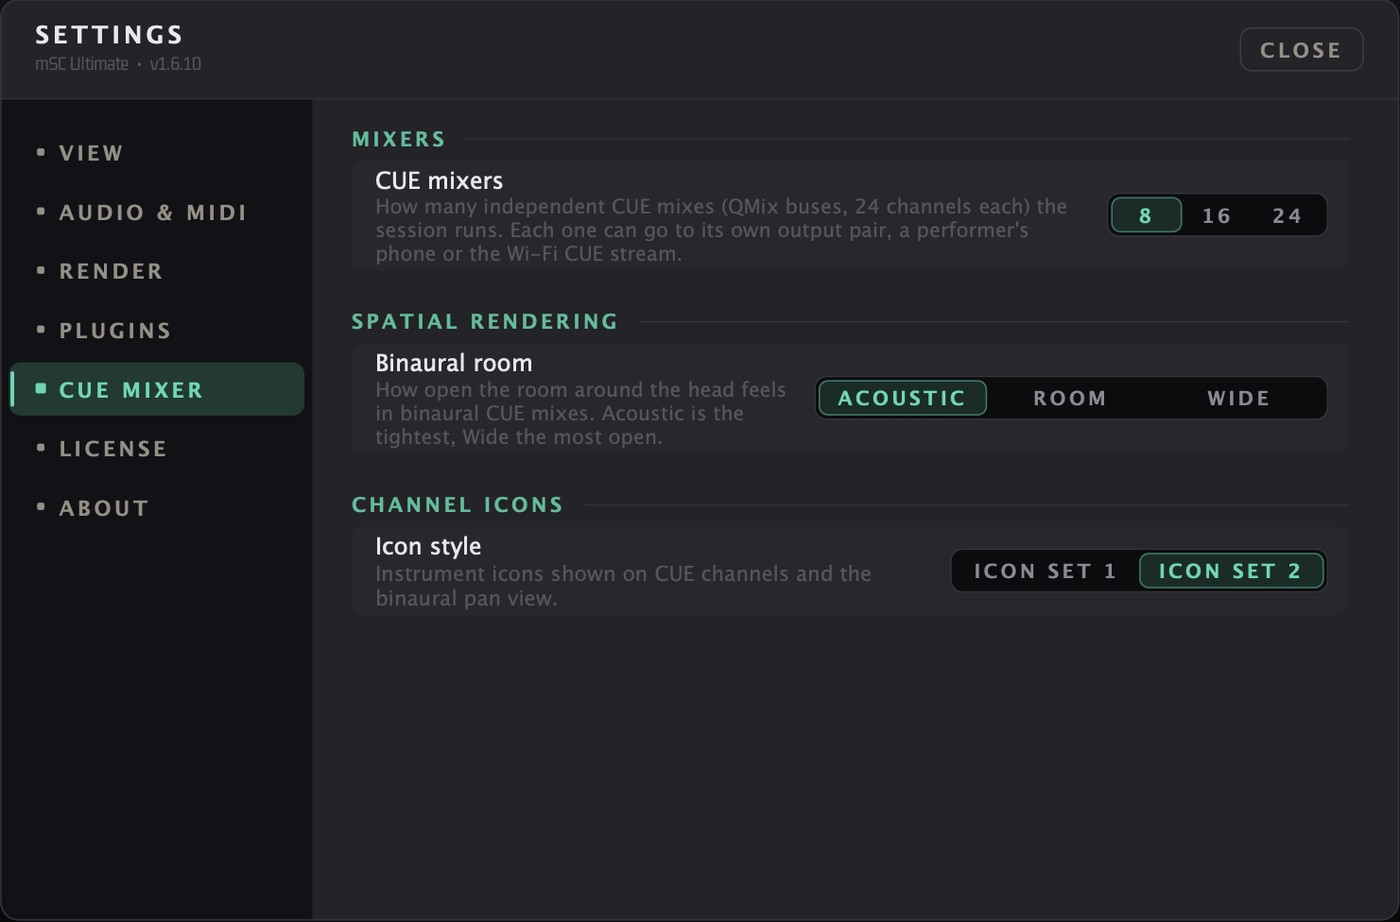
| CUE Mixer | CUE mixers 8 / 16 (default) / 24 / 48 (Studio: 8 / 16) · Binaural room Acoustic / Room / Wide · Icon style (Set 1 / Set 2, default Set 2). |
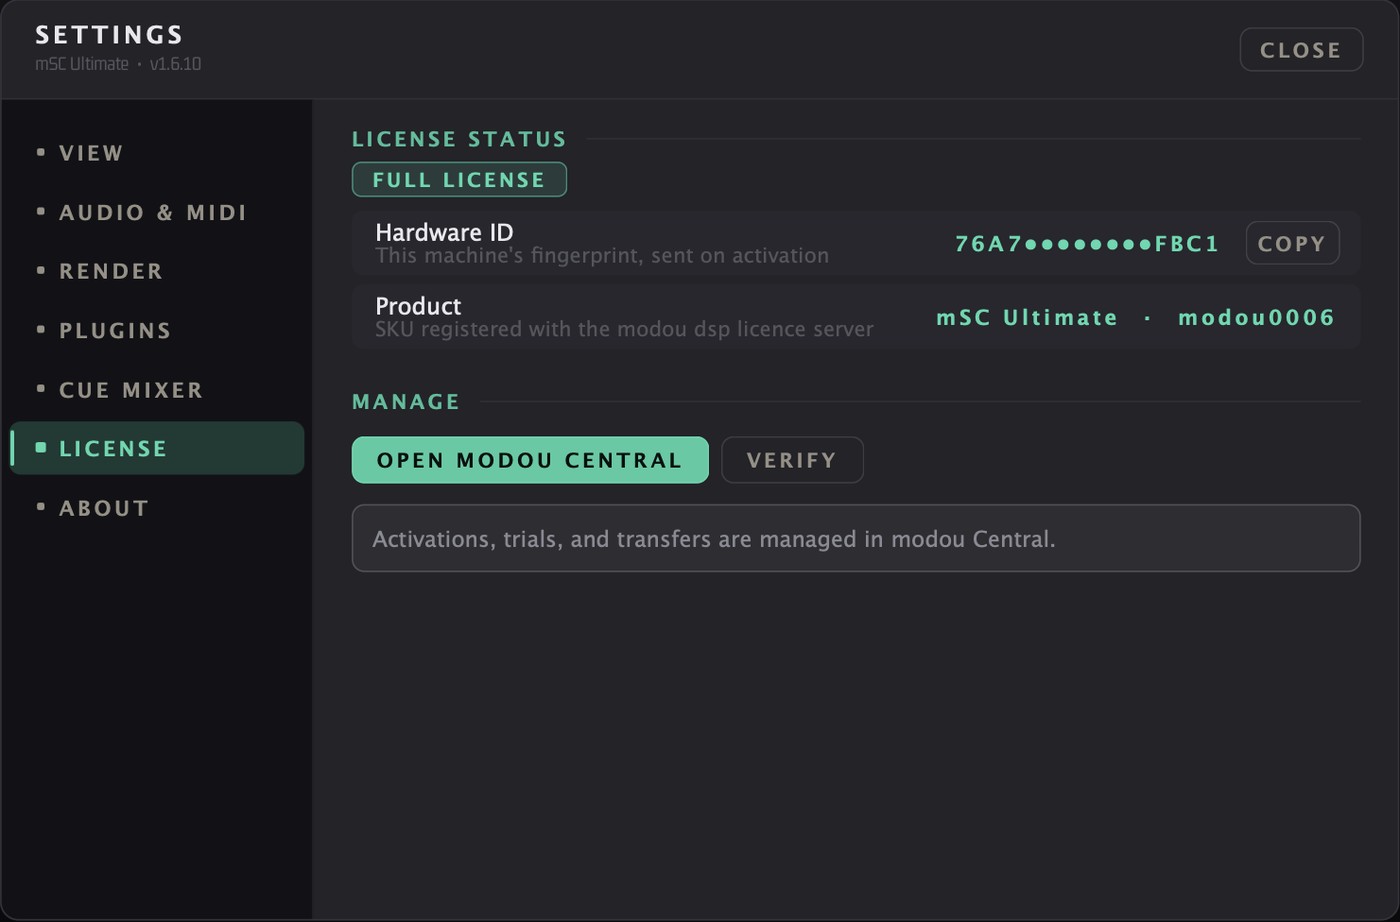
| License | Status badge FULL LICENSE / TRIAL / NO LICENSE, Hardware ID (COPY), product, OPEN MODOU CENTRAL and VERIFY (re-reads the local licence file only). Activation, trials and transfers are managed in modou Central, not in mSC. |
| About | Product identity, credits, legal, EULA / website / support links. |
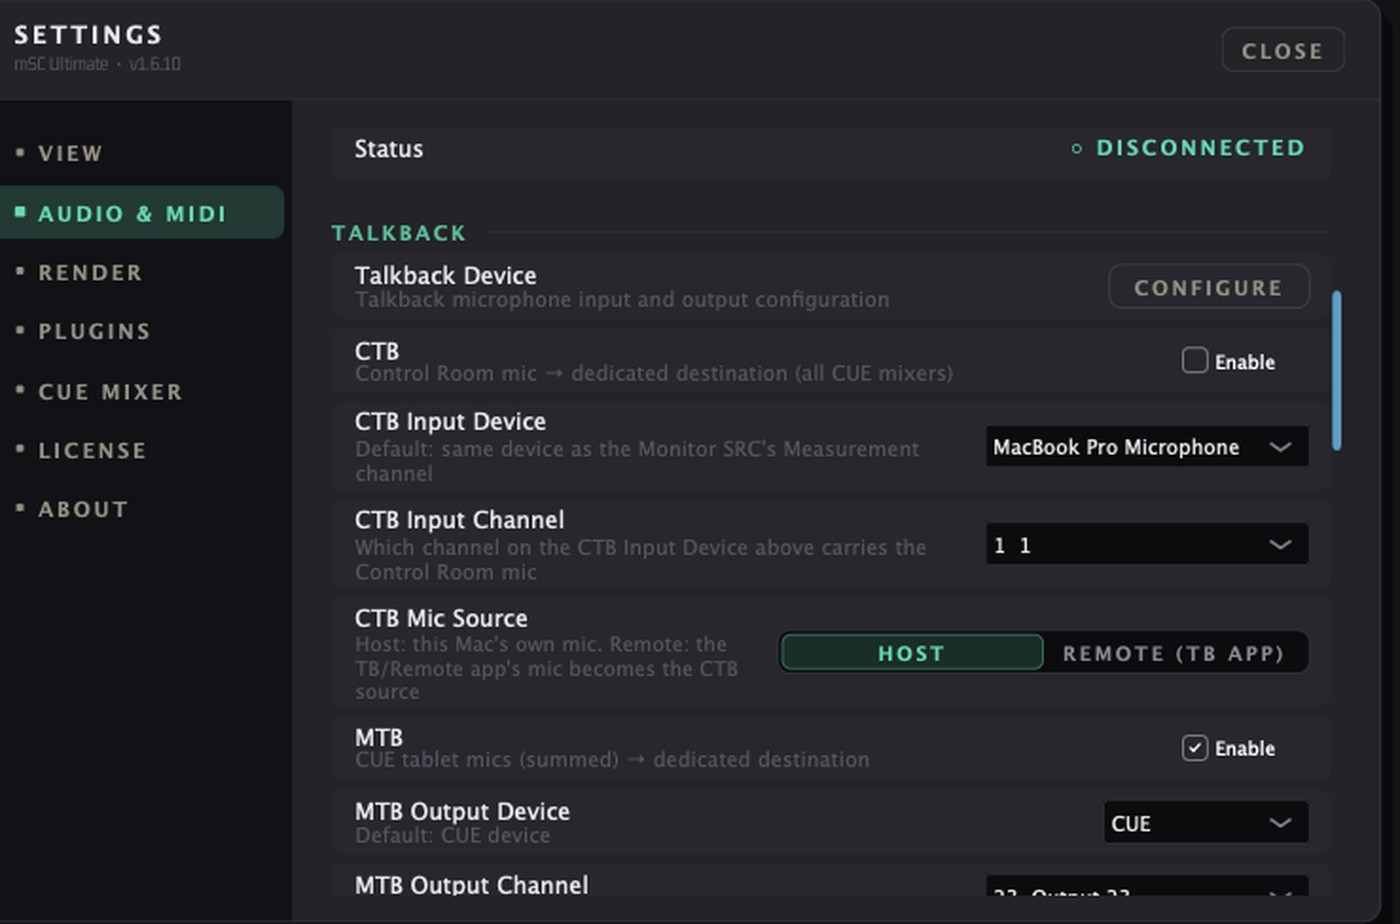
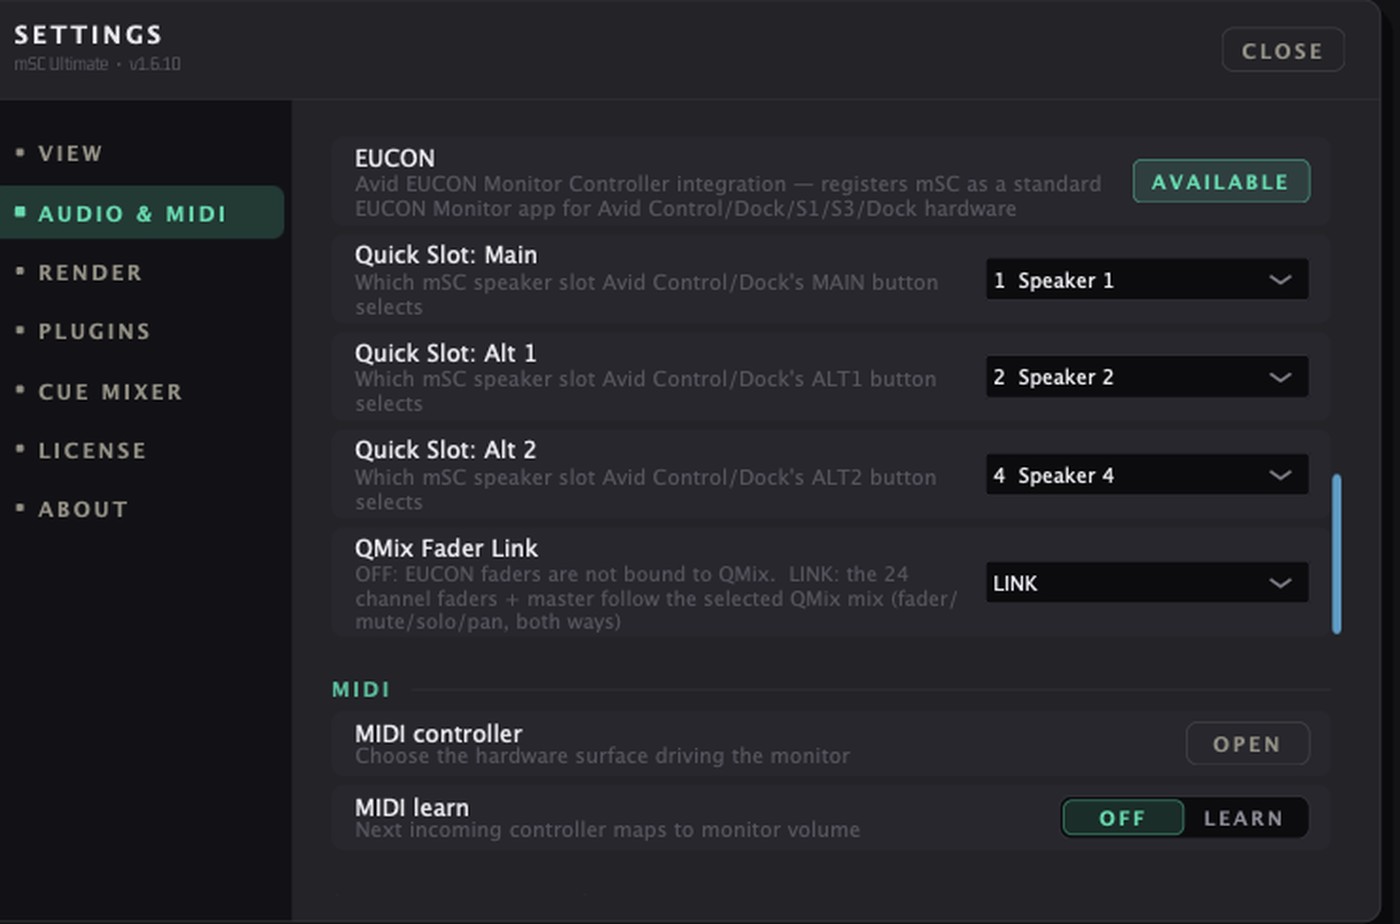
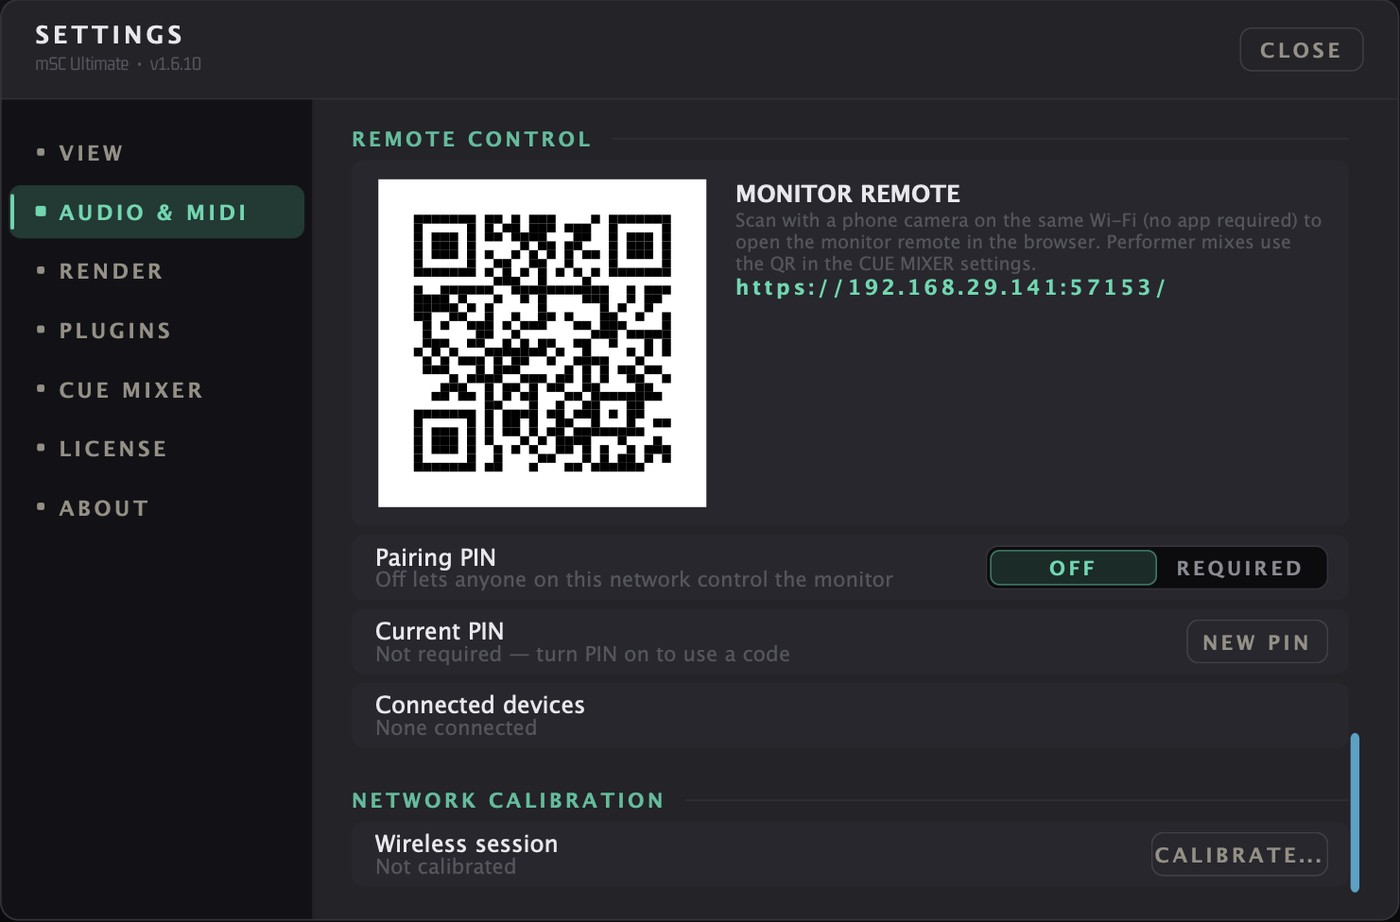
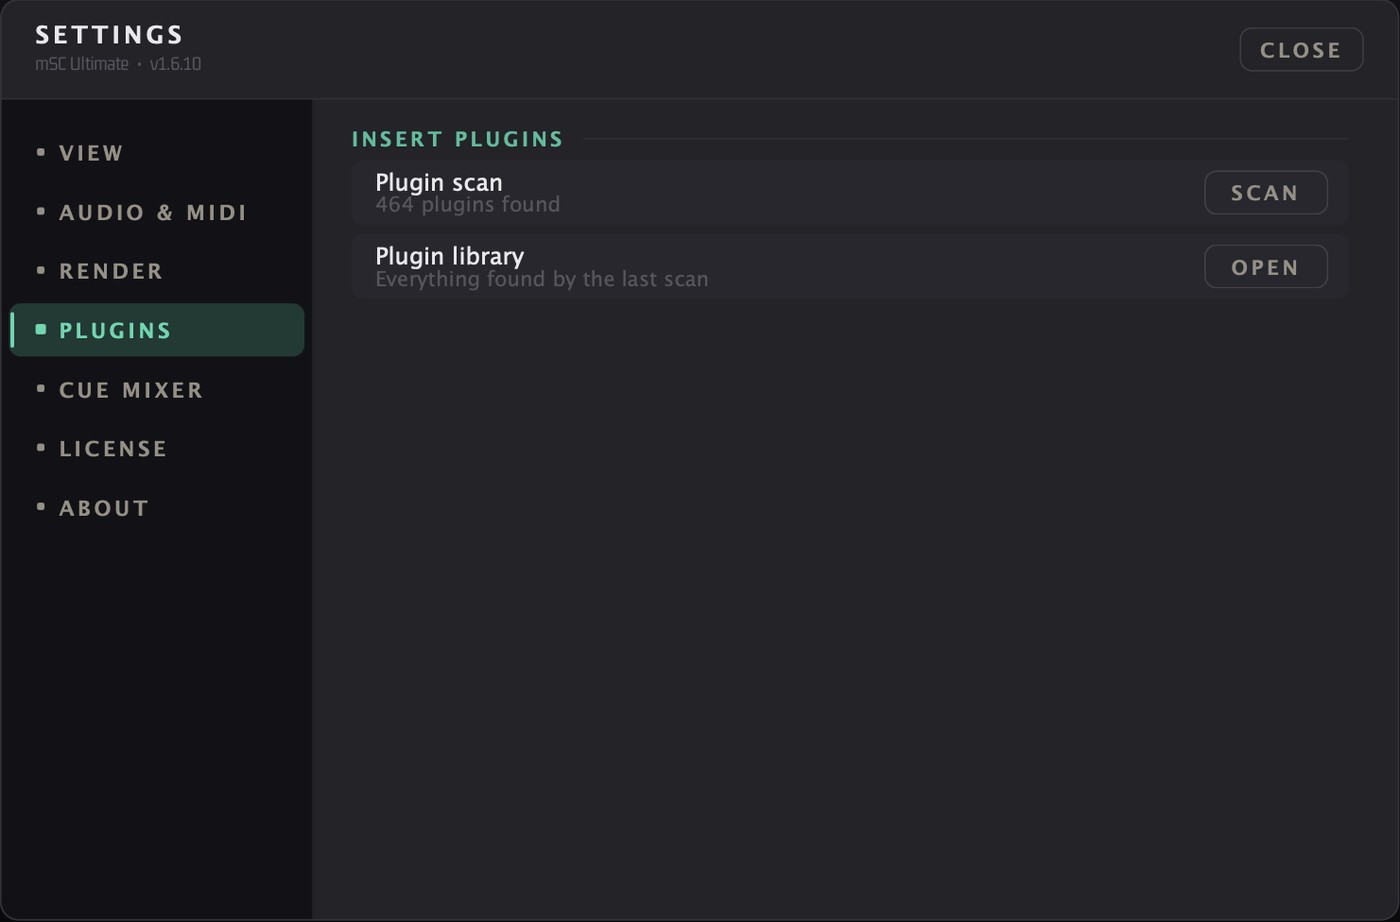
Talkback settings
Input Patchbay
DAW input connection is handled by the bundled modouPatchBay (see Part 3 — DAW System); the DAW's audio interface is modou128, and this mSC window is for monitoring. This setting is only a convenience for DAWs that use a single audio interface for both input and output: enable it and choose the Input Device, and the device's outputs are routed sequentially (up to 64 channels) into the modou128 virtual inputs. Channels, Sample Rate and Status are shown read-only.
MIDI & MIDI Learn
Choose one MIDI input in Settings › Audio & MIDI › MIDI controller [Open]. The app remembers it by identifier, then by name, and silently skips it if the device is absent (the setting is kept). Note On and Control Change messages are handled.
- Set MIDI learn to Learn. A dark overlay covers the shell, every learnable control gets an amber outline and a badge showing its binding (“CC 12 · Ch 1”, “Note 36 · Ch 1”). The header shows the instruction and an EXIT MIDI LEARN pill appears in the top bar.
- Click a control. The header reads “name (not assigned) – waiting for a MIDI control…” (badge shows “…”).
- Move or press the hardware control. The header confirms “name ← CC n · Ch m”. Clicking empty space cancels.
- Right-click a control for a popup with the current mapping (or “No mapping” / “● Listening…”) and Learn / Reset.
- Press EXIT MIDI LEARN (or set the switch to Off) to finish.
Learnable: MONO, LR FLIP, DIM, CTB, MTB MON, HP, CUE SEL, Monitor Level, Source 1–8, Speaker 1–8. Buttons accept a Note (each press toggles) or a CC (64 and above = on); Monitor Level accepts CC only (0 – 127 maps to −60 … 0 dB, near 0 = silence); source/speaker slots fire on the rising edge. One control has one binding and one MIDI number drives one control; a new mapping replaces the old. All bindings are saved automatically.
Old description in Settings
>The MIDI learn row still reads “Next incoming controller maps to monitor volume”. That text is outdated — use the per-control flow above.
EUCON (Avid)
Monitor section only
>mSC uses EUCON for the Monitor section only. The CUE mixer channel strips and faders are not used: the 24 + 1 strip bridge is not created, so no faders are registered with EuControl. Settings › Audio & MIDI › EUCON Monitor Remote shows the connection badge and the Quick Slot options (macOS only; the EUCON SDK is needed at build time). The QMix Fader Link option has no effect.
- Monitor: the native Monitor section controls level (−80 … +12 dB), mute (CUT), DIM, mono, eight source soft keys, Main / Alt 1 / Alt 2 speaker quick slots (assignable to any of the 8 speaker slots in Settings), per-channel speaker select and solo, CTB talk and mic level, and an MTB MON key.
- CUE select: the Monitor section's CUE soft keys pick the CUE mix to listen to. Mixing itself (levels, pan, mute, solo) is done in QMix, not on EUCON faders.
QMix Overview
QMix is mSC's personal monitor mixer. Each performer gets a mix of their own — up to 24 or 48 channels grouped into 8 or 16 DCAs — heard in headphones or a wedge, and adjustable from the engineer's CUE MIXER window or from the performer's own phone or tablet browser.
| Item | Value |
|---|---|
| Channels per mix | 24 / 48 (default 24) |
| DCA groups per mix | 8 / 16 (default 8) |
| Active mixes | 8 / 16 / 24 / 48 (default 16) |
| Cues (snapshots) | up to 64, shared by all mixes |
| Fader range | −90 dB (OFF) … +10 dB |
| Audio format of the CUE device | 48 kHz; buffer quantum 64 samples (locked) |
| Output modes | BIN (binaural), STEREO, MONO |
Where the mix count is set
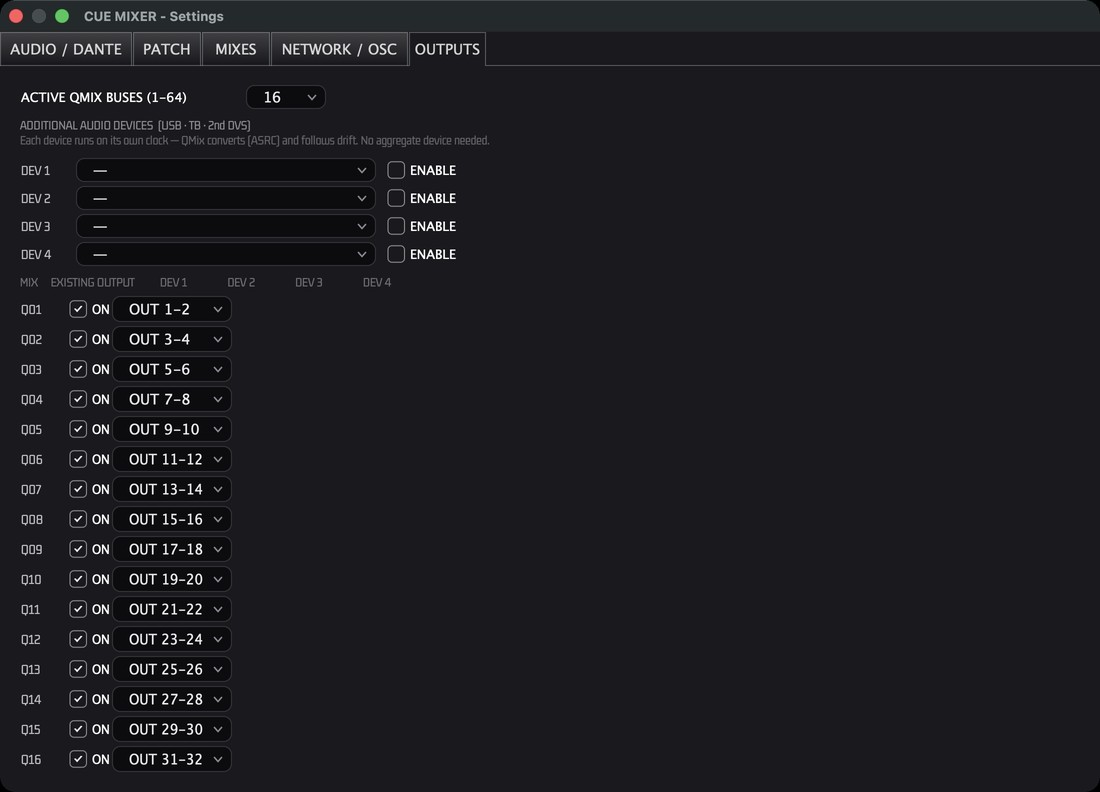
>Settings › CUE Mixer › Mixers (8 / 16 / 24 / 48; Studio 8 / 16), the Setup Wizard's QMix step, or the CUE MIXER window's Settings › OUTPUTS tab. Any other number is rounded up to the next of 8, 16, 24 or 48. Channels per mixer (24 / 48; Studio 24 / 32) and DCAs per mixer (8 / 16) are chosen in the same places (Studio: mixers 8 or 16 with 24 or 32 channels, and 8 DCAs fixed; Ultimate: 24 or 48 channels and 8 or 16 DCAs). Raising a count fills the new channels and DCAs with defaults; lowering the DCA count leaves channels of a removed DCA unassigned.
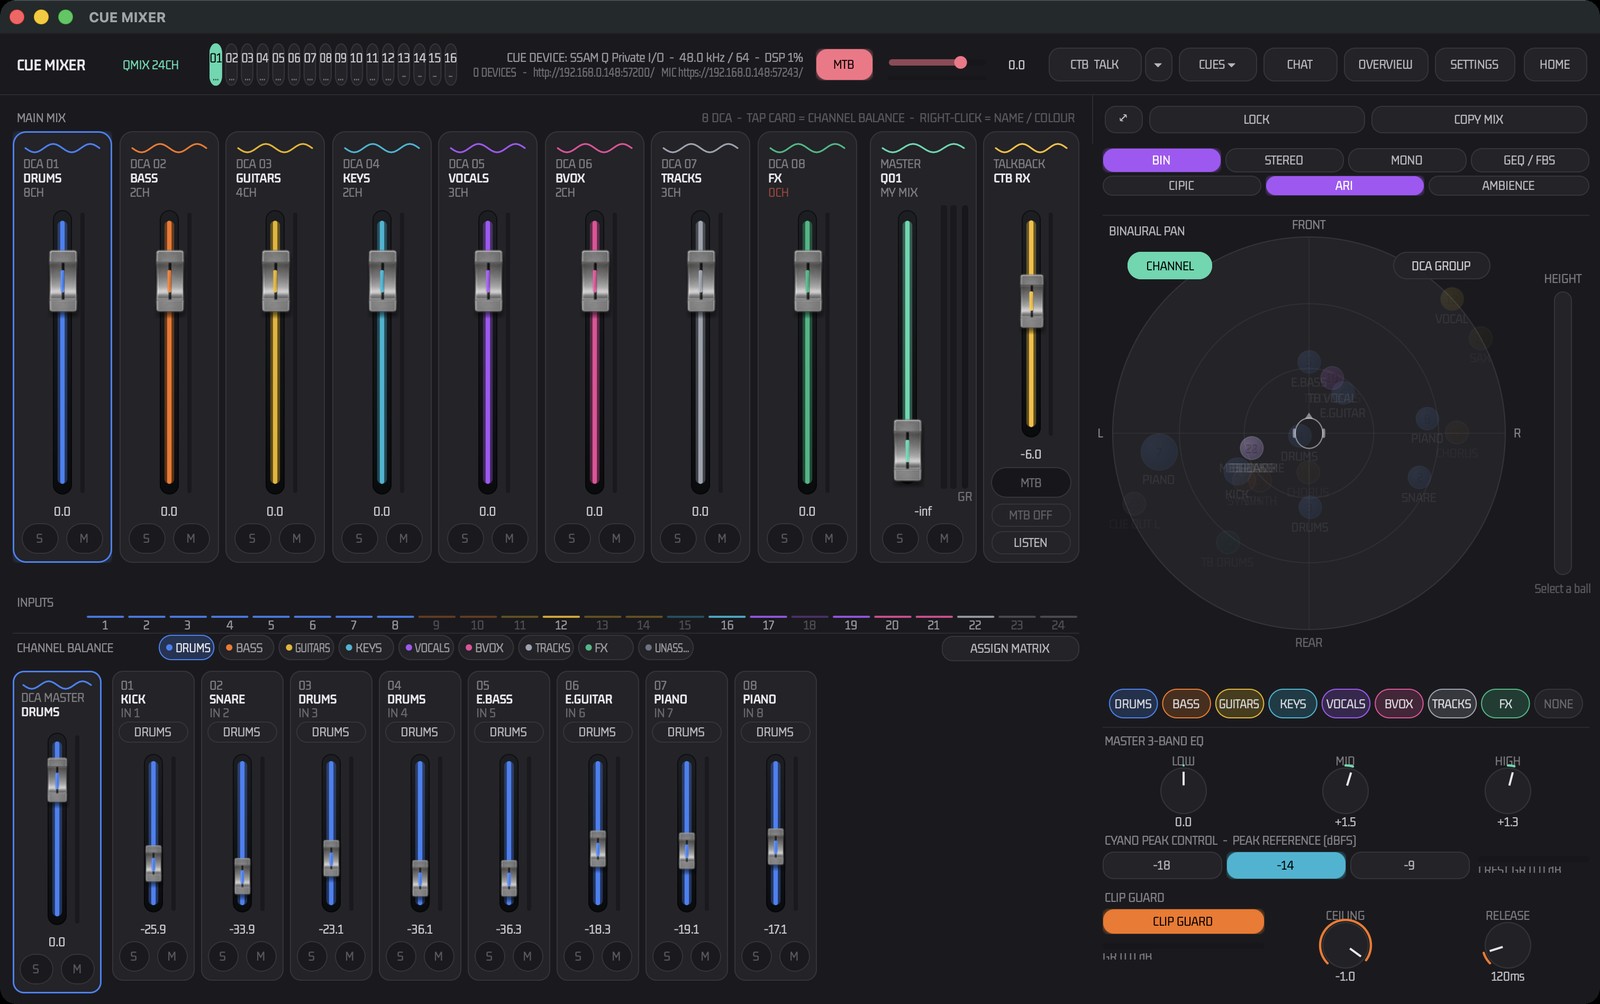
- 1Mix tabs 01–16 with the performer name underneath.
- 2CTB TALK (hold to talk) and its ▾ menu.
- 3CUES — the shared cue list.
- 4CHAT · OVERVIEW · SETTINGS · HOME.
- 5DCA card — one group fader, with its channel count and S / M.
- 6MASTER of this mix, with output meters and GR.
- 7TALKBACK / CTB RX level plus MTB, MTB OFF and LISTEN.
- 8INPUTS meter bridge for the 24 / 48 channels.
- 9CHANNEL BALANCE — DCA chips choose which group's channels are shown; ASSIGN MATRIX on the right.
- 10DCA MASTER and channel strips of the selected group.
- 11⤢ opens the pan view in its own window; LOCK and COPY MIX sit beside it.
- 12Output mode BIN · STEREO · MONO · GEQ/FBS and HRTF CIPIC · ARI · AMBIENCE.
- 13BINAURAL PAN — one ball per channel around the performer's head.
- 14DCA chips to show, hide or flash groups of balls.
- 15MASTER 3-BAND EQ.
- 16CYANO PEAK CONTROL with the −18 / −14 / −9 reference and the CREST GR readout.
- 17CLIP GUARD with CEILING and RELEASE.
Opening the window
| Control | What it does |
|---|---|
| CUE | Opens the CUE MIXER window on the last used mix. It never toggles the window closed; closing only hides it, so it reopens exactly as you left it. |
| CUE SEL | Short click: monitor the last selected cue mix master on the control-room monitor (the program source is soloed away). Click again to release. Long-press (0.5 s): choose the mix from a menu, or “OFF (no interrupt)”. |
| Keys in the window | ←/→ previous/next mix · O OVERVIEW · P BINAURAL PAN window |
QMix Sources & Connection
QMix accepts three source categories: direct feeds from the audio interface, cue mixes created on DAW buses, and a program feed from the mSC monitor bus. These sources are assigned through the QMix input patch and balanced independently for each performer. QMix retains its own processing and output path, while receiving audio from all three systems.
| QMix source | Use |
|---|---|
| 1 · Audio Interface Direct Feed | Live microphones and instruments monitored without a round trip through the DAW. |
| 2 · DAW Cue Mix Bus | A cue mix built in Pro Tools or another DAW, including backing tracks and plug-in processed sound. The DAW outputs it through modou128, and modouPatchBay delivers it to mSC / QMix. |
| 3 · mSC Monitor Bus Mix | The program selected and summed in mSC (stereo L/R), distributed to the performers. It is carried inside the application — no physical channel or cable is used. In a mix channel, choose the source Monitor Bus and L or R. |
Planning the three sources
>Send point of the Monitor Bus Mix: the program is taken before the control-room monitor level, DIM, CUT, mono and L/R flip, so the engineer's knobs do not change what performers hear. Source selection, channel trims, solo/mute and bus gain still apply.
No return loop: a mix you listen to through CUE SEL must not be fed back into the same QMix input.
Avoid doubled sources: all three paths can be used at once. When the same dry signal is present in more than one path, set each performer's source balance so it is not heard twice.
The CUE MIXER Window
The window opens at 1500×900 (minimum 1100×640) and remembers its position. The left side holds MAIN MIX, the INPUTS meter bridge and CHANNEL BALANCE; the 480 px sidebar holds BINAURAL PAN and the master processing.
| Header item | Function |
|---|---|
| Mix tabs | One per active mix (01…16 by default) with the performer name below. A green dot = a phone/browser is connected; a yellow bar = locked; a glow = that player is holding MTB. |
| CTB TALK ▾ | Hold to talk to the performers (control-room talkback). The ▾ menu: Latch, Talk to ALL mixes (default), Talk to selected mix only. |
| MTB · MTB slider | MTB bus master. The MTB button turns the whole musician talkback bus on or off; the slider sets its level (−60 … +10 dB, double-click = 0 dB) with a bus meter under it and the value at the right (“OFF” when off). It acts on every MTB source — a performer's MTB MIC input, the performer's phone microphone and the host MTB from mobile apps — and is saved with the session. |
| CUES ▾ | Cue list (see Cues). |
| CHAT | Opens the chat panel on the right. The button turns red and shows the unread count (up to 99). |
| OVERVIEW | Shows every mix as a card (see Overview). |
| SETTINGS | Opens the separate “CUE MIXER – Settings” window. |
| HOME | Hides the CUE MIXER window. |
| Status text | “CUE DEVICE: name – kHz / buffer – DSP n %”, then “n DEVICES – http://ip:port/ MIC https://ip:port/”. The MIC address is the secure page performers use for the phone-microphone MTB (macOS). With no CUE device open it reads “CUE DEVICE: NONE (CUE SEL / Wi-Fi only)”. |
MAIN MIX
MAIN MIX is the top strip: eight or sixteen DCA cards, the MASTER card and the TALKBACK card. Tap a DCA card to bring that DCA's channels into CHANNEL BALANCE below.
Fader gestures (every fader)
| Gesture | Action |
|---|---|
| Drag | Move the fader (it never jumps to where you touched). |
| Shift + Drag | Fine control (¼ speed). |
| Double-click | Reset to 0 dB. |
| Mouse wheel | Nudge the value. |
The fader scale is: position 0 = −90 dB (OFF), 0.05 = −60, 0.25 = −30, 0.5 = −10, 0.75 = 0 dB, 1.0 = +10 dB.
INPUTS meter bridge
A strip of 24 numbered meters under MAIN MIX, tinted by DCA colour. Meters turn yellow above −12 dB and red above −3 dB; channels that are inaudible (muted, muted through their DCA, or silenced by another solo) are dimmed. Click a meter to jump to that channel's DCA.
CHANNEL BALANCE
The bottom half shows the channels of the selected DCA as strips, with the DCA MASTER strip on the left. A channel fader sets the balance inside its DCA; the effective gain is channel × DCA, so moving the DCA never changes the balance you set.
- A chip row selects the DCA (8 or 16 DCAs plus UNASSIGNED). It stays in sync with MAIN MIX.
- Each strip shows the channel number, its name (shared by all mixes), “IN n” or “NO INPUT”, a DCA pill (click it to reassign the channel), the fader, dB value, M and S.
- S on a channel is a solo/PFL: any solo silences the other channels of that mix, and mute always wins over solo.
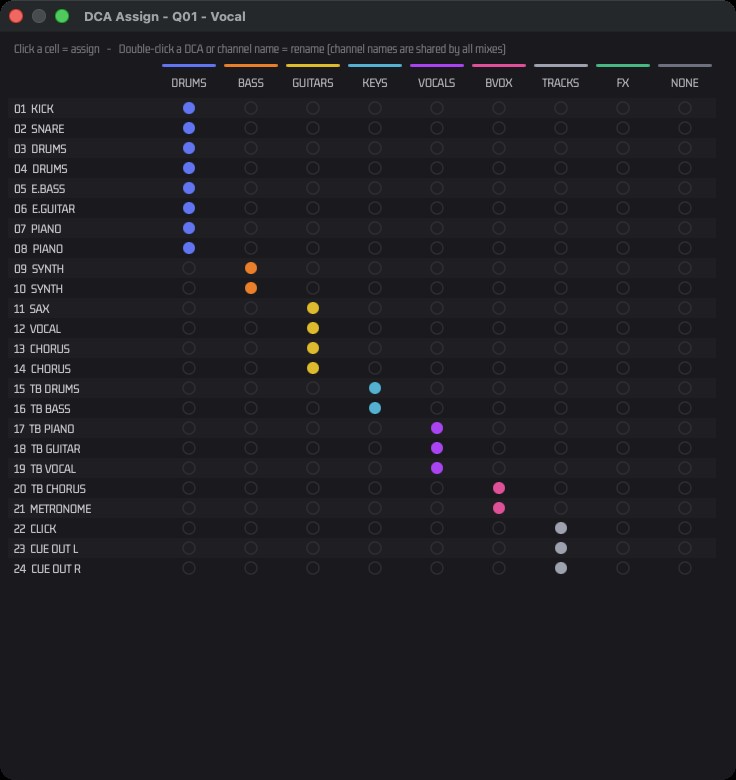
- ASSIGN MATRIX opens a grid of all channels (24 or 48) × all DCAs (8 or 16): click a cell to assign, double-click a channel or DCA name to rename it in place. Channel names are shared by all mixes; DCA names belong to each mix.
By default channels 1–8 are in DCA 1, 9–10 in DCA 2, 11–14 in DCA 3, 15–16 in DCA 4, 17–19 in DCA 5, 20–21 in DCA 6 and 22–24 in DCA 7; channel 24 (CLICK) and DCA 8 (FX) start unassigned/empty.
BINAURAL PAN
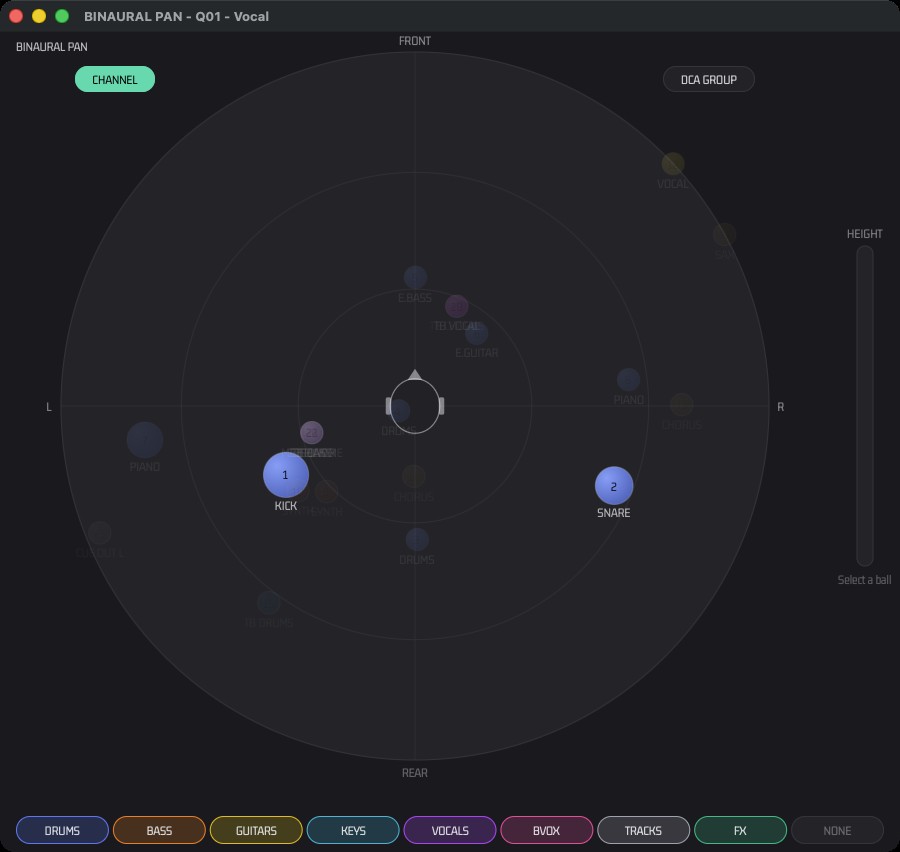
A top-down view of the performer's head with FRONT, REAR, L and R. Every ball is one channel; its colour is its DCA. The position is the real input to the binaural engine (interaural time/level difference and head shadow), so what you see is what the performer hears. One unit of radius is about 4.8 m.
| Gesture | Action |
|---|---|
| Click / drag a ball | Select and move it. The CHANNEL BALANCE view below jumps to that channel's DCA and scrolls to its fader, so you can adjust level right away. |
| Shift + drag | Single ball only: snap to a 15° / 0.2 m grid. |
| Double-click a ball | Set its height to 0 (floor); position unchanged. |
| CHANNEL pill | Dragging moves one ball. |
| DCA GROUP pill | Dragging moves the whole group of the touched ball and keeps their relative positions. |
| DCA chip: tap | Show / hide that DCA's balls. |
| DCA chip: double-tap | Show only that DCA; double-tap again to restore all. |
| DCA chip: long-press (0.5 s) | Flash that DCA's balls for 1.5 s without changing visibility. |
| NONE chip | Master hide-all switch (selecting any DCA turns it off). |
The ⤢ button
>Opens the pan view as a separate window (900×820). For a MONO mix the sidebar shows the GEQ/FBS panel instead and ⤢ opens the GEQ window.
Output Mode & Master Processing
GEQ / FBS (MONO wedge only)
In MONO mode the sidebar shows a 15-band graphic EQ (25 Hz … 16 kHz, ±12 dB) with FLAT, SWITCH TO MONO, FBS ON and CLEAR buttons and a SENS knob (0–100, default 50). The feedback suppressor sets up to 8 notches automatically and lists them as “Hz depth”; it shows “listening – no feedback detected” when idle. GEQ and FBS work only in MONO mode.
OVERVIEW
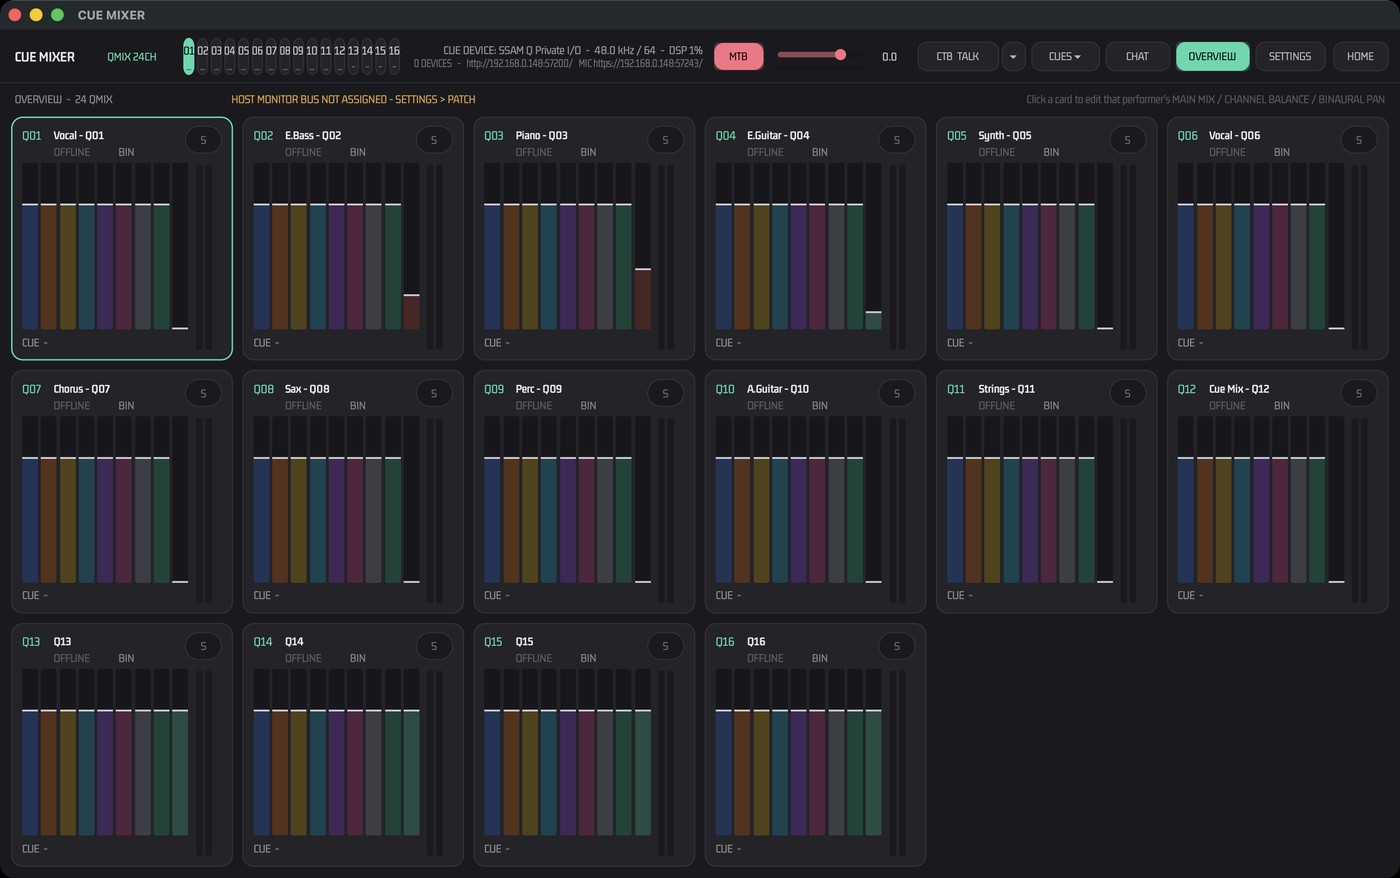
OVERVIEW replaces the window body with one card per active mix (4 columns, 6 on windows wider than 1500 px). A card shows the mix and performer name, connection count (“n DEVICE(S)” or “OFFLINE”), output mode, MTB / LOCK / FADE tags, the current cue, eight or sixteen DCA bars plus MASTER, L/R meters and the limiter reduction.
| Gesture | Action |
|---|---|
| Click a card | Select that mix and return to the mixer. |
| Double-click the card header | Rename dialog: mix name and performer. |
| “S” pill | Listen to that mix master on the host monitor bus (one at a time). If no host monitor output is assigned, a dialog offers to open Settings. |
Cues (Snapshots)
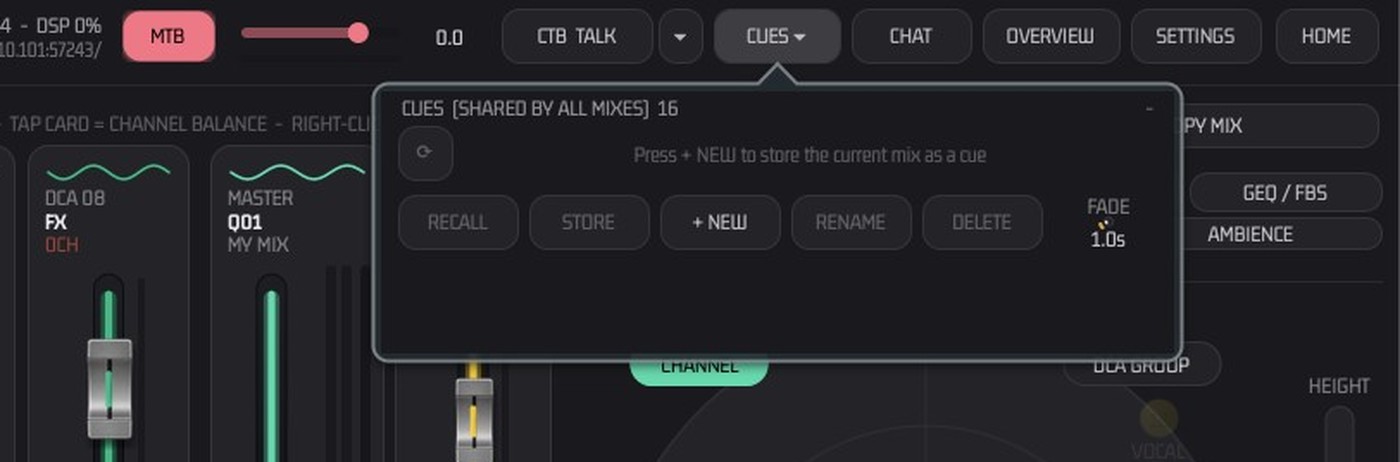
Cues are a shared song list (up to 64). Every cue keeps its own snapshot for every mix, so recalling “Chorus” can reshape all mixes at once or just one. Open the list with CUES ▾ in the header.
| Control | What it does |
|---|---|
| Cue chip | Tap to select, tap again within 350 ms to recall. A red dot means this mix has no stored snapshot for that cue. The special “⟳” chip is RECALL ALL (recalls that cue in every mix). |
| RECALL | Recall the selected cue for this mix (enabled only if a snapshot is stored). |
| STORE | Overwrite this mix's snapshot of the selected cue. |
| + NEW | Ask for a name (default “CUE n”, max 24 characters) and create a cue whose snapshot for every mix is that mix's current state. Default fade 1000 ms. |
| RENAME / DELETE | Host only. |
| FADE | 0–10 s (default 1.0 s) for the selected cue. |
Stored: master level/mute, EQ, CYANO, Clip Guard, CTB RX, output mode and binaural render, GEQ/FBS, and per DCA/channel level, mute, names, colours, DCA membership and position/height. Not stored: solo states and the MTB pressed state. Recall fades levels in dB and positions over the fade time; mutes and memberships switch at the start. If anyone touches a control during a fade, that control leaves the fade (“people first”).
CUE MIXER Settings
The Settings window (1100×760) has five tabs; COMMUNICATION exists only in builds with AES67 endpoints enabled and is not part of the normal build.
| Tab | Contents |
|---|---|
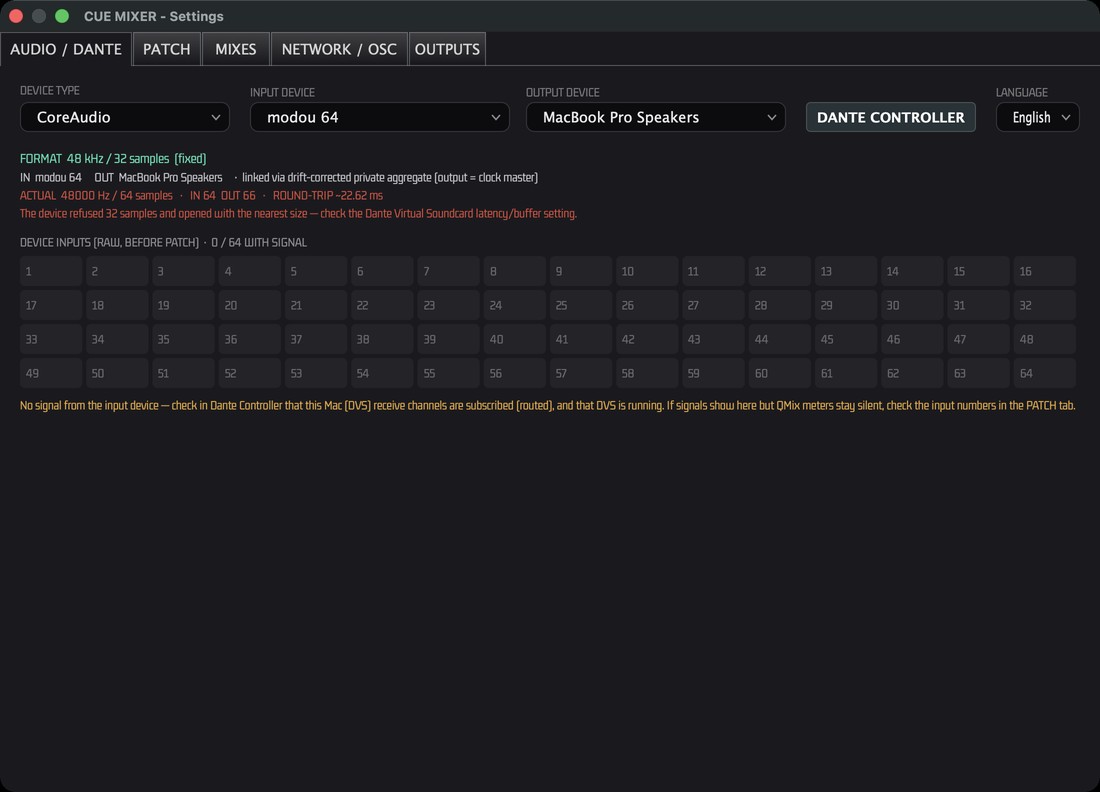
| AUDIO / DANTE | Device type, input and output device (each with “None”), a DANTE CONTROLLER button, language (English / 한국어 / 日本語; restart to apply). The target format is 48 kHz (this page says 32 samples, but the main Settings page and the code hold 64); actual rate, buffer, channel counts and round-trip are shown. When input and output are different devices they are joined as a drift-corrected private aggregate with the output as clock master. A raw-input grid (up to 128 channels) shows whether signal reaches the device. |
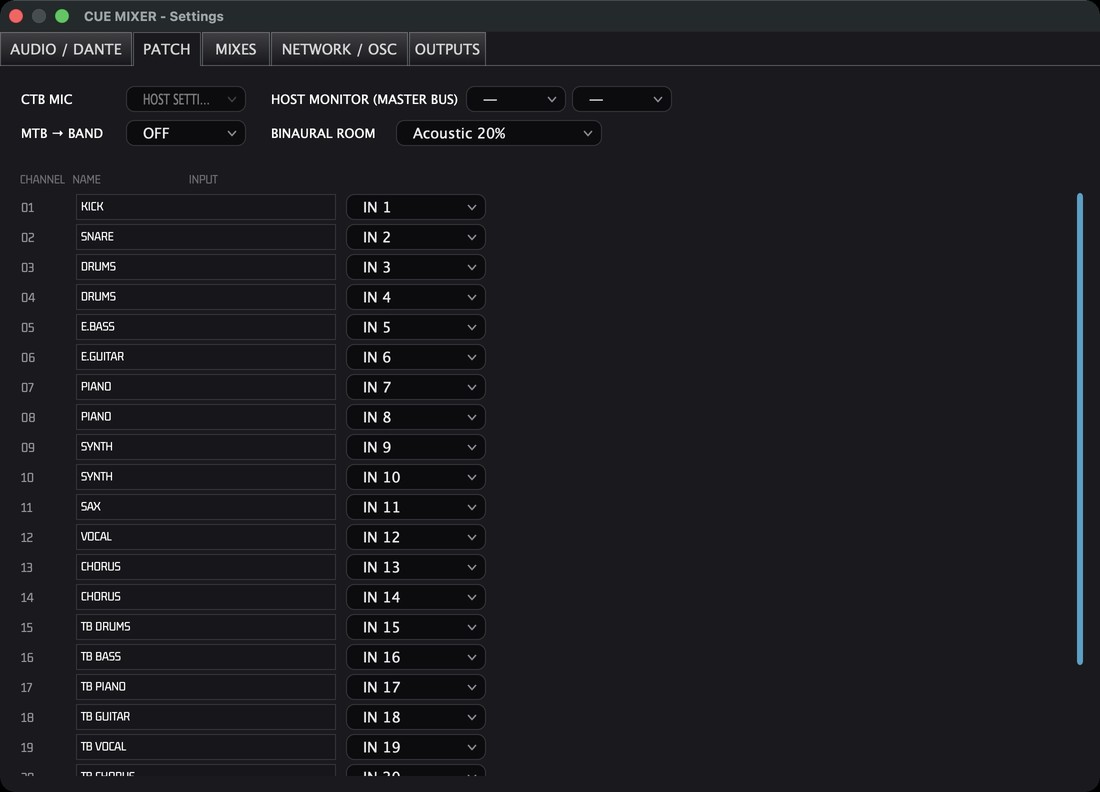
| PATCH | CTB MIC (read-only, “HOST SETTINGS”), HOST MONITOR (MASTER BUS) OUT L/R, MTB → BAND (OFF default, −20 / −12 / −6 / 0 dB), BINAURAL ROOM (Acoustic 20 % default / Room 30 % / Wide Room 40 %), and a 24- or 48-row table of channel names and INPUT assignment. |
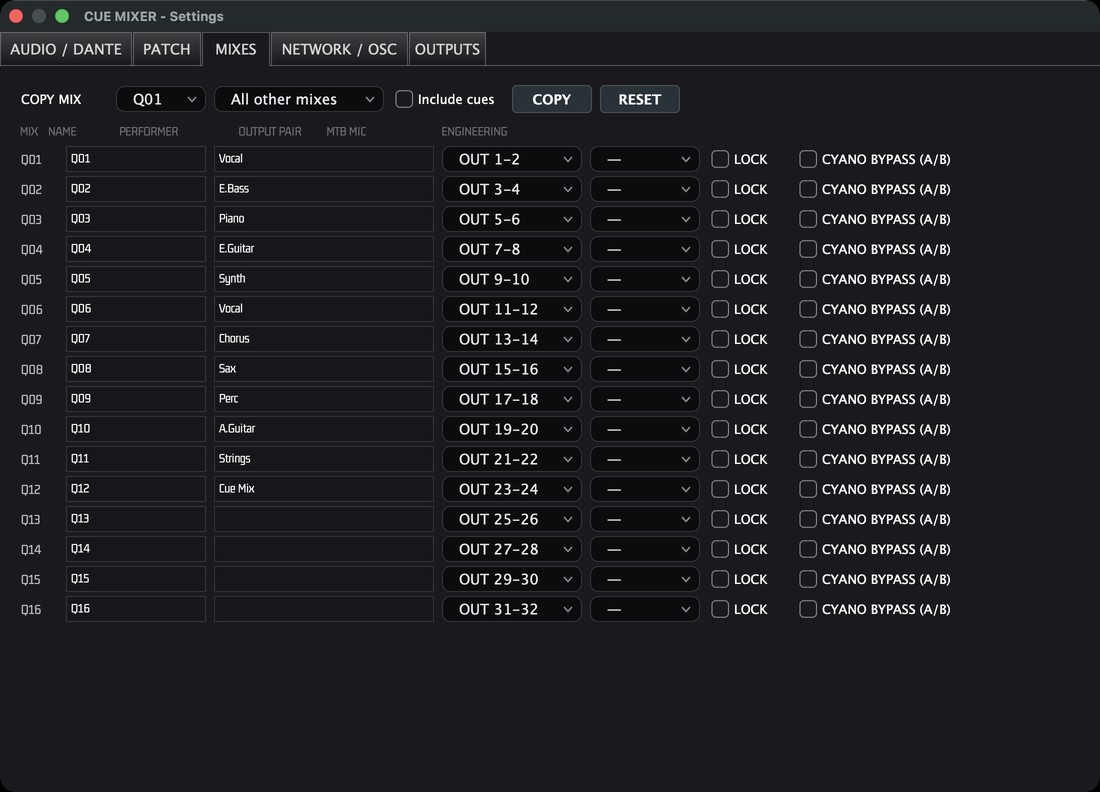
| MIXES | COPY / RESET tools and one row per active mix: name, performer, OUTPUT PAIR, MTB MIC, LOCK and CYANO BYPASS (A/B). |
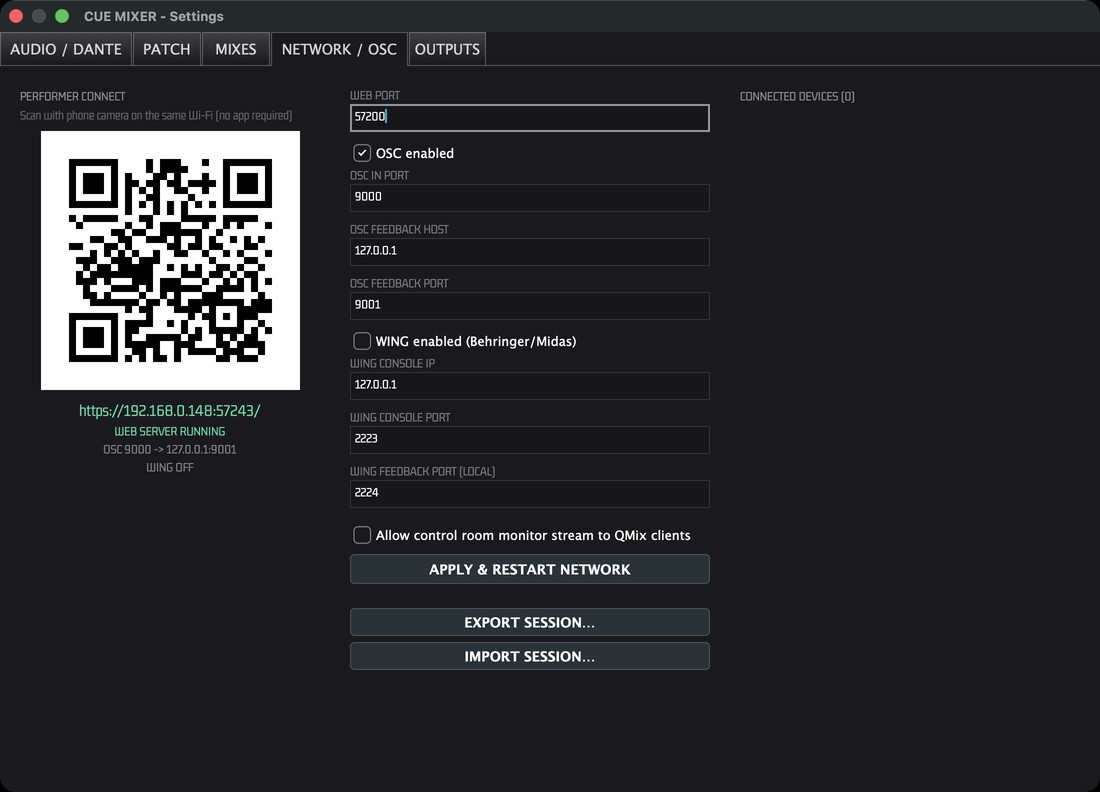
| NETWORK / OSC | PERFORMER CONNECT (QR code and secure https URL), web port (default 57200; the secure HTTPS page, which the QR code uses and which the phone-microphone MTB needs, is web port + 43, default 57243; http:// requests are forwarded to it), OSC (in 9000, feedback host 127.0.0.1, feedback 9001), WING, Allow control room monitor stream to QMix clients (default off), APPLY & RESTART NETWORK, EXPORT / IMPORT SESSION, and the connected devices list. |
| OUTPUTS | Active mix count (8 / 16 / 24 / 48), channels per mix (24 / 48), DCAs per mix (8 / 16), up to four additional audio devices (USB, Thunderbolt, a second Dante Virtual Soundcard; each runs on its own clock with sample-rate conversion), and a per-mix routing table (ON + OUT pair for the main device and for each extra device). |
Apply the network settings
>Port and OSC changes take effect only after APPLY & RESTART NETWORK. Session export saves a .json file; import reports “Not an SSAM Q session file” if the file is invalid.
Phone & Tablet (Web)
Performers need no app: open the URL shown in Settings › NETWORK / OSC (for example http://192.168.x.x:57200/) or scan its QR code with the phone camera, on the same Wi-Fi as the Mac. The page reconnects automatically (0.5 s backing off to 5 s); while offline it shows “OFFLINE — Host keeps the last mix running · reconnecting…” and ignores input.
Choose the language (English / 한국어 / 日本語) from the ⋯ menu. The page remembers your mix and language in the browser.
| ⋯ menu item | What it does |
|---|---|
| Overview / switch mix… | Pick the mix to control (the header button also does this). |
| Rename mix… | Name up to 16 characters, performer up to 24. |
| OUTPUT MODE | BINAURAL / STEREO / MONO. |
| Master EQ / Peak control… | 3-band EQ, CYANO peak reference, binaural render, CTB RX. |
| GEQ / Feedback suppressor… | For MONO wedge mixes. |
| Channel balance · Binaural pan | Open the two views (on wide screens one is shown in the right pane). |
| Stream audio to this phone | Streams this mix to the phone as audio over the network. |
| Full screen | Fullscreen mode. iPhone Safari cannot do it — use Share › Add to Home Screen. |
| Control room monitor (stream) | Hear the control-room monitor on the device. Greyed out unless the host enabled “Allow control room monitor stream to QMix clients”. It cannot run together with “Stream audio to this phone”. |
MTB on the web page — the phone's own microphone
>The MTB (HOLD TO TALK) button is momentary: while it is held, the phone's microphone is sent to the control room as that mix's MTB (together with the MTB MIC input assigned in Settings › MIXES, if any). It releases on lift, pointer-cancel or when the page goes to the background.
Browsers only give the microphone to a secure (HTTPS) page. The PERFORMER CONNECT QR code and address in Settings › NETWORK / OSC are already the secure address — https://192.168.x.x:57243/ (web port + 43). A plain http:// address (port 57200) is forwarded to the secure page automatically, so the microphone is always available.
Connecting the phone microphone, step by step: 1) scan the PERFORMER CONNECT QR code with the phone camera (same Wi-Fi as the Mac); 2) accept the one-time certificate warning (below); 3) choose your mix, then press and hold MTB (HOLD TO TALK) and tap Allow when the browser asks for the microphone; 4) speak while holding. If the browser says the microphone is blocked, allow it in the browser's site settings and reload the page.
First time on each device: the certificate is made by mSC on this Mac, so the browser warns once — Safari: Show Details › visit this website; Chrome: Advanced › Proceed. Then press MTB and allow the microphone. After that the device goes straight in. If the Mac's IP address changes, mSC makes a new certificate and each device accepts it once more.
Only the device that is controlling a mix can talk into that mix; if two devices on the same mix talk at once, the first one is heard. The host's MTB button and slider set the final level. The HTTPS address is macOS only. The mSC Remote / CueMixer / TB mobile apps still work as before (see Mobile Apps).
If another device or the engineer holds a control you get a short message such as “IN USE: name”, “MIX LOCKED”, “LOCKED BY FOH”, “FOH ONLY” or “Host monitor bus not assigned”. Cue rename, delete and fade time are FOH only.
Demo mode: add ?demo=1 to the URL to try the page against a built-in simulated server.
Talkback: CTB & MTB
| CTB — Control Room Talkback | MTB — Musician Talkback | |
|---|---|---|
| Direction | Engineer → performers | Performer → control room (and optionally the band) |
| Source | Host mic chosen in the main Settings › Talkback (CTB Input Device / Channel, Mic Source Host or Remote TB app) | Per-mix MTB MIC input (Settings › MIXES), the performer's phone microphone on the web page (HTTPS) and the host MTB from mobile apps |
| Gate | CTB TALK button (momentary; ▾ menu for Latch and target) | The player holds MTB (web button or app) |
| Level in a mix | CTB RX fader per mix (default −6 dB) | Host MTB: about −3 dB into every active mix; MTB → BAND (OFF default) sends one player into the others. The header MTB button / slider is the master for all of them |
| Processing | High-pass 100 Hz, 2.5:1 compressor, safety limiter −6 dBFS, 10 ms ramp | Same strip processing |
- Ducking: program in a mix is ducked by −10 dB while a talkback signal is present on that mix's communication bus (host MTB and MTB → BAND), with smoothing.
- Talkback is added after the master fader/mute, so a muted master never silences it.
- In the main window the CTB button is a latch on a short click and hold-to-talk on a press of 0.5 s or longer.
Chat
CHAT in the CUE MIXER header slides a 300 px chat panel in from the right. It shares the messenger of the main window, so both windows show the same conversation. Enter sends, Shift+Enter adds a line. Your messages are mint and right-aligned; others are on the left with a role-coloured edge; state messages appear as centred chips.
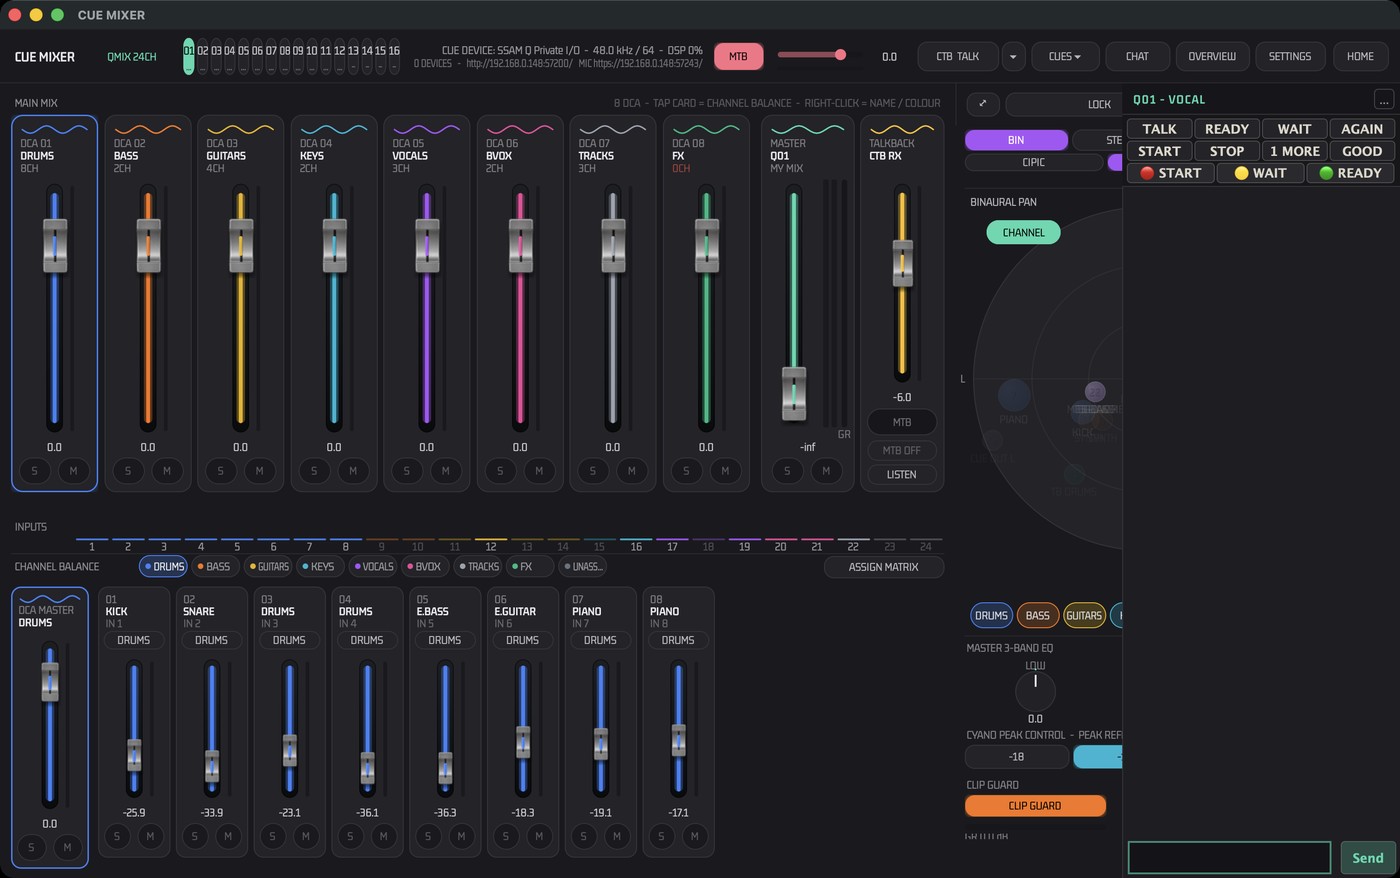
- Quick commands: TALK, READY, WAIT, AGAIN, START, STOP, ONE MORE, GOOD.
- State buttons: 🔴 START, 🟡 WAIT, 🟢 READY.
- There is one conversation room; changing mix only changes the title. The QMix web page itself has no chat — messages reach players through the mSC mobile apps.
Ports & Firewall
| Port | Protocol | Purpose |
|---|---|---|
| 57110 | TCP | Remote server: HTTP + WebSocket (CUE web page, phone apps, camera pairing). No fallback port. A plain http:// page request is forwarded to the HTTPS port below. |
| 57153 | TCP (TLS) | Secure (HTTPS / WSS) entry to the remote server, remote port + 43 — the address in the Setup › Remote control QR code. A few ports up are tried if it is taken. |
| 57111 | UDP | Discovery beacon, broadcast every 1.5 s. |
| auto | TCP / UDP | Talkback control and audio — ports are assigned by the OS and announced in the beacon. |
| 57200 | TCP | QMix performer web page (HTTP + WebSocket); editable in QMix Settings. A plain http:// page request is forwarded to the HTTPS port below. If the port is taken, the app logs the failure. |
| 57243 | TCP (TLS) | Secure (HTTPS / WSS) entry to the QMix performer page, QMix web port + 43 — the address in the CUE MIXER QR code and the one the phone-microphone MTB needs. |
| 9000 / 9001 | UDP | QMix OSC in / feedback. |
| 2223 | UDP | Behringer / Midas WING OSC (optional). |
| 57130 / 57131 / 57132 | TCP / UDP / UDP | mSC Session control / LAN beacon / audio. |
| client-chosen | UDP | Wi-Fi CUE audio to a phone (“MCA1” packets, 1 ms, stereo 24-bit). |
| 443 | HTTPS | modoudsp.com (licence, session servers). |
Firewall rule of thumb
>Allow the mSC application itself for incoming connections. Because talkback and CUE-audio ports are not fixed, allowing only the web ports (57110, 57153, 57200, 57243) is not enough.
There is no Bonjour / mDNS advertisement from the Mac; phone apps find it through the UDP beacon. On Windows, DSCP marking of CUE audio is not applied, so prioritise it with access-point rules.
Remote Control & PIN
The remote server lets phone apps and the web CUE page control the Mac. In Settings › Audio & MIDI › Remote control, set Pairing PIN to Off or Required; New PIN generates a 6-digit code. At the top of the same section a MONITOR REMOTE QR code and its address (https://192.168.x.x:57153/) are shown: scan it with a phone camera on the same Wi-Fi to open the remote page in the browser. It is a different server and port from the performer QR code in the CUE MIXER settings (https://…:57243/). If the remote server is not running the block reads “WEB SERVER STOPPED”. Connected devices are listed; when the PIN is off, a new device appears as an Access request with Approve / Deny, and connected devices have a Reject button.
Monitor remote web page
Scan the MONITOR REMOTE QR code (Settings › Audio & MIDI › Remote control) or open https://<Mac IP>:57153/ in a phone browser to control the monitor from anywhere in the studio. If a PIN is required, enter it first. The page is a single screen:
- Top: SOURCES and SPEAKERS, each in four columns by two rows. Tap to select; press and hold to lock (amber outline).
- Centre: a large MONITOR LEVEL knob (−80 … +12 dB). Drag up or down (mouse wheel on a computer); −1 dB, +1 dB and 0 dB buttons sit next to it.
- Around the knob: MONO, CUT, DIM and CTB, lit while on. CUT mutes the speaker output and keeps the level.
- Below: loudness readouts (integrated, short-term, true peak) and, when something is playing, the title with previous / play / next buttons.
- Full screen: the ⛶ button in the header. iPhone Safari does not allow full screen for web pages: choose Share › Add to Home Screen and open it from the Home Screen instead.
- Landscape: sources and speakers on the left, the knob on the right.
This page controls the monitor of this Mac. The performer pages (CUE mixes) use a different QR code, server and port — see Settings › NETWORK / OSC in the CUE MIXER.
Secure (HTTPS) connection and the microphone
Both QR codes open a secure https:// page. Phone browsers only allow the microphone on a secure page, so with HTTPS the web microphone (for example MTB on the performer page) is always possible. A plain http:// address is forwarded to the HTTPS page automatically.
The first time on each phone the browser warns that the connection is not private, because the certificate is made by mSC on this Mac (it cannot be issued by a public authority for a LAN address). Accept it once — Safari: Show Details › visit this website; Chrome: Advanced › Proceed. The traffic is still encrypted. If the Mac's IP address changes, mSC makes a new certificate and each phone accepts it once more.
Microphone: when the page asks, tap Allow. If you denied it before, allow the microphone in the browser's site settings and reload. Make sure the phone and the Mac are on the same Wi-Fi and that the firewall allows the mSC application.
PIN is off by default
With the PIN off, anyone on the same network can request control. On shared or public Wi-Fi, turn the PIN on.
Mobile Apps
| App | Role |
|---|---|
| mSC Remote | Monitor Controller (speaker solo / mute, master volume, source selector, media player) plus the CUE Mixer, switchable. Talk button uses the CTB role. |
| mSC Cue | Goes straight into the CUE Mixer after connecting. Talk button uses the MTB role. |
| mSC TB | One screen: a push-to-talk button that sends this device's microphone as the control-room talkback mic (needs CTB Mic Source = Remote). |
- Join the same Wi-Fi as the Mac. Open the app; it lists Macs found by the beacon, or enter the Mac's IP address and port 57110 manually.
- If the Mac requires a PIN, enter the 6-digit code; otherwise wait for the engineer to approve.
- In the CUE Mixer: the app-bar icon toggles full screen, the bottom bar has LISTEN (stream the mix to the device) with personal volume and mute, and the floating TALK button works while pressed (when the host allows it).
- Camera pairing: scan the QR shown for a CUE; after the host approves, the device streams its camera as that CUE's video source.
The apps need microphone, camera and local-network permission on the phone. The TB app has no PIN field, so it cannot connect to a host that requires a PIN.
mSC Session
mSC Session is a separate app (also reachable from File › mSC Session…) for remote collaboration: a host sets up and monitors a session, musicians join with a CUE mixer, roster and network statistics. Sign-in uses an e-mail one-time code. Media travels peer-to-peer: 24 individual channels plus a 2-channel CUE master over UDP 57132, control over TCP 57130.
Over the internet
>There is no STUN/TURN. Across the internet the host must forward TCP 57130 and UDP 57132 and set its public address; on a LAN an ip:port code works. Talkback and video over the session transport are not implemented yet.
Dante & Hardware
- Pick a Dante Virtual Soundcard as a CUE device in QMix Settings › AUDIO; the DANTE CONTROLLER button opens Dante Controller. There is no fixed Dante CUE band: every mix's output pair is assigned by hand in CUE MIXER › SETTINGS › OUTPUTS. A default Dante Virtual Soundcard has 64 channels, so 48 mixers (96 channels) need a 128-channel device such as DVS Pro.
- Native AES67 endpoints are on hold and not part of the normal build.
- Behringer / Midas WING can be linked over OSC (port 2223); only fader and mute are implemented, not solo.
- Network Calibration (Settings › Wireless session › Calibrate…) measures the Wi-Fi path; the dialog lists connected wireless clients. Streaming quality depends on the venue's Wi-Fi and is not guaranteed.
Recipe: a tracking session with headphone mixes
Goal: the engineer monitors the DAW on speakers while four performers each hear their own headphone mix and can ask for changes from a phone.
- Run the Setup Wizard: one DAW source, your monitor outputs, QMix with 8 or 16 mixers, and the CUE output device (for example a Dante Virtual Soundcard or a second interface).
- Send each track you want performers to hear from the DAW to a numbered output of the CUE device (or a Dante channel). In CUE MIXER › SETTINGS › PATCH assign those inputs to channels 1–24 and type the channel names.
- In SETTINGS › MIXES give each mix a name, a performer name and an OUTPUT PAIR; in the CUE MIXER header check that “CUE DEVICE” shows your device at 48 kHz.
- Open ASSIGN MATRIX and put the channels into DCAs (Drums, Bass, Guitars, Keys, Vocals, FX). Set a sensible starting balance on mix 01, then use COPY MIX › All other mixes.
- In NETWORK / OSC show the QR code. Each performer scans it, picks their mix from the ⋯ menu and, if you want, you press LOCK on mixes they should not change.
- Store the balance as a cue (CUES ▾ › + NEW) for each song, and recall it between takes.
- During the take: hold CTB to speak, use MTB MON to hear their talkback mic, and use CHAT quick buttons (READY, WAIT, START).
Check what a performer hears
>Press CUE SEL in the main window (or the S button on the OVERVIEW card) to listen to any mix master on the control-room monitor. This needs a host monitor bus assigned in SETTINGS › PATCH › HOST MONITOR.
Recipe: mixing in 7.1.4
- In SPEAKERS pick the slot that holds your 7.1.4 system (its format is shown in the 3D view). If you also want the stereo nearfields, lock nothing — instead click between them to compare.
- Pick the DAW source (Atmos renderer output). The format pills in the 3D view should read 7.1.4; the groups FRONT, SIDE, REAR, TOP and LFE can be soloed or muted to hear a layer alone.
- Run Guided Calibration (Settings › Audio & MIDI) once per speaker set for delay and level alignment.
- Watch INTEGRATED LUFS and TRUE PEAK on the status card; press RESET before a loudness pass and read the final value at the end.
- For a headphone check select Speaker 8 and turn on POV (Engineer POV) — binaural rendering of the room with ARI or CIPIC.
Recipe: compare against a reference
- Long-press REFERENCE on the analyser, choose Select… and pick a finished track you trust; wait while it is analysed in the background.
- Optionally choose a GENRE TARGET (for example Pop or Rock) to overlay a typical spectrum shape.
- Switch on MEASURE to see the measurement microphone, and HOUSE to see a target curve (AES-like, Harman-like or your own).
- Compare the blue reference with your mix in the 1/3-octave bars, and compare loudness on the M · S · I · T bars against the −14 and −23 LUFS lines.
Recipe: when something stops working
- No sound at all: check the red licence bar, then the CUT state of the knob, then that a source and a speaker set are both selected.
- A performer hears nothing: OVERVIEW card shows OFFLINE? Check the OUTPUT PAIR, the CUE DEVICE line and the master M button on that mix.
- Meters show no signal in QMix: open SETTINGS › AUDIO / DANTE: the raw input grid tells you whether the device delivers signal at all; if it does, re-check the numbers in PATCH.
- The phone page does not load: same Wi-Fi, firewall, correct port (default 57200), and use APPLY & RESTART NETWORK after changing the port.
Troubleshooting
| Symptom | Cause and fix |
|---|---|
| Red “NO LICENSE” bar, no sound | Activate in modou dsp central, then Settings › License › Verify. |
| Loudness shows −INF | No signal reaches the analyser, or the loudness meter was just reset. Check the active source and that audio is playing. |
| SPL shows “--” | No measurement mic. Choose SOURCE on the status card and allow microphone access. |
| Microphone denied | System Settings › Privacy › Microphone, then restart mSC. |
| Music panel empty | Allow mSC to control Music in System Settings › Privacy › Automation; it retries after 60 s. |
| Phone cannot connect | Same Wi-Fi? Client isolation off on the access point? Firewall allows mSC? PIN entered? Try the IP and port 57110 manually. |
| QMix page does not open | Port 57200 may be used by another app on the Mac. Change the port in QMix Settings › NETWORK / OSC and press APPLY & RESTART NETWORK. |
| Clicks or dropouts | Raise Host Buffer size; avoid mixing different devices for monitor and CUE; keep Wi-Fi streaming off during critical monitoring. |
| Wireless audio breaks up | Use 5 GHz, a dedicated access point and run Network Calibration. |
| Someone stuck on MTB | Press MTB OFF on that mix's MAIN MIX card. |
FAQ
Does MTB use the phone's microphone?
>Yes. On the QMix web page, holding MTB sends the phone's microphone to the control room (with the MTB MIC input assigned to that mix, if any). Browsers only allow the microphone on a secure page, so open the page from the PERFORMER CONNECT QR code (https, port 57243), accept the one-time certificate warning and allow the microphone. The mobile apps also send the device microphone.
Can I use EUCON?
>Yes, on macOS, for the Monitor section only (level, CUT, DIM, mono, source and speaker keys, CTB, CUE select). The CUE mixer faders are not mapped to control-surface faders. Other hardware can be mapped with MIDI Learn.
Can a talkback signal be cut by the master?
>No. Talkback is added after the master fader and mute in each mix.
Which languages are available?
>The QMix web page and settings offer English, Korean and Japanese. This manual is available in English, Korean, Japanese, Spanish, French and Chinese.
Are the HRTFs measured?
>No. CIPIC and ARI are parametric approximations, as are the AES-like and Harman-like house curves.
Specifications
| Item | Value |
|---|---|
| Monitor level | −80 … +12 dB |
| DIM | −20 dB |
| Source / speaker slots | 8 / 8 |
| Buses | 16 × 16 ch (CUSTOM: up to 32 ch) |
| Max physical I/O | 146 in / 128 out (monitor path) |
| Per-channel trim / delay | −24 … +12 dB / 0 … 500 ms |
| Alignment | delay 0 … 100 ms, 10-band EQ, ±24 dB trim, polarity |
| Analyser | 31 bands, 20 Hz – 20 kHz |
| QMix | 8/16/24/48 mixes · 24/48 ch · 8/16 DCA · 64 cues |
| QMix fader | −90 … +10 dB |
| Host buffer | 128 / 256 / 512 / 1024 (default 512) |
Some on-screen texts disagree with the behaviour: the QMix Settings AUDIO page mentions a fixed 32-sample buffer while the main Settings page reports the CUE quantum as 64 samples (locked); the code holds 64.
Glossary
Known Limitations
- EUCON covers the Monitor section only; the CUE mixer faders are not mapped to control-surface faders.
- Startup monitor level is always −10 dB regardless of the Startup Monitor Level setting.
- The QMix web page follows the channel and DCA counts set in Settings (24 / 48 channels, 8 / 16 DCAs).
- The CTB ▾ menu offers Latch; its behaviour differs from the main window's short-click latch.
- MAX PEAK on the status card is an indicator (true peak − 9.5 dB), not a tracked maximum.
- Session: no STUN/TURN, no talkback or video over the session transport.
- Edit › Copy and Paste are placeholders.